There used to be a tiny bakery tucked inside an old converted garage on a side street in Portland that made the most incredible pumpkin cheesecake bars I have ever tasted. When they closed their doors three years ago — a quiet “retiring, thanks for the memories” sign in the window — I actually felt a little pang of grief. I mean, I stood there reading that sign in the rain, holding a half-eaten bar, and honestly felt a little lost.
After twelve tries — some were too dense, a few were so sweet they made my teeth ache, and one batch I swear had the texture of wet cardboard — I finally got it. This is that bar. The one with the creamy, tangy-sweet cheesecake layer that melts into a spiced pumpkin blanket, all sitting on a buttery crust that actually stays crisp. It took me a while to realize the secret wasn’t more sugar or more cream cheese. It was about balance. And maybe a little cottage cheese trick I stumbled upon during try number eight.
I remember the day it finally worked. My kitchen was a wreck — flour on the counter, a cracked measuring cup I forgot to throw away, and my dog staring at me like I had lost my mind for pulling out the mixer for the fourth time that week. But when I pulled those bars out of the oven and let them cool, then cut that first perfect square, I knew. The top had that slight crackle. The filling was set but still jiggly in the center. And the crust, oh the crust, held together without crumbling into a million pieces. You know that feeling when something just clicks? That was it.
These lighter pumpkin cheesecake bars have become my go-to fall dessert. They are the kind of thing you make for a potluck and watch disappear before the main course is even served. They are also the kind of thing you keep in the fridge for a Tuesday afternoon when you need a little something sweet but don’t want to undo all your good habits. Honestly, I make them for Thanksgiving now, and no one ever guesses they are a little lighter. They just ask for the recipe. And I happily share it, because some memories deserve to be recreated.
Why You’ll Love These Lighter Pumpkin Cheesecake Bars
Let me tell you, these are not your average diet dessert that tastes like a compromise. These bars deliver the full experience — the creamy richness, the warm pumpkin spice, the satisfying crunch of the crust — but with a few smart swaps that keep them feeling indulgent without the heavy aftermath. I have tested this recipe on friends, family, and even a few skeptical coworkers who swear by full-fat everything, and every single time the response is the same: “Wait, these are actually healthy?”
- Quick & Easy : Comes together in about 30 minutes of active prep, then the oven does the rest. Perfect for busy weeknights or last-minute fall gatherings.
- Simple Ingredients : No fancy grocery trips needed. You probably have most of this in your pantry right now — canned pumpkin, eggs, spices, cream cheese, and a few staples.
- Perfect for Fall Gatherings : Great for Thanksgiving, Friendsgiving, Halloween parties, or just a cozy weekend treat. They travel well and slice beautifully.
- Crowd-Pleaser : Always gets rave reviews from kids and adults alike. Even my picky nephew asked for seconds, and he usually avoids anything green or orange.
- Unbelievably Delicious : The texture is next-level comfort food. Creamy, spiced, and just sweet enough, with a crust that actually stays crisp.
What makes these lighter pumpkin cheesecake bars different from the rest is the cottage cheese trick. I know, I know, it sounds weird. But blending cottage cheese until silky smooth creates a texture that is impossibly creamy without all the extra fat and calories of heavy cream or extra blocks of cream cheese. It is a trick I learned from a nutritionist friend who specializes in making comfort food healthier, and honestly, it works like magic. The flavor is still rich and tangy, but the texture is lighter, airier, and somehow more satisfying.
These bars are comfort food reimagined — healthier, faster, but with the same soul-soothing satisfaction. Perfect for impressing guests without stress, or turning a simple fall evening into something memorable. And honestly, they are the kind of dessert that makes you close your eyes after the first bite. That is the goal, right?
What Ingredients You Will Need
This recipe uses simple, wholesome ingredients to deliver that bold pumpkin spice flavor and creamy cheesecake texture without the fuss. Most of these are pantry staples, especially if you are a regular fall baker, and I have included a few substitution notes to make things easier for different dietary needs.
For the Crust
- 1 ½ cups graham cracker crumbs (about 12 full sheets, crushed finely) — I prefer Honey Maid brand for consistent texture, but any brand works.
- ¼ cup melted coconut oil (or unsalted butter, melted) — coconut oil keeps it dairy-free if needed, but butter gives a richer flavor.
- 2 tablespoons maple syrup (or honey) — adds sweetness and helps bind the crust.
- ¼ teaspoon salt — balances the sweetness and enhances the spice flavors later.
For the Pumpkin Layer
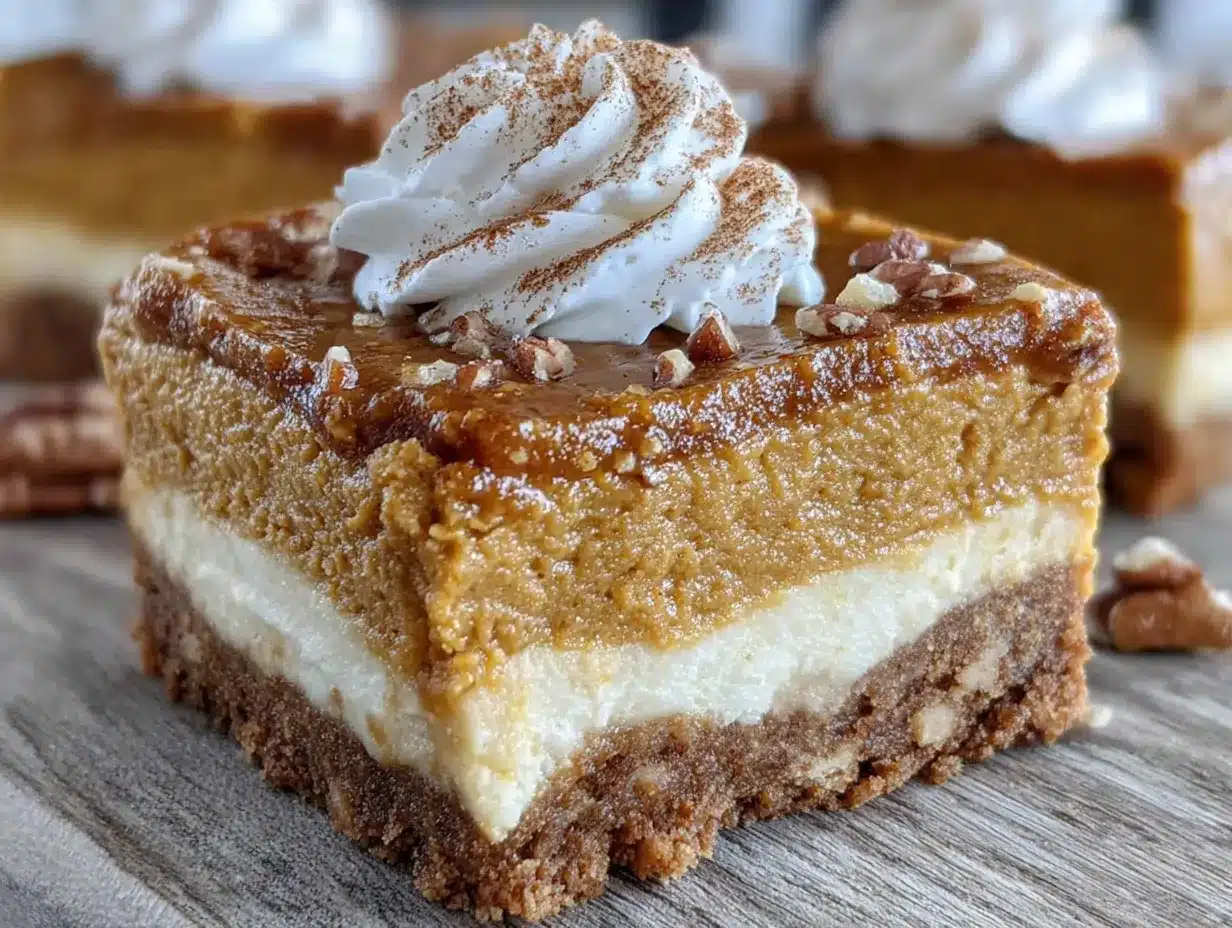
- 1 cup canned pumpkin puree (not pumpkin pie filling) — look for 100% pure pumpkin. Libby’s is my go-to brand for consistent texture and flavor.
- ½ cup cottage cheese (small-curd, 2% or full-fat) — this is the secret ingredient! Blended until smooth, it adds creaminess without the heavy calories.
- ¼ cup maple syrup (or honey) — adds natural sweetness without refined sugar.
- 1 large egg — helps bind the pumpkin layer and gives it structure.
- 1 teaspoon vanilla extract — pure vanilla, not imitation, if you can swing it.
- 1 ½ teaspoons pumpkin pie spice — store-bought is fine, or make your own with cinnamon, nutmeg, ginger, and cloves.
- ½ teaspoon ground cinnamon — extra warmth because you can never have too much cinnamon.
- ¼ teaspoon salt — brings all the flavors together.
For the Cheesecake Layer
- 8 ounces cream cheese (reduced-fat or full-fat, softened to room temperature) — Philadelphia brand is my favorite for reliable texture. Let it sit out for at least 30 minutes before using.
- ½ cup cottage cheese (same as above, blended until smooth) — yes, more cottage cheese! Trust me on this.
- ¼ cup maple syrup (or honey) — keeps it refined sugar-free.
- 1 large egg — for structure and richness.
- 1 teaspoon vanilla extract — pure vanilla for the best flavor.
- 1 tablespoon all-purpose flour (or cornstarch) — helps stabilize the cheesecake layer and prevents cracking.
Optional Toppings
- ¼ cup chopped pecans (or walnuts) — adds a nice crunch on top before baking.
- Whipped cream (dairy or coconut-based) — for serving, if you want to get fancy.
- Extra cinnamon — for dusting on top before serving.
Ingredient Selection Tips: When choosing cottage cheese, look for small-curd varieties with no added gums or thickeners. Good Culture or Daisy brands work beautifully. For the pumpkin puree, avoid anything labeled “pumpkin pie mix” as it already contains sugar and spices. You want pure pumpkin. And for the cream cheese, make sure it is truly softened to room temperature — cold cream cheese will leave lumps in your filling, and nobody wants lumpy cheesecake bars.
Substitution Guidance: Use almond flour or gluten-free graham crackers for a gluten-free crust option. Swap the maple syrup with agave or honey if preferred. For a dairy-free version, use dairy-free cream cheese (Kite Hill is a good option) and coconut yogurt in place of cottage cheese, though the texture will be slightly different. I have tested the dairy-free version and it works, but the original is definitely creamier.
Equipment Needed
You do not need a professional bakery setup for these lighter pumpkin cheesecake bars. Most of this equipment is standard kitchen fare, and I have included some alternatives for things you might not have on hand.
- 8×8-inch baking pan (or 9×9, but adjust baking time slightly) — glass or metal both work. I prefer a metal pan for more even browning on the crust.
- Parchment paper — absolutely essential for easy removal. Let the edges hang over the sides for handles.
- Food processor or blender — for blending the cottage cheese until silky smooth. A high-speed blender works best, but a food processor does the job too.
- Electric hand mixer or stand mixer — for beating the cream cheese until fluffy. A whisk and some elbow grease works too, but your arm will thank you for using a mixer.
- Mixing bowls — at least two medium-sized bowls.
- Measuring cups and spoons — precise measurements matter in baking.
- Spatula — for spreading the layers evenly.
- Sharp knife — for clean slices. Run it under hot water before each cut for the prettiest bars.
Budget-Friendly Options: If you do not have a food processor, you can blend the cottage cheese in a blender, or even mash it through a fine-mesh sieve for a smoother texture. It takes a little more effort but works in a pinch. For the crust, you can crush graham crackers in a sealed zip-top bag using a rolling pin — it is oddly satisfying and saves you from washing the food processor.
Maintenance Tip: If you use a glass baking dish, reduce the oven temperature by 25 degrees to prevent over-browning on the edges. Glass retains heat differently than metal, and I learned this the hard way after a few burnt crusts.
Preparation Method
Alright, let us get to the good part. Here is how to make these lighter pumpkin cheesecake bars step by step. I have included every little detail I wish someone had told me when I was trying to recreate that bakery version, so pay attention to the sensory cues — they are your best friend here.
- Preheat your oven to 350°F (175°C). Line an 8×8-inch baking pan with parchment paper, leaving a 2-inch overhang on two opposite sides. These will be your handles later. Lightly spray the parchment with non-stick cooking spray just to be safe.
- Make the crust. In a medium bowl, combine 1 ½ cups graham cracker crumbs, ¼ cup melted coconut oil, 2 tablespoons maple syrup, and ¼ teaspoon salt. Stir until the mixture looks like wet sand and holds together when pressed between your fingers. If it seems too dry, add another teaspoon of melted coconut oil. If too wet, add a tablespoon more crumbs.
- Press the crust into the pan. Transfer the crumb mixture to your prepared pan and press it down firmly and evenly. I use the bottom of a measuring cup for this — it creates a flat, even surface. Make sure to press into the corners well. Bake for 10 minutes, until the crust is lightly golden and fragrant. Set aside to cool while you make the fillings.
- Blend the cottage cheese. While the crust cools, add 1 cup of cottage cheese (total for both layers) to your blender or food processor. Blend on high for 30-60 seconds, until completely smooth with no lumps. You are looking for a texture similar to Greek yogurt. Scrape down the sides as needed. Divide the blended cottage cheese evenly between two bowls — ½ cup for the pumpkin layer and ½ cup for the cheesecake layer.
- Make the pumpkin layer. In a medium bowl, combine 1 cup canned pumpkin puree, ½ cup blended cottage cheese, ¼ cup maple syrup, 1 large egg, 1 teaspoon vanilla extract, 1 ½ teaspoons pumpkin pie spice, ½ teaspoon ground cinnamon, and ¼ teaspoon salt. Whisk until smooth and well combined. The mixture should be thick but pourable, with a rich orange color and a warm, spicy aroma.
- Make the cheesecake layer. In a separate bowl, beat 8 ounces softened cream cheese with an electric mixer on medium speed until smooth and fluffy, about 2 minutes. Add the remaining ½ cup blended cottage cheese, ¼ cup maple syrup, 1 large egg, 1 teaspoon vanilla extract, and 1 tablespoon all-purpose flour. Beat on low speed until just combined — do not overmix, or the cheesecake can become dense. Scrape down the sides of the bowl. The mixture should be creamy, pale, and slightly thick.
- Layer the fillings. Pour the pumpkin mixture over the cooled crust and spread it into an even layer. Then, gently spoon the cheesecake mixture over the pumpkin layer in dollops. Use a spatula to spread it carefully, or leave it in dollops for a marbled effect. If you want that classic two-layer look, spread the cheesecake layer evenly to the edges.
- Bake the bars. Place the pan in the preheated oven and bake for 35-40 minutes. The edges should be set and lightly puffed, but the center should still have a slight jiggle when you gently shake the pan. That jiggle is your friend — it means the cheesecake will be creamy, not dry. If the top starts browning too quickly, tent loosely with foil after 25 minutes.
- Cool completely. Remove the pan from the oven and place it on a wire rack. Let it cool to room temperature, about 1 hour. Then, transfer the pan to the refrigerator and chill for at least 4 hours, preferably overnight. This step is non-negotiable — the bars need time to set properly. I know it is hard to wait, but trust me, the texture will be so much better.
- Slice and serve. Once fully chilled, lift the bars out of the pan using the parchment handles. Place on a cutting board and use a sharp knife to slice into 16 squares. For clean cuts, wipe the knife clean between each slice. Run the knife under hot water for even cleaner cuts. Serve cold or at room temperature, with whipped cream and a dusting of cinnamon if desired.
Cooking Tips & Techniques
After twelve attempts at recreating these lighter pumpkin cheesecake bars, I have collected a few hard-earned lessons that will save you from the same trial-and-error path I walked. Here are the tips that made the biggest difference.
Room temperature ingredients matter. I cannot stress this enough. Cold cream cheese creates lumps that no amount of mixing can fully fix. Cold eggs can cause the filling to curdle. Set everything out on the counter at least 30 minutes before you start. I usually pull my cream cheese, eggs, and cottage cheese out first thing, then prep the crust while they warm up. It is a small step that makes a huge difference in texture.
Do not overmix the cheesecake layer. Once you add the flour, mix just until everything comes together. Overmixing incorporates too much air, which can cause the cheesecake to puff up during baking and then crack as it cools. A few small lumps are fine — they will smooth out during baking. I learned this the hard way after batch number four, which looked like a topographical map.
Water bath? Not necessary. Unlike a full cheesecake, these bars are forgiving enough that you do not need a water bath. The smaller surface area and shorter baking time mean they cook evenly without cracking as long as you do not overbake them. Just watch for that jiggle in the center and you will be fine.
Patience is a virtue. I know you want to eat these immediately. I have been there. But cutting into them too early will result in a gooey mess. The chilling time allows the bars to set properly, making for clean slices and a better texture overall. I once cut into a batch after only two hours of chilling, and let me tell you, it was more of a pumpkin cheesecake pudding situation. Delicious, but not pretty.
Use a hot knife for clean slices. Run your knife under hot water, dry it off, then make your cut. Repeat for each slice. This gives you those beautiful, bakery-style squares that look like they came from that little Portland bakery. It is a small detail, but it makes a big impression when serving guests.
Variations & Adaptations
One of the best things about these lighter pumpkin cheesecake bars is how adaptable they are. I have experimented with several variations over the years, and each one brings something new to the table. Here are a few of my favorites.
Gluten-Free Version: Swap the graham cracker crumbs for gluten-free graham crackers or use a mixture of almond flour and oat flour. For the crust, combine 1 cup almond flour, ½ cup oat flour, ¼ cup melted coconut oil, and 2 tablespoons maple syrup. Bake as directed. The texture is slightly nuttier and less crisp, but still delicious. I have made this version for my gluten-sensitive friends and it was a hit.
Vegan Adaptation: Use dairy-free cream cheese (Kite Hill or Violife work well) and replace the eggs with a flax egg (1 tablespoon ground flaxseed mixed with 3 tablespoons water per egg, let sit for 5 minutes). For the cottage cheese, use blended silken tofu or unsweetened coconut yogurt. The texture will be a little softer, so chill for at least 6 hours before slicing. I tested this version for a vegan potluck and it disappeared faster than the regular batch.
Pumpkin Spice Latte Twist: Add 1 tablespoon of instant espresso powder dissolved in 1 teaspoon of hot water to the pumpkin layer. It deepens the pumpkin flavor and adds a subtle coffee note that pairs beautifully with the spices. I tried this on a whim one rainy Sunday morning and honestly, it might be my new favorite version. Top with a drizzle of melted dark chocolate for extra indulgence.
Nutty Crunch Version: Sprinkle ¼ cup chopped pecans or walnuts over the top of the bars before baking. The nuts toast in the oven and add a wonderful crunch that contrasts with the creamy filling. I like to use pecans because they have a natural sweetness that complements the pumpkin spice. Just make sure to chop them finely so they do not sink into the filling.
Low-Carb Option: Replace the graham cracker crust with a mixture of 1 cup almond flour, ¼ cup melted butter, and 2 tablespoons monk fruit sweetener. Use a sugar-free maple syrup alternative in the fillings. The texture is a bit denser, but the flavor is still spot-on. I made this version for a friend on a keto diet and she said it was the best dessert she had had in months.
Serving & Storage Suggestions
These lighter pumpkin cheesecake bars are versatile enough for any occasion, from a casual afternoon snack to a show-stopping holiday dessert. Here is how to serve and store them for the best experience.
Serving Temperature: I prefer these bars cold, straight from the fridge. The texture is firmer and the flavors are more pronounced. But they are also delicious at room temperature, especially if you let them sit out for about 15 minutes before serving. If you want to get fancy, warm them slightly in the microwave for about 10 seconds — it softens the cheesecake layer and makes the pumpkin spice aroma fill the room.
Presentation Ideas: For a beautiful presentation, arrange the bars on a wooden serving board or a white platter. Top each bar with a dollop of whipped cream, a sprinkle of cinnamon, and a few toasted pecans. For Thanksgiving, I like to dust the plate with a little cinnamon and arrange the bars in a staggered pattern. It looks impressive with minimal effort.
Complementary Dishes: These bars pair beautifully with a warm cup of spiced chai, a pumpkin spice latte, or a simple cup of black coffee. For a dessert spread, serve them alongside a pumpkin cheesecake, apple crisp, or cinnamon sugar cookies. They also work well as a lighter option on a dessert table full of heavier treats.
Storage Instructions: Store the bars in an airtight container in the refrigerator for up to 5 days. Place a sheet of parchment paper between layers to prevent sticking. The flavors actually deepen after a day or two, so do not be surprised if they taste even better on day three.
Freezing Instructions: These bars freeze beautifully. Wrap individual bars tightly in plastic wrap, then place them in a freezer-safe bag or container. Freeze for up to 3 months. To thaw, transfer to the refrigerator overnight or let sit at room temperature for about 30 minutes. I always keep a stash in the freezer for unexpected guests or late-night cravings.
Reheating Tips: If you prefer warm bars, microwave a single bar for 10-15 seconds. For a larger batch, place them on a baking sheet in a 300°F oven for 5-7 minutes. Just keep an eye on them — you want them warm, not hot, to preserve the creamy texture.
Nutritional Information & Benefits
One of the best things about these lighter pumpkin cheesecake bars is that you can enjoy them without the guilt that often comes with traditional cheesecake desserts. Here is the estimated nutritional breakdown for one bar (based on 16 servings).
| Nutrient | Amount Per Bar |
|---|---|
| Calories | 185 |
| Total Fat | 10g |
| Saturated Fat | 5g |
| Cholesterol | 45mg |
| Sodium | 210mg |
| Total Carbohydrates | 20g |
| Dietary Fiber | 2g |
| Sugars | 12g |
| Protein | 6g |
Health Benefits: Pumpkin is packed with vitamin A, which supports eye health and immune function. It is also rich in fiber, which helps keep you full and satisfied. Cottage cheese adds a boost of protein without the high fat content of heavy cream, making these bars a more balanced dessert option. The maple syrup provides natural sweetness with a lower glycemic impact than refined sugar, though moderation is still key.
Dietary Considerations: These bars are vegetarian and can be made gluten-free, dairy-free, or vegan with the substitutions mentioned earlier. They are lower in sugar than traditional cheesecake bars, with about 12 grams per serving compared to 20-25 grams in standard recipes. If you are watching your carbohydrate intake, the low-carb version is a great alternative.
My Wellness Perspective: I believe in enjoying dessert without guilt, and these bars fit that philosophy perfectly. They are satisfying enough to feel like a treat, but balanced enough that you do not need to feel like you overindulged. That is the sweet spot, if you ask me.
Conclusion
These lighter pumpkin cheesecake bars are more than just a recipe — they are a little piece of that Portland bakery memory I have been chasing for years. They are creamy, spiced, and just sweet enough, with a crust that actually stays crisp and a filling that feels indulgent without being heavy. Honestly, they are the kind of dessert that makes you close your eyes after the first bite, and that is exactly what I was going for.
I hope you give these a try and make them your own. Maybe you will add a little extra cinnamon, or swap the pecans for walnuts, or serve them with a drizzle of caramel sauce. That is the beauty of a good recipe — it is a starting point, not a rulebook. I would love to hear how yours turn out, so drop a comment below and let me know what variations you tried. Share a photo if you are feeling proud, because you should be.
Thank you for stopping by and reading my little story about a bakery, a rainy day, and a whole lot of trial and error. Here is to recreating the memories that matter most, one lighter pumpkin cheesecake bar at a time. Happy baking, friends!
Frequently Asked Questions
Can I use pumpkin pie filling instead of pumpkin puree?
I would not recommend it. Pumpkin pie filling already has sugar and spices added, which will throw off the sweetness and spice balance of this recipe. Stick with 100% pure pumpkin puree for the best results. If you only have pumpkin pie filling on hand, reduce the maple syrup by half and skip the added spices, but the texture may still be different.
Why did my cheesecake layer crack?
Cracking usually happens from overbaking or overmixing. Make sure you pull the bars out of the oven when the center still has a slight jiggle — it will continue to set as it cools. Also, avoid overmixing the cheesecake layer once you add the flour. If cracks do appear, do not worry! A dollop of whipped cream or a dusting of cinnamon covers them beautifully.
Can I make these bars ahead of time?
Absolutely! In fact, I recommend it. These bars taste even better after a day or two in the fridge because the flavors have time to meld. You can make them up to 3 days in advance and store them in an airtight container in the refrigerator. They are perfect for holiday prep when you want to get ahead of the cooking chaos.
How do I get clean slices without the bars falling apart?
Patience is key here. Make sure the bars are fully chilled — at least 4 hours, preferably overnight. Use a sharp knife and run it under hot water before each cut, wiping it clean between slices. This gives you those beautiful, bakery-style squares that look like they came from a professional kitchen.
Can I double this recipe for a larger crowd?
Yes, you can easily double the recipe and bake it in a 9×13-inch pan. Increase the baking time to about 45-50 minutes, keeping an eye on that center jiggle. You may need to tent the top with foil after 30 minutes to prevent over-browning. The rest of the instructions remain the same, including the essential chilling time.
Pin This Recipe!
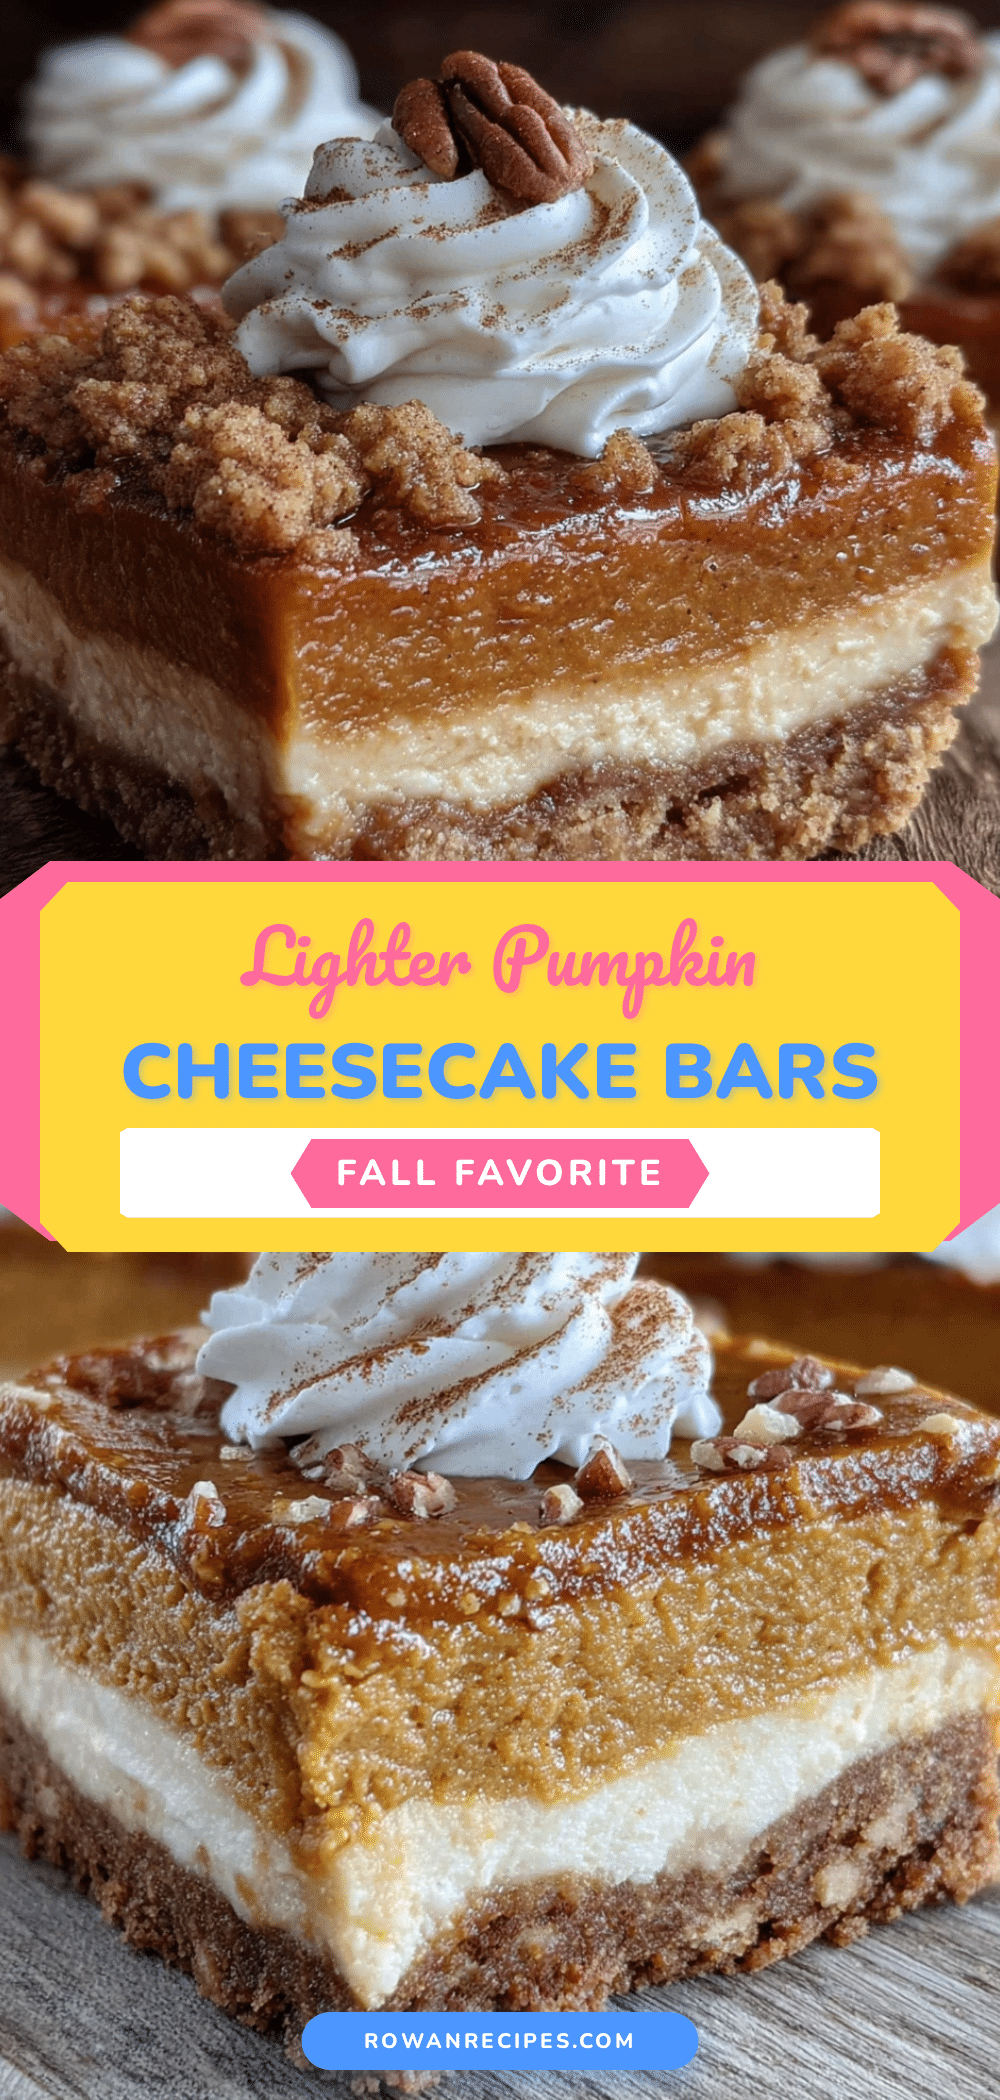
Lighter Pumpkin Cheesecake Bars: Easy Healthy Fall Dessert
These lighter pumpkin cheesecake bars are creamy, spiced, and just sweet enough, with a buttery crust that stays crisp. A healthier twist on a classic fall dessert, they are perfect for Thanksgiving, potlucks, or a cozy weekend treat.
- Prep Time: 30 minutes
- Cook Time: 35-40 minutes
- Total Time: 5 hours 10 minutes (including chilling)
- Yield: 16 bars 1x
- Category: Dessert
- Cuisine: American
Ingredients
- 1 ½ cups graham cracker crumbs (about 12 full sheets, crushed finely)
- ¼ cup melted coconut oil (or unsalted butter, melted)
- 2 tablespoons maple syrup (or honey)
- ¼ teaspoon salt
- 1 cup canned pumpkin puree (not pumpkin pie filling)
- ½ cup cottage cheese (small-curd, 2% or full-fat, blended until smooth)
- ¼ cup maple syrup (or honey)
- 1 large egg
- 1 teaspoon vanilla extract
- 1 ½ teaspoons pumpkin pie spice
- ½ teaspoon ground cinnamon
- ¼ teaspoon salt
- 8 ounces cream cheese (reduced-fat or full-fat, softened to room temperature)
- ½ cup cottage cheese (small-curd, 2% or full-fat, blended until smooth)
- ¼ cup maple syrup (or honey)
- 1 large egg
- 1 teaspoon vanilla extract
- 1 tablespoon all-purpose flour (or cornstarch)
- ¼ cup chopped pecans (or walnuts, optional)
- Whipped cream (dairy or coconut-based, for serving, optional)
- Extra cinnamon (for dusting, optional)
Instructions
- Preheat your oven to 350°F (175°C). Line an 8×8-inch baking pan with parchment paper, leaving a 2-inch overhang on two opposite sides. Lightly spray the parchment with non-stick cooking spray.
- Make the crust: In a medium bowl, combine 1 ½ cups graham cracker crumbs, ¼ cup melted coconut oil, 2 tablespoons maple syrup, and ¼ teaspoon salt. Stir until the mixture looks like wet sand and holds together when pressed between your fingers. If it seems too dry, add another teaspoon of melted coconut oil. If too wet, add a tablespoon more crumbs.
- Press the crust into the pan: Transfer the crumb mixture to your prepared pan and press it down firmly and evenly using the bottom of a measuring cup. Bake for 10 minutes, until the crust is lightly golden and fragrant. Set aside to cool while you make the fillings.
- Blend the cottage cheese: While the crust cools, add 1 cup of cottage cheese (total for both layers) to your blender or food processor. Blend on high for 30-60 seconds, until completely smooth with no lumps. Scrape down the sides as needed. Divide the blended cottage cheese evenly between two bowls — ½ cup for the pumpkin layer and ½ cup for the cheesecake layer.
- Make the pumpkin layer: In a medium bowl, combine 1 cup canned pumpkin puree, ½ cup blended cottage cheese, ¼ cup maple syrup, 1 large egg, 1 teaspoon vanilla extract, 1 ½ teaspoons pumpkin pie spice, ½ teaspoon ground cinnamon, and ¼ teaspoon salt. Whisk until smooth and well combined.
- Make the cheesecake layer: In a separate bowl, beat 8 ounces softened cream cheese with an electric mixer on medium speed until smooth and fluffy, about 2 minutes. Add the remaining ½ cup blended cottage cheese, ¼ cup maple syrup, 1 large egg, 1 teaspoon vanilla extract, and 1 tablespoon all-purpose flour. Beat on low speed until just combined — do not overmix. Scrape down the sides of the bowl.
- Layer the fillings: Pour the pumpkin mixture over the cooled crust and spread it into an even layer. Then, gently spoon the cheesecake mixture over the pumpkin layer in dollops. Use a spatula to spread it carefully, or leave it in dollops for a marbled effect.
- Bake the bars: Place the pan in the preheated oven and bake for 35-40 minutes. The edges should be set and lightly puffed, but the center should still have a slight jiggle when you gently shake the pan. If the top starts browning too quickly, tent loosely with foil after 25 minutes.
- Cool completely: Remove the pan from the oven and place it on a wire rack. Let it cool to room temperature, about 1 hour. Then, transfer the pan to the refrigerator and chill for at least 4 hours, preferably overnight.
- Slice and serve: Once fully chilled, lift the bars out of the pan using the parchment handles. Place on a cutting board and use a sharp knife to slice into 16 squares. For clean cuts, wipe the knife clean between each slice. Run the knife under hot water for even cleaner cuts. Serve cold or at room temperature, with whipped cream and a dusting of cinnamon if desired.
Notes
Room temperature ingredients are crucial for a smooth texture. Do not overmix the cheesecake layer to prevent cracking. The bars need at least 4 hours of chilling (preferably overnight) to set properly. For clean slices, use a hot knife and wipe it clean between cuts. The bars can be stored in the refrigerator for up to 5 days or frozen for up to 3 months.
Nutrition
- Serving Size: 1 bar
- Calories: 185
- Sugar: 12
- Sodium: 210
- Fat: 10
- Saturated Fat: 5
- Carbohydrates: 20
- Fiber: 2
- Protein: 6
Keywords: pumpkin cheesecake bars, healthy fall dessert, lighter cheesecake, pumpkin dessert, cottage cheese cheesecake, Thanksgiving dessert, easy pumpkin bars


