I ruined three checkerboard cakes before I figured out what I was doing wrong. Not just minor imperfections—we’re talking layers that slid apart on the stand, colors that bled into muddy brown stripes, and one particularly tragic attempt where the whole thing collapsed while I was carrying it to a birthday party. Honestly, I almost gave up on the whole idea. But there was something about the vision of those pink, white, and chocolate stripes that kept pulling me back. A Neapolitan checkerboard cake isn’t just a dessert—it’s a conversation piece, a showstopper that makes people stop mid-sentence when you walk into the room.
The funny thing is, I don’t even usually go for fussy layer cakes. I’m more of a sheet pan and scoop kind of baker. But this cake? It felt different. Every time I saw a picture of one online, perfectly sliced to reveal those concentric rings of strawberry, vanilla, and chocolate, I’d think, “I need to figure this out.” So I kept at it. I tested different batters, different piping methods, different chilling times. I read forum threads at 11 PM from bakers who’d cracked the code. And eventually, after more trial and error than I care to admit, I landed on a method that actually works—one that doesn’t require a special pan or a pastry degree.
This recipe is the result of all that stubborn persistence. It’s the version I’d make for a friend who says, “I could never pull that off.” Because you can. It takes patience, sure, but the technique is simpler than it looks. And when you cut into that first slice and see those perfect stripes? That’s the moment it all becomes worth it.
Why You’ll Love This Recipe
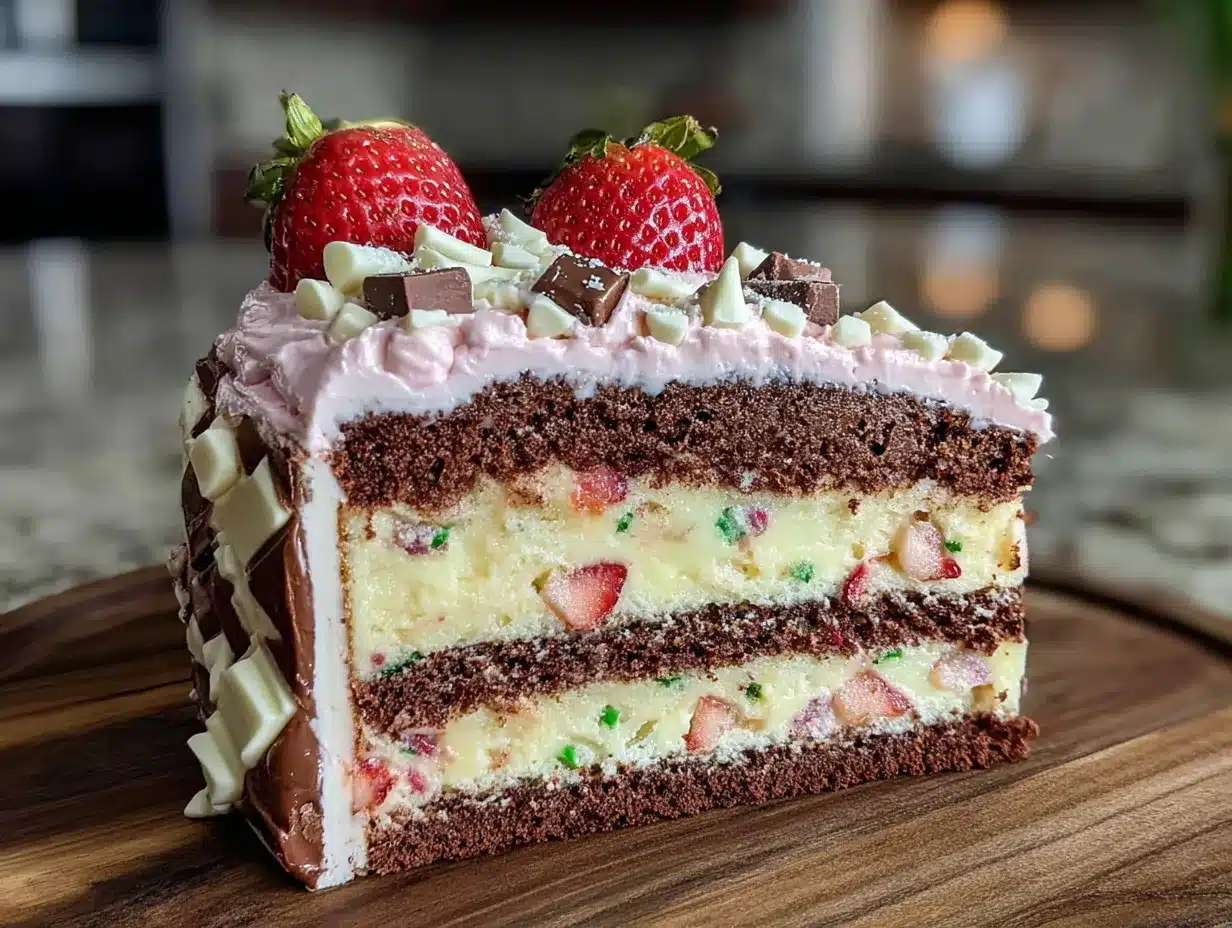
Let me tell you why this cake is worth every minute of effort. First off, it’s a visual masterpiece. The checkerboard pattern is genuinely stunning—those three distinct rings of pink, white, and chocolate create a slice that looks like it belongs in a bakery window. But here’s the thing: it tastes just as good as it looks.
- Three Flavors in One Cake : You get strawberry, vanilla, and chocolate in every single bite. It’s like having your favorite ice cream flavors, but in cake form.
- No Special Pan Required : Most checkerboard cake recipes call for a special pan with dividers. Not this one. I’ll show you how to get the pattern using regular round cake pans and a piping bag.
- Perfect for Celebrations : Birthdays, anniversaries, holidays—this cake commands attention. I brought it to a family gathering last summer and people were taking photos before anyone even grabbed a fork.
- Surprisingly Manageable : Yes, there are steps. But each step is straightforward. The trick is breaking it down into manageable chunks, and I’ve included all my time-saving shortcuts.
- Customizable Colors : The Neapolitan colors are classic, but you can switch up the flavors and colors however you like. More on that later.
This cake is the kind of baking project that feels like an event. It’s not an everyday thing—it’s the recipe you pull out when you want to impress someone, or when you need a baking challenge that delivers a huge payoff. The first time I got the checkerboard pattern right, I actually texted a photo to my mom. She didn’t believe I made it.
What Ingredients You Will Need
This recipe uses simple, pantry-friendly ingredients to create three distinct batters. The magic is in how you flavor and color them, not in any hard-to-find specialty items.
For the Vanilla Cake Batter (Base)
- 2 ¾ cups (345g) all-purpose flour – Spoon and level for accuracy. Too much flour makes the cake dense.
- 2 ½ teaspoons baking powder – Fresh baking powder is key for proper rise.
- ½ teaspoon salt – Balances the sweetness.
- 1 cup (226g) unsalted butter, softened to room temperature – I prefer Land O’Lakes for consistent results.
- 2 cups (400g) granulated sugar – Regular white sugar works best here.
- 4 large eggs, room temperature – Cold eggs can seize the batter. Let them sit out for 30 minutes.
- 1 cup (240ml) whole milk, room temperature – Whole milk gives the best texture, but 2% works in a pinch.
- 2 teaspoons vanilla extract – Pure vanilla, not imitation.
For the Strawberry Layer
- ⅓ of the vanilla batter – You’ll divide the base batter into three portions.
- 3 tablespoons strawberry puree – I use thawed frozen strawberries blended smooth. Fresh strawberries work too, but frozen are more consistent year-round.
- Pink or red gel food coloring – Gel coloring is essential. Liquid drops will thin the batter too much. I use Americolor Super Red, just a tiny dab.
For the Chocolate Layer
- ⅓ of the vanilla batter
- 3 tablespoons unsweetened cocoa powder – Dutch-process cocoa gives a deeper flavor. I like Rodelle or Ghirardelli brands.
- 2 tablespoons whole milk – This helps the cocoa powder dissolve smoothly.
For the Vanilla Layer
- Remaining ⅓ of the vanilla batter – Leave it as is. Simple and classic.
For the Buttercream Frosting
- 1 ½ cups (339g) unsalted butter, softened
- 5 cups (600g) powdered sugar, sifted
- ¼ cup (60ml) heavy cream – Or whole milk if that’s what you have.
- 2 teaspoons vanilla extract
- Pinch of salt
- Optional: ¼ cup strawberry puree and pink gel coloring for the strawberry buttercream variation
- Optional: ¼ cup cocoa powder for the chocolate buttercream variation
See how straightforward that is? No weird ingredients. You probably have most of this in your kitchen right now. The strawberry puree is the only thing you might need to plan for, and honestly, you can use strawberry jam in a pinch—just thin it with a teaspoon of water first.
Equipment Needed
You don’t need fancy tools for this cake, but having the right stuff makes the process smoother.
- Three 8-inch round cake pans – I use Fat Daddio’s anodized aluminum pans. They conduct heat evenly and don’t rust. If you only have two pans, bake in batches and let the pans cool completely between rounds.
- Piping bags – At least two, or you can reuse one if you wash it between colors. Disposable bags are easiest.
- Large round piping tip – A ½-inch round tip (like Ateco 806) works perfectly. No tip? Just snip the end of the bag.
- Offset spatula – For smooth frosting. A regular butter knife works too, but an offset spatula is one of those tools I use constantly.
- Cake turntable – Not essential, but it makes frosting so much easier. I got mine for $15 at a kitchen supply store.
- Cake leveler or serrated knife – For trimming the domes off your cakes.
- Mixing bowls – At least three medium bowls for dividing the batter.
- Stand mixer or hand mixer – A stand mixer makes the buttercream easier, but a hand mixer works fine.
- Parchment paper – For lining the pans.
- Cooling rack – Wire racks let the cakes cool evenly.
I’ll be honest—the first time I made this, I used cheap nonstick pans and the cakes burned on the edges. Good quality pans make a real difference. But if you’re just starting out, use what you have. You can always upgrade later.
Preparation Method
This method has six main stages. Read through them once before you start so you know where you’re headed. Trust me, it helps.
Stage 1: Make the Base Vanilla Batter
- Preheat your oven to 350°F (175°C). Grease three 8-inch round pans and line the bottoms with parchment paper.
- In a medium bowl, whisk together the flour, baking powder, and salt. Set aside.
- In the bowl of a stand mixer fitted with the paddle attachment, beat the butter and sugar together on medium speed until light and fluffy—about 3-4 minutes. Scrape down the sides halfway through.
- Add the eggs one at a time, beating well after each addition. The mixture should look smooth and slightly glossy.
- Add the vanilla extract and mix briefly.
- With the mixer on low speed, add the flour mixture in three additions, alternating with the milk. Start and end with the flour. Mix just until combined—overmixing makes the cake tough.
Stage 2: Divide and Flavor the Batters
- Weigh or eyeball the batter into three equal portions in separate bowls. Each should be about 1 ⅓ cups (320g).
- For the strawberry batter: Add the strawberry puree and a tiny dab of pink gel coloring. Fold gently until evenly colored. The puree will thin the batter slightly—that’s fine.
- For the chocolate batter: Sift the cocoa powder into the bowl. Add the 2 tablespoons of milk. Fold until no streaks remain. The batter will be slightly thicker than the others.
- Leave the third bowl as plain vanilla.
Stage 3: Pipe the Checkerboard Pattern
- This is the important part. Transfer each batter into a separate piping bag fitted with a round tip (or just snip the corner).
- Take one prepared cake pan. Starting from the center, pipe a ring of strawberry batter in a tight spiral, working outward to the edge. The spiral should be about ¼-inch thick.
- Now, pipe a second ring directly on top of the first, this time using the vanilla batter. Pipe from the center outward again.
- Pipe a third ring on top using the chocolate batter.
- You should have three concentric rings of batter in one pan. Repeat this process for the second and third pans, alternating which batter goes in the center. For example:
- Pan 1: Center = Strawberry, Middle = Vanilla, Outer = Chocolate
- Pan 2: Center = Vanilla, Middle = Chocolate, Outer = Strawberry
- Pan 3: Center = Chocolate, Middle = Strawberry, Outer = Vanilla
- Don’t worry if the rings aren’t perfect. The batter will spread slightly as it bakes.
Stage 4: Bake the Cakes
- Bake each pan for 22-28 minutes, or until a toothpick inserted in the center comes out clean. The cakes should feel springy to the touch.
- Let the cakes cool in the pans for 10 minutes, then turn them out onto a wire rack to cool completely. Remove the parchment paper.
- Once cool, use a cake leveler or serrated knife to trim the domes off each layer. You want flat, even surfaces for stacking.
Stage 5: Make the Buttercream
- In the bowl of a stand mixer fitted with the paddle attachment, beat the butter on medium speed until smooth and creamy—about 2 minutes.
- Add the powdered sugar one cup at a time, mixing on low speed to avoid a sugar cloud. Scrape down the sides as needed.
- Add the heavy cream, vanilla extract, and salt. Increase the speed to medium-high and beat for 3-4 minutes until the frosting is light and fluffy. If it’s too thick, add another tablespoon of cream. If it’s too thin, add more powdered sugar.
Stage 6: Assemble and Frost
- Place one cake layer on your serving plate or cake board. Spread a thin layer of buttercream on top.
- Place the second layer on top, making sure the pattern is oriented the same way. Spread another thin layer of buttercream.
- Add the third layer. Apply a thin crumb coat of buttercream all over the cake. Refrigerate for 20 minutes to set the crumb coat.
- Apply the final layer of buttercream, smoothing it with an offset spatula. For a rustic look, leave the sides slightly textured. For a smooth finish, use a bench scraper.
- Optional: Pipe decorative swirls on top or add sprinkles.
The first time I piped the spirals, I made a mess. Batter everywhere. But after one or two tries, you get the hang of it. The key is steady pressure and a consistent hand. If your spirals look uneven, just smooth them out with a small offset spatula before baking.
Cooking Tips & Techniques
Here are the lessons I learned the hard way so you don’t have to.
Room temperature ingredients matter. I know it’s tempting to use cold eggs straight from the fridge, but room temperature ingredients emulsify better. The result is a more tender, evenly textured cake. Set your butter, eggs, and milk out 30-60 minutes before you start.
Don’t overmix the batter. Once you add the flour, mix just until it disappears. Overmixing develops gluten, which makes the cake dense and tough. You want it tender and light.
Use gel food coloring. Liquid food coloring will thin your strawberry batter too much, and the colors won’t be as vibrant. Gel coloring gives you bold pink without altering the batter consistency. I use a toothpick to add just a tiny amount.
Chill the cakes before trimming. If your cakes are still slightly warm when you try to level them, they’ll crumble. Pop them in the freezer for 15-20 minutes before trimming. The cold cake cuts much cleaner.
The crumb coat is non-negotiable. I know it adds an extra step, but skipping the crumb coat means you’ll have crumbs in your final frosting layer. That thin layer of frosting seals everything in. Refrigerate it for 20 minutes and you’ll have a perfectly smooth canvas for the final coat.
Let the cake rest overnight. If you can, assemble and frost the cake a day before serving. The flavors meld together, and the cake cuts more cleanly. I’ve done this for every successful checkerboard cake I’ve made.
Variations & Adaptations
One of the best things about this recipe is how adaptable it is. Here are some variations I’ve tried and loved.
Chocolate Mint Checkerboard: Replace the strawberry puree with mint extract (start with ½ teaspoon and adjust to taste) and use green food coloring. The chocolate and mint combination is classic and refreshing.
Lemon Blueberry Checkerboard: Replace the strawberry puree with lemon zest and a tablespoon of lemon juice. Use blue food coloring or leave it natural. Add fresh blueberries to the vanilla layer for texture.
Gluten-Free Version: Substitute the all-purpose flour with a 1:1 gluten-free baking flour blend. I’ve tested this with King Arthur Measure for Measure flour, and it works well. Add an extra tablespoon of milk to compensate for the drier flour.
Dairy-Free Version: Use vegan butter (I like Miyoko’s) and unsweetened oat milk or almond milk. The texture will be slightly different, but the checkerboard pattern still works beautifully.
Different Pan Sizes: You can make this as a two-layer cake using 9-inch pans. Just divide the batter into two portions instead of three, and pipe two rings per pan. Reduce the baking time by 3-5 minutes.
I once made a rainbow checkerboard cake for a friend’s kid’s birthday. I used six different colors and flavors—strawberry, orange, lemon, lime, blueberry, and grape. It took forever, but the look on that kid’s face when we cut into it? Priceless.
Serving & Storage Suggestions
This cake is best served at room temperature. Take it out of the refrigerator about 30-45 minutes before you plan to serve it. Room temperature cake has a softer, more tender crumb, and the buttercream softens to a perfect creamy consistency.
For the cleanest slices, use a long, sharp knife dipped in hot water. Wipe the blade clean between slices. This gives you those gorgeous checkerboard cross-sections without smearing the colors.
This cake pairs beautifully with a cup of coffee or a tall glass of cold milk. For a dessert spread, serve it alongside a creamy tiramisu in a jar for contrast, or with fresh berries and whipped cream for a lighter option.
Storage: Store the cake in an airtight container in the refrigerator for up to 5 days. The flavors actually improve after a day or two as they meld together. Bring slices to room temperature before serving.
Freezing: You can freeze the unfrosted cake layers for up to 3 months. Wrap each layer tightly in plastic wrap, then in foil. Thaw at room temperature before frosting. I’ve also frozen the fully frosted cake (without decorations) with good results. Just thaw overnight in the refrigerator.
If you’re making this ahead for a party, I recommend baking the layers and making the buttercream a day or two in advance. Assemble and frost the day you plan to serve it. The cake stays fresh and the pattern stays clean.
Nutritional Information & Benefits
Let’s be real—this is a celebration cake, not a health food. But here’s the nutritional breakdown per slice (based on 12 servings):
- Calories: Approximately 520
- Fat: 28g
- Carbohydrates: 68g
- Protein: 5g
- Sugar: 48g
That said, there are some redeeming qualities. The strawberries in the pink layer provide a small dose of vitamin C and antioxidants. The butter, in moderation, contains fat-soluble vitamins A, D, E, and K. And honestly? There’s a mental health benefit to baking something beautiful and sharing it with people you love. I firmly believe that counts.
For those with dietary restrictions, the gluten-free and dairy-free variations above make this cake accessible to more people. Just be mindful of cross-contamination if you’re baking for someone with celiac disease.
This cake contains gluten, dairy, and eggs. It is not suitable for vegans unless adapted with the substitutions mentioned earlier.
Conclusion
This showstopping Neapolitan checkerboard layer cake is one of those recipes that looks impossible but is completely doable with a little patience and the right technique. It’s the kind of cake that makes people say, “Wait, you made that?” And honestly, that never gets old.
I love this recipe because it rewards persistence. Those first few failures taught me more about baking than any perfect recipe ever could. And now, every time I cut into a clean slice with those beautiful pink, white, and chocolate rings, I feel a little proud of how far I’ve come.
I’d love to see your version of this cake! Tag me in your photos, leave a comment below with your questions or variations, and don’t forget to share this recipe with a friend who needs a baking challenge. You’ve got this. And when you pull that cake out of the oven and see those layers? You’ll be glad you didn’t give up.
Frequently Asked Questions
Can I use a boxed cake mix for this recipe?
Technically yes, but I don’t recommend it. Boxed mixes are designed to be sturdy, which means they’re denser and less tender. The checkerboard pattern still works, but the texture won’t be as light and the flavor won’t be as rich. If you’re short on time, use a high-quality vanilla cake mix and add your own extracts and colors.
Why did my colors bleed together?
This usually happens when the batters are too thin or when the cake is overbaked. Make sure you’re using gel food coloring, not liquid. Also, don’t overmix the batters after adding the color. If your strawberry puree is very watery, drain it through a fine-mesh sieve first.
Can I make this cake in advance?
Absolutely. You can bake the layers up to two days ahead and store them wrapped tightly at room temperature. You can also make the buttercream ahead and refrigerate it for up to a week—just let it come to room temperature and re-whip before using. For best results, assemble and frost the cake the day before serving.
How do I get clean slices?
Use a long, sharp knife dipped in hot water. Wipe the blade clean between each slice. If the cake is cold, let it sit at room temperature for 30 minutes before cutting. A warm knife cuts through buttercream without dragging.
Can I use different flavors for the layers?
Yes! This technique works with any three flavors. Try lemon, lavender, and white chocolate. Or matcha, vanilla, and red velvet. Just make sure the flavors have distinct colors so the checkerboard pattern is visible. Avoid flavors that are all the same color (like all vanilla) unless you use food coloring.
Pin This Recipe!
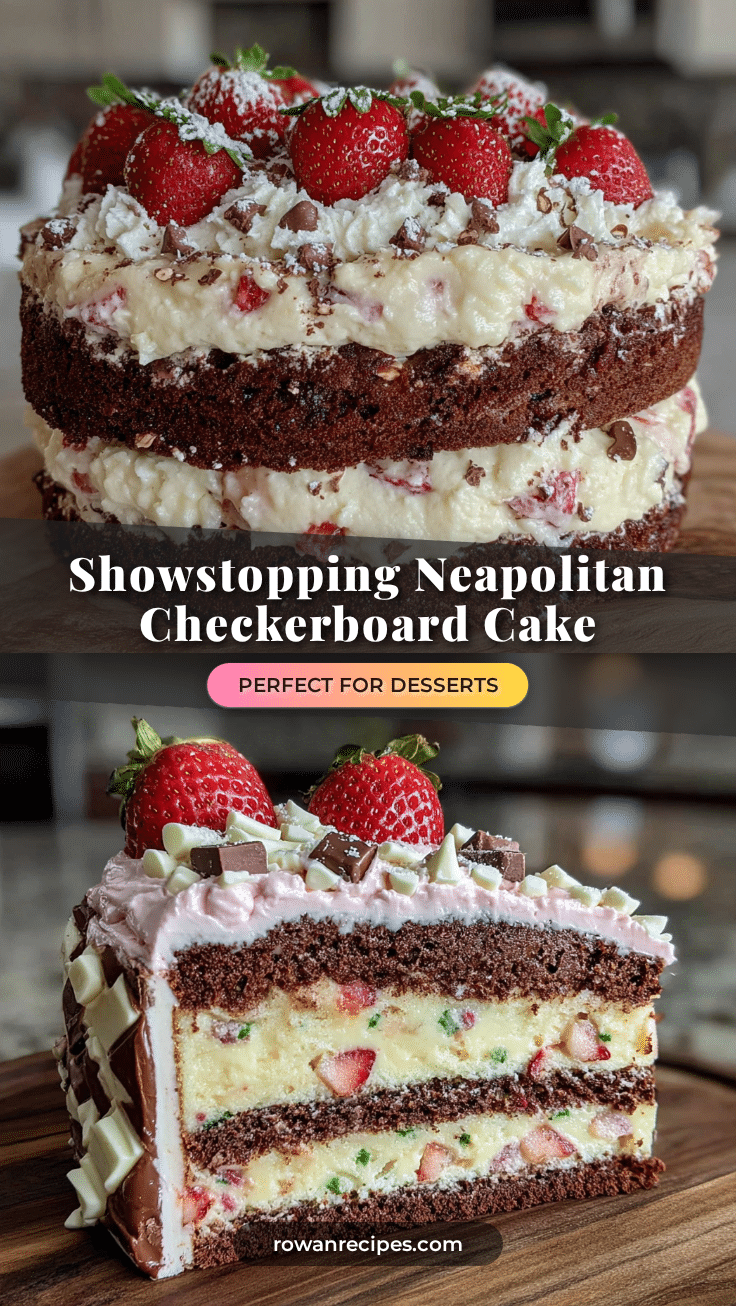
Showstopping Neapolitan Checkerboard Layer Cake Recipe
A stunning Neapolitan checkerboard layer cake with pink, white, and chocolate stripes that tastes as good as it looks. This recipe uses simple ingredients and a piping technique to create the pattern without special pans.
- Prep Time: 45 minutes
- Cook Time: 28 minutes
- Total Time: 1 hour 13 minutes
- Yield: 12 servings 1x
- Category: Dessert
- Cuisine: American
Ingredients
- 2 ¾ cups (345g) all-purpose flour
- 2 ½ teaspoons baking powder
- ½ teaspoon salt
- 1 cup (226g) unsalted butter, softened to room temperature
- 2 cups (400g) granulated sugar
- 4 large eggs, room temperature
- 1 cup (240ml) whole milk, room temperature
- 2 teaspoons vanilla extract
- 3 tablespoons strawberry puree
- Pink or red gel food coloring
- 3 tablespoons unsweetened cocoa powder (Dutch-process)
- 2 tablespoons whole milk (for chocolate batter)
- 1 ½ cups (339g) unsalted butter, softened (for buttercream)
- 5 cups (600g) powdered sugar, sifted
- ¼ cup (60ml) heavy cream
- 2 teaspoons vanilla extract (for buttercream)
- Pinch of salt
Instructions
- Preheat oven to 350°F (175°C). Grease three 8-inch round pans and line bottoms with parchment paper.
- In a medium bowl, whisk together flour, baking powder, and salt. Set aside.
- In a stand mixer with paddle attachment, beat butter and sugar on medium speed until light and fluffy, about 3-4 minutes. Scrape down sides.
- Add eggs one at a time, beating well after each. Add vanilla extract and mix briefly.
- With mixer on low, add flour mixture in three additions, alternating with milk. Start and end with flour. Mix just until combined.
- Divide batter into three equal portions (about 1 ⅓ cups each) in separate bowls.
- For strawberry batter: Add strawberry puree and a tiny dab of pink gel coloring. Fold gently until evenly colored.
- For chocolate batter: Sift cocoa powder into bowl, add 2 tablespoons milk. Fold until no streaks remain.
- Leave third bowl as plain vanilla.
- Transfer each batter into separate piping bags fitted with round tips (or snip corners).
- In one prepared pan, pipe a ring of strawberry batter from center outward in a tight spiral, about ¼-inch thick.
- Pipe a second ring of vanilla batter directly on top of the first, from center outward.
- Pipe a third ring of chocolate batter on top.
- Repeat for second and third pans, alternating which batter goes in the center: Pan 1: Strawberry, Vanilla, Chocolate; Pan 2: Vanilla, Chocolate, Strawberry; Pan 3: Chocolate, Strawberry, Vanilla.
- Bake each pan for 22-28 minutes, until toothpick inserted in center comes out clean. Cool in pans 10 minutes, then turn out onto wire rack to cool completely.
- Trim domes off each layer with a cake leveler or serrated knife.
- For buttercream: Beat butter on medium speed until smooth. Add powdered sugar one cup at a time on low speed. Add heavy cream, vanilla, and salt. Beat on medium-high for 3-4 minutes until light and fluffy.
- Place one cake layer on serving plate. Spread thin layer of buttercream on top.
- Add second layer, oriented same way. Spread thin layer of buttercream.
- Add third layer. Apply thin crumb coat of buttercream all over. Refrigerate 20 minutes.
- Apply final layer of buttercream, smoothing with offset spatula. Optional: pipe decorative swirls or add sprinkles.
Notes
Room temperature ingredients are crucial for proper emulsification. Use gel food coloring to avoid thinning the batter. Chill cakes before trimming for cleaner cuts. The crumb coat is essential to prevent crumbs in the final frosting. For best results, assemble and frost the cake a day before serving.
Nutrition
- Serving Size: 1 slice
- Calories: 520
- Sugar: 48
- Sodium: 280
- Fat: 28
- Saturated Fat: 17
- Carbohydrates: 68
- Fiber: 1
- Protein: 5
Keywords: Neapolitan cake, checkerboard cake, layer cake, strawberry cake, chocolate cake, vanilla cake, birthday cake, celebration cake


