My sister-in-law, Jen, claimed she hated cheesecake for fifteen years. Fifteen years! Every holiday, every birthday, every potluck — she’d pass the platter with a polite “no thank you” and reach for the fruit salad instead. I honestly thought it was just a thing she said to feel superior about her willpower. Then last October, I made these Lighter Fall Harvest Cheesecake Bars with Pecan Crust purely for a recipe testing session. I was trying to lighten up a classic dessert, you know, something that wouldn’t leave me sluggish after one slice. I set the pan on the counter to cool and walked away to answer my phone. When I came back maybe twenty minutes later, Jen was standing at the kitchen island, fork in hand, caught mid-bite. She froze, crumbs on her chin, and mumbled, “Okay, this doesn’t count.” That was the moment I knew these bars were something special.
Honestly, I wasn’t even trying to convert anyone that day. I was just tired of fall desserts that felt like a sugar coma waiting to happen. I wanted something that tasted like a warm sweater and a crackling fire but didn’t make me regret my life choices at 2 a.m. These bars hit that sweet spot perfectly — a buttery, toasty pecan crust, a creamy filling that’s surprisingly light, and a subtle warmth from fall spices that lingers just enough. I mean, the fact that they also happened to change Jen’s mind about an entire food category? That was just a bonus.
Maybe you’ve been in a similar spot, where you want a dessert that feels indulgent and cozy but doesn’t weigh you down. Or maybe you’re just looking for something that’ll impress at a gathering without requiring a culinary degree. Either way, these bars have a way of making people pause, take another bite, and ask for the recipe before they’ve even finished the first one. They’ve become my go-to for everything from Thanksgiving dinner to a quiet Tuesday afternoon when I need a little comfort. And honestly, that’s why I keep making them — they deliver that fall feeling without any of the heaviness.
Why You’ll Love This Recipe
These Lighter Fall Harvest Cheesecake Bars with Pecan Crust aren’t just another dessert recipe. They’re the result of countless test batches, a few happy accidents, and a genuine desire to make something that feels both special and sensible. Here’s why they stand out:
- Quick & Easy : The whole thing comes together in about 30 minutes of active prep time. The oven does the rest of the work, so you can get back to your day.
- Simple Ingredients : No weird specialty items or trips to three different stores. You probably have most of this in your pantry right now.
- Perfect for Fall Gatherings : These bars are made for Thanksgiving, Friendsgiving, or any cozy get-together where you want something impressive but not fussy.
- Crowd-Pleaser : I’ve served these to kids, picky eaters, and even a self-proclaimed cheesecake hater (hi, Jen). They disappear every single time.
- Unbelievably Delicious : The combination of toasted pecans, warm spices, and a creamy, tangy filling is just next-level comfort food. You get that rich flavor without the heavy feeling afterward.
What makes this version different from every other cheesecake bar out there? It’s the way I lighten things up without sacrificing an ounce of flavor. Instead of using a full block of cream cheese and heavy cream, I blend in some Greek yogurt and a touch of cottage cheese. I know, I know — cottage cheese in cheesecake sounds a little out there. But trust me, when you whip it until it’s completely smooth, it adds this incredible creaminess with way less fat and a boost of protein. The pecan crust is also lighter than a traditional graham cracker crust because it uses less butter and gets its richness from the natural oils in the nuts.
This recipe isn’t just good — it’s the kind that makes you close your eyes after the first bite. It’s comfort food reimagined: healthier, faster, but with the same soul-soothing satisfaction. Perfect for impressing guests without stress, or turning a simple fall evening into something memorable. And honestly? It’s the only cheesecake that’s ever made my sister-in-law break a fifteen-year streak.
What Ingredients You Will Need
This recipe uses simple, wholesome ingredients to deliver bold flavor and satisfying texture without the fuss. Most of these are pantry staples, especially if you do any fall baking. Let’s walk through each one so you know exactly what to look for.
For the Pecan Crust
- 1 ½ cups pecan halves (toasted for extra flavor — I like buying them raw and toasting them myself for the freshest taste)
- ¼ cup packed light brown sugar (adds moisture and a subtle molasses note that pairs beautifully with the pecans)
- 3 tablespoons unsalted butter, melted (use salted butter and skip the added salt if that’s what you have)
- ¼ teaspoon salt (enhances the nuttiness of the pecans)
- ½ teaspoon ground cinnamon (optional, but I love the warmth it brings)
For the Cheesecake Filling
- 8 ounces cream cheese, softened (full-fat works best for texture, but reduced-fat is fine too — just don’t use nonfat)
- ½ cup cottage cheese (small-curd, full-fat or 2% — this is my secret for a lighter but creamy filling)
- ½ cup plain Greek yogurt (I prefer 2% or full-fat for richness, but nonfat works in a pinch)
- ½ cup granulated sugar (or use coconut sugar for a less refined option — it’ll be a touch darker in color)
- 2 large eggs, room temperature (cold eggs can make the filling seize up)
- 1 teaspoon vanilla extract (pure, not imitation, for the best flavor)
- 1 tablespoon all-purpose flour (helps stabilize the filling and prevents cracking)
- ½ teaspoon ground cinnamon
- ¼ teaspoon ground nutmeg (freshly grated if you have it — it makes a difference)
- ⅛ teaspoon ground cloves (go easy here, cloves are strong)
For the Harvest Swirl (Optional but Recommended)
- ½ cup canned pumpkin puree (not pumpkin pie filling — make sure it’s 100% pumpkin)
- 1 tablespoon maple syrup (adds a beautiful autumn sweetness)
- ¼ teaspoon pumpkin pie spice (or a mix of cinnamon, nutmeg, and ginger)
Ingredient Tips: I recommend using Diamond brand pecans for consistent quality — they’re always fresh and never bitter. For the cottage cheese, look for a brand that’s smooth and creamy, like Good Culture or Daisy. If you can’t find small-curd, just pulse regular cottage cheese in a food processor before adding it to the mix. For the pumpkin swirl, canned pumpkin is totally fine, but if you have fresh roasted pumpkin, even better.
Substitution Guidance: To make this gluten-free, use a gluten-free all-purpose flour blend in the filling and skip the flour in the crust entirely (the pecans and butter hold it together fine). For a dairy-free version, use vegan cream cheese, dairy-free yogurt, and a plant-based butter substitute. I’ve tested it with Miyoko’s cream cheese and it worked beautifully — just note the texture is slightly softer.
Equipment Needed
You don’t need a ton of fancy tools for these bars, which is one of the reasons I make them so often. Here’s what you’ll need:
- 8×8-inch baking pan (a 9×9 works too, but the bars will be slightly thinner — adjust baking time by 5 minutes)
- Parchment paper (for easy lifting — I never skip this step)
- Food processor (for grinding the pecans into a crust — a high-speed blender works too, but pulse carefully so you don’t end up with pecan butter)
- Electric hand mixer or stand mixer (for whipping the filling until smooth and fluffy)
- Mixing bowls (one medium, one large)
- Rubber spatula (for scraping down the bowl and spreading the filling)
- Measuring cups and spoons
- Small offset spatula (optional, but helpful for spreading the pumpkin swirl evenly)
If you don’t have a food processor, you can crush the pecans by placing them in a zip-top bag and smashing them with a rolling pin. It’s a little more work, and the texture won’t be as uniform, but it gets the job done. I’ve done it that way when my food processor was in the dishwasher, and honestly, the rustic look is kind of charming.
Preparation Method
Let’s get into the actual making of these Lighter Fall Harvest Cheesecake Bars with Pecan Crust. I’ll walk you through every step so you feel confident, even if you’ve never made cheesecake before.
Step 1: Prep Your Pan and Preheat
Preheat your oven to 350°F (175°C). Line your 8×8-inch baking pan with parchment paper, leaving a 2-inch overhang on two opposite sides. This creates little handles that make lifting the bars out later a breeze. Lightly spray the parchment with nonstick cooking spray — just a quick spritz.
Step 2: Make the Pecan Crust
Spread the pecan halves on a baking sheet and toast them in the preheated oven for 6-8 minutes, until they smell fragrant and are slightly darkened. Watch them carefully — pecans can go from toasted to burnt in about 30 seconds. Let them cool for 5 minutes. Then, add the toasted pecans, brown sugar, salt, and cinnamon to your food processor. Pulse until the pecans are finely ground — you want a texture similar to coarse sand. Drizzle in the melted butter and pulse again until the mixture clumps together when you squeeze it. Press this mixture firmly into the bottom of your prepared pan. I use the bottom of a flat measuring cup to really pack it down evenly. Bake the crust for 10 minutes, then set it aside to cool while you make the filling.
Step 3: Blend the Cottage Cheese
This is the step that makes the filling so creamy. Add the cottage cheese to your food processor (no need to wash it from the crust) and blend for about 60 seconds, until it’s completely smooth with no lumps. Scrape it into a large mixing bowl. If you don’t have a food processor, you can press the cottage cheese through a fine-mesh sieve with a spatula — it takes a little elbow grease but works.
Step 4: Make the Cheesecake Filling
Add the softened cream cheese to the bowl with the smooth cottage cheese. Beat with an electric mixer on medium speed until combined and creamy, about 2 minutes. Scrape down the sides and bottom of the bowl. Add the Greek yogurt, sugar, and vanilla, and beat again until smooth. Add the eggs one at a time, beating on low speed after each just until incorporated — don’t overmix, or you’ll incorporate too much air and the bars will puff up and crack. Finally, add the flour, cinnamon, nutmeg, and cloves, and mix on low until just combined. Give the bowl a final scrape with your spatula.
Step 5: Make the Pumpkin Swirl (If Using)
In a small bowl, whisk together the pumpkin puree, maple syrup, and pumpkin pie spice until smooth. Set aside.
Step 6: Assemble the Bars
Pour the cheesecake filling over the cooled crust and spread it evenly with your spatula. If you’re adding the pumpkin swirl, drop spoonfuls of the pumpkin mixture over the top of the filling. Use a knife or a skewer to gently swirl it into the filling — don’t overdo it, or you’ll lose the marbled effect. I like to do about 5-6 figure-eight motions and call it done.
Step 7: Bake
Bake at 350°F (175°C) for 30-35 minutes, until the edges are set and the center jiggles slightly when you gently shake the pan. It should look matte on top, not wet. If you notice the top browning too quickly, tent the pan loosely with foil for the last 10 minutes of baking. Turn the oven off, crack the door open, and let the bars sit in the cooling oven for 30 minutes. This gentle cooling helps prevent cracking.
Step 8: Cool and Chill
Remove the pan from the oven and let it cool completely on a wire rack, about 1 hour. Then, transfer the pan to the refrigerator and chill for at least 4 hours, but overnight is better. This is crucial — the bars need time to set up properly. I know it’s hard to wait, but trust me, it’s worth it. Once chilled, use the parchment handles to lift the bars out of the pan. Slice into 9 or 16 squares, wiping the knife clean between cuts for neat edges.
Cooking Tips & Techniques
I’ve made these Lighter Fall Harvest Cheesecake Bars with Pecan Crust more times than I can count, and I’ve learned a few things along the way. Here are the tips that make a real difference:
Don’t skip toasting the pecans. I know it’s an extra step, but it wakes up the natural oils in the nuts and adds a depth of flavor that you just can’t get from raw pecans. I once skipped it because I was in a hurry, and the crust tasted flat and almost dusty. Never again.
Room temperature ingredients matter. Cold cream cheese and cold eggs will give you a lumpy filling that’s hard to smooth out. Take everything out of the fridge at least 30 minutes before you start. If you forget, you can soften cream cheese in the microwave in 10-second bursts, and place cold eggs in a bowl of warm water for 5 minutes.
Watch for overmixing. When you add the eggs, mix on low speed and stop as soon as they’re incorporated. Overmixing beats too much air into the batter, which causes the bars to puff up in the oven and then collapse, leaving cracks on the surface. A few small cracks are totally fine, but if you want a smooth top, go easy on the mixer.
The water bath shortcut. Traditional cheesecake recipes call for a water bath to prevent cracking. I don’t use one here because the bars are shallow enough that they bake evenly without it. But if you’re nervous, place a shallow pan of hot water on the oven rack below the bars while they bake. The steam keeps the oven environment moist.
Patience with chilling. I cannot stress this enough. The bars need at least 4 hours in the fridge, and overnight is ideal. I once tried to rush this step and ended up with a gooey, sliceable mess. The filling needs time to firm up so you get clean, beautiful slices.
Variations & Adaptations
One of the best things about this recipe is how flexible it is. Here are some ways to make it your own:
Gluten-Free Version: As I mentioned, skip the flour in the filling and make sure your pecans are certified gluten-free if that’s a concern. The crust holds together beautifully without any added flour.
Vegan Adaptation: I tested this with a friend who’s vegan, and we used Miyoko’s cream cheese, a dairy-free Greek-style yogurt, and a flax egg (1 tablespoon ground flaxseed mixed with 3 tablespoons water, left to sit for 5 minutes). The texture was slightly softer than the original, but the flavor was spot-on. We added an extra tablespoon of flour to help stabilize it.
Different Nut Crusts: Don’t have pecans? Walnuts work wonderfully here — they have a slightly more bitter edge that balances the sweet filling. You could also use a mix of pecans and almonds for a different flavor profile.
No Pumpkin Swirl: If pumpkin isn’t your thing, or you want a plain cheesecake bar, just leave out the swirl. The bars are still incredible with just the spiced filling. You could also swirl in some caramel sauce or raspberry jam instead.
Spice It Up: For a more intense fall flavor, add ¼ teaspoon of ground ginger and a pinch of cardamom to the filling. I did this for a Thanksgiving potluck once, and people kept asking what the “secret spice” was.
Mini Version: This recipe works great in a 12-cup muffin tin lined with paper liners. Press about 1½ tablespoons of crust into each cup, fill with cheesecake batter, and bake for 18-20 minutes. Perfect for parties or portion control.
Serving & Storage Suggestions
These bars are best served cold, straight from the fridge. The texture is firm and creamy, almost like a cheesecake ice cream bar. If you prefer a softer texture, let them sit at room temperature for 10-15 minutes before serving. I like to slice them into 16 small squares for a dessert buffet, or 9 larger bars for a more generous serving.
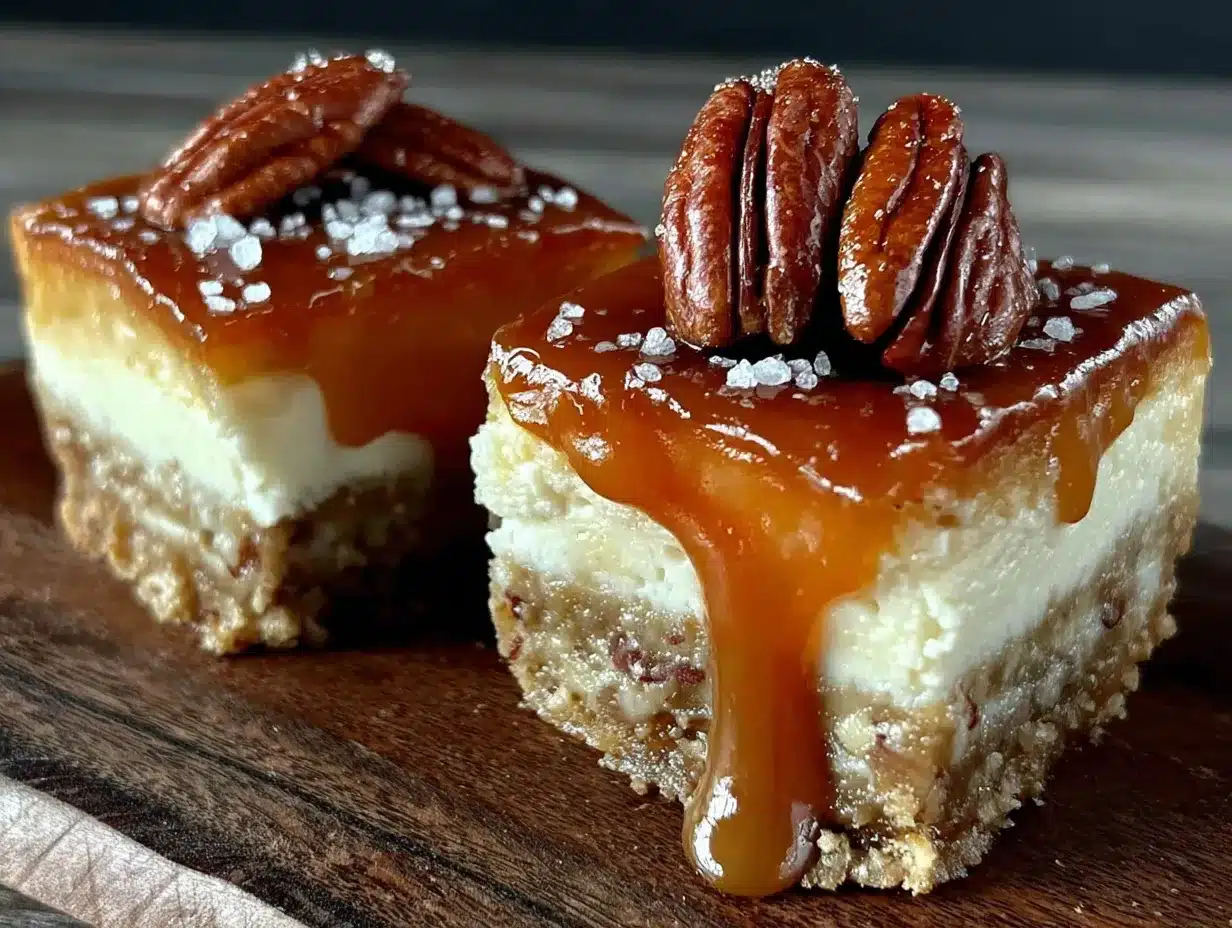
Presentation Tips: A light dusting of powdered sugar or a drizzle of warm caramel sauce takes these bars to the next level visually. I also love topping each bar with a single toasted pecan half and a tiny pinch of flaky sea salt — the salt really makes the flavors pop. For a full fall dessert spread, serve them alongside a warm apple crisp or a slice of pumpkin bread.
Storage: Place leftover bars in an airtight container, separating layers with parchment paper, and store in the refrigerator for up to 5 days. They actually get better after a day or two as the flavors meld together. You can also freeze them for up to 3 months. Wrap each bar individually in plastic wrap, then place them in a freezer-safe bag. Thaw in the refrigerator overnight before serving.
Reheating: I don’t recommend reheating these bars — they’re meant to be enjoyed cold or at room temperature. But if you want a warm dessert experience, microwave a single bar for about 10 seconds. It’ll soften the filling slightly while keeping the crust firm.
One thing I’ve noticed is that the pecan crust softens slightly after a day or two in the fridge. That’s totally normal and actually gives the bars a more cohesive, almost cheesecake-like texture. If you prefer a crunchier crust, serve them the same day you make them.
Nutritional Information & Benefits
Here’s the estimated nutritional breakdown for one bar (based on 16 servings):
- Calories: 185
- Fat: 13g
- Saturated Fat: 5g
- Carbohydrates: 14g
- Fiber: 1g
- Sugar: 10g
- Protein: 5g
These numbers are approximate and will vary based on the specific brands and substitutions you use. But compared to a traditional cheesecake bar, which can easily clock in at 300+ calories and 20g of fat per serving, this version is a significant improvement.
Health Benefits: The pecans in the crust are packed with healthy fats, fiber, and antioxidants. They’re also a good source of magnesium, which is great for muscle function and sleep. The cottage cheese and Greek yogurt add a solid dose of protein and calcium, making these bars more satisfying than your average dessert. Plus, the pumpkin puree is loaded with vitamin A and fiber. This is a dessert that actually gives back a little.
Dietary Considerations: This recipe is vegetarian and can easily be made gluten-free or dairy-free with the substitutions mentioned above. It’s also lower in sugar than most cheesecake recipes, which makes it a better option for those watching their sugar intake. The main allergens are dairy, tree nuts (pecans), and eggs.
Conclusion
These Lighter Fall Harvest Cheesecake Bars with Pecan Crust have become a staple in my kitchen for a reason. They deliver everything you want from a fall dessert — warm spices, rich nuttiness, creamy texture — without the heavy, guilt-inducing feeling that often comes after a slice of traditional cheesecake. They’re the kind of recipe that proves you don’t have to choose between eating well and eating something that actually tastes amazing.
I honestly love how adaptable they are. You can dress them up for a holiday party with a drizzle of caramel and a sprinkle of sea salt, or keep them simple for a weekday treat that feels just a little bit special. And if you’re anything like my sister-in-law, they might even change your mind about an entire dessert category.
I’d love to hear how these turn out for you! Did you try a fun variation? Did you serve them at a gathering? Drop a comment below and let me know — I read every single one. And if you share a photo on social media, tag me so I can see your beautiful creations. Happy baking, friends!
Frequently Asked Questions
Can I make these bars ahead of time?
Absolutely! In fact, I recommend it. These bars need at least 4 hours to chill, but they’re even better after a full day in the fridge. You can make them up to 3 days in advance and store them in an airtight container in the refrigerator.
Can I use a different nut for the crust?
Yes, walnuts or almonds work great as substitutes. Just keep in mind that different nuts have different oil contents, so the crust might be slightly more or less crumbly. If using almonds, I recommend blanched or slivered almonds for a milder flavor.
Why did my cheesecake bars crack?
Cracking usually happens from overmixing the batter (which incorporates too much air) or from sudden temperature changes. To prevent cracks, mix the eggs on low speed until just combined, and let the bars cool gradually in the turned-off oven before moving them to the fridge.
Can I freeze these bars?
Yes! Wrap each bar individually in plastic wrap, then place them in a freezer-safe bag or container. They’ll keep for up to 3 months. Thaw in the refrigerator overnight before serving. The texture stays remarkably creamy after freezing.
How do I know when the bars are done baking?
The edges should be set and look matte, while the center will still jiggle slightly when you gently shake the pan. If the center looks wet or shiny, give it another 3-5 minutes. Remember, the bars will continue to set as they cool and chill.
Pin This Recipe!
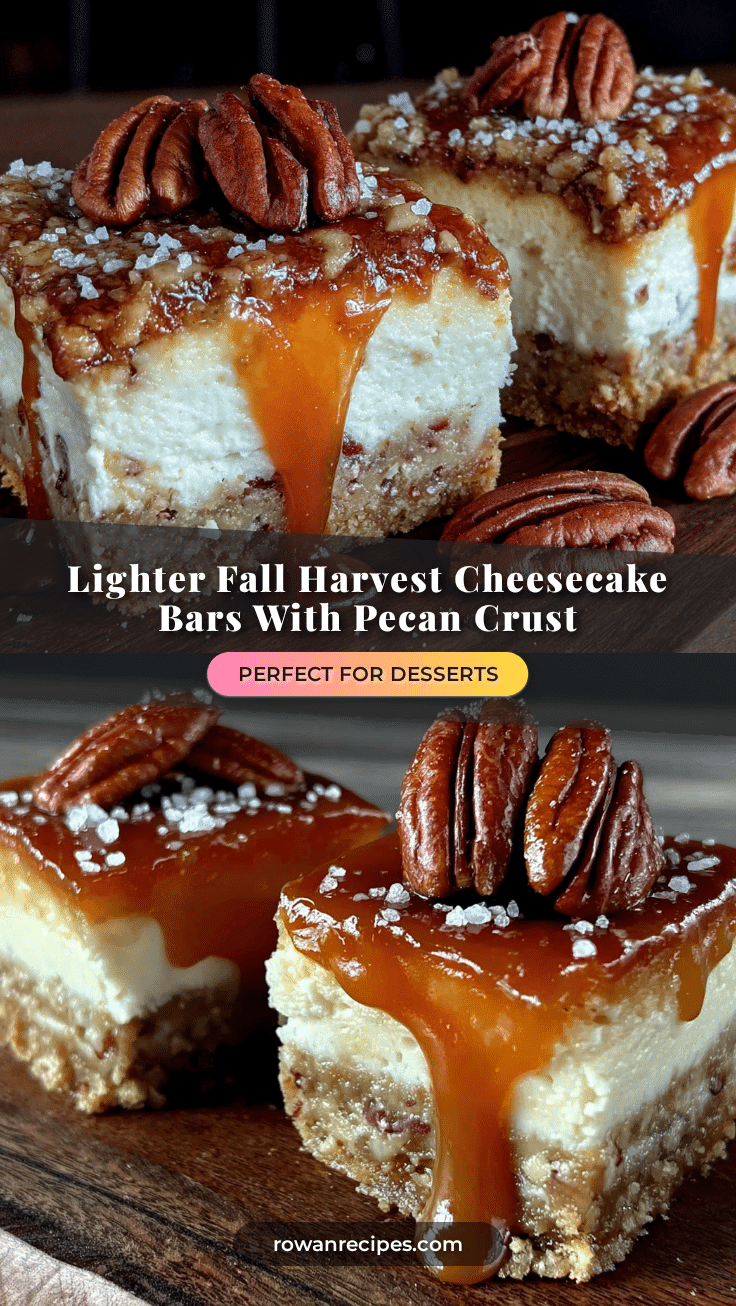
Lighter Fall Harvest Cheesecake Bars with Easy Pecan Crust
These Lighter Fall Harvest Cheesecake Bars with Pecan Crust are a creamy, spiced fall dessert that’s surprisingly light and easy to make. With a buttery pecan crust and a tangy filling, they’re perfect for Thanksgiving or any cozy gathering.
- Prep Time: 30 minutes
- Cook Time: 35 minutes
- Total Time: 5 hours 5 minutes (includes chilling)
- Yield: 16 servings 1x
- Category: Dessert
- Cuisine: American
Ingredients
- 1 ½ cups pecan halves
- ¼ cup packed light brown sugar
- 3 tablespoons unsalted butter, melted
- ¼ teaspoon salt
- ½ teaspoon ground cinnamon
- 8 ounces cream cheese, softened
- ½ cup cottage cheese
- ½ cup plain Greek yogurt
- ½ cup granulated sugar
- 2 large eggs, room temperature
- 1 teaspoon vanilla extract
- 1 tablespoon all-purpose flour
- ½ teaspoon ground cinnamon
- ¼ teaspoon ground nutmeg
- ⅛ teaspoon ground cloves
- ½ cup canned pumpkin puree
- 1 tablespoon maple syrup
- ¼ teaspoon pumpkin pie spice
Instructions
- Preheat oven to 350°F (175°C). Line an 8×8-inch baking pan with parchment paper, leaving a 2-inch overhang on two opposite sides. Lightly spray with nonstick cooking spray.
- Spread pecan halves on a baking sheet and toast for 6-8 minutes until fragrant. Let cool for 5 minutes.
- In a food processor, combine toasted pecans, brown sugar, salt, and cinnamon. Pulse until finely ground (like coarse sand). Add melted butter and pulse until mixture clumps together. Press firmly into the bottom of the prepared pan. Bake for 10 minutes, then set aside to cool.
- In the same food processor (no need to wash), blend cottage cheese for 60 seconds until completely smooth. Scrape into a large mixing bowl.
- Add softened cream cheese to the bowl with cottage cheese. Beat with an electric mixer on medium speed until combined and creamy, about 2 minutes. Scrape down sides.
- Add Greek yogurt, sugar, and vanilla. Beat until smooth. Add eggs one at a time, beating on low speed after each just until incorporated. Add flour, cinnamon, nutmeg, and cloves. Mix on low until just combined.
- In a small bowl, whisk together pumpkin puree, maple syrup, and pumpkin pie spice until smooth.
- Pour cheesecake filling over cooled crust and spread evenly. Drop spoonfuls of pumpkin mixture over the top. Gently swirl with a knife or skewer (5-6 figure-eight motions).
- Bake at 350°F (175°C) for 30-35 minutes, until edges are set and center jiggles slightly. If top browns too quickly, tent with foil for last 10 minutes. Turn off oven, crack door, and let bars sit in cooling oven for 30 minutes.
- Remove from oven and cool completely on a wire rack, about 1 hour. Transfer to refrigerator and chill for at least 4 hours, preferably overnight.
- Use parchment handles to lift bars out of pan. Slice into 9 or 16 squares, wiping knife clean between cuts.
Notes
Don’t skip toasting the pecans for best flavor. Use room temperature ingredients to avoid lumps. Overmixing can cause cracks; mix eggs on low just until incorporated. Chilling for at least 4 hours (preferably overnight) is essential for clean slices. For a gluten-free version, use gluten-free flour in the filling; the crust holds without flour. For dairy-free, use vegan cream cheese, dairy-free yogurt, and plant-based butter.
Nutrition
- Serving Size: 1 bar (based on 16 s
- Calories: 185
- Sugar: 10
- Sodium: 120
- Fat: 13
- Saturated Fat: 5
- Carbohydrates: 14
- Fiber: 1
- Protein: 5
Keywords: cheesecake bars, fall harvest, pecan crust, lighter cheesecake, pumpkin swirl, Thanksgiving dessert, easy cheesecake


