“Wait, you made that? From scratch?” My sister-in-law stood in my kitchen, fork already hovering over the first slice. I just shrugged, trying to play it cool, but honestly, I was holding my breath. This was my third attempt at a pumpkin roll in as many weeks, and the first two had ended up looking more like pumpkin puzzle pieces on my countertop. That question, right there, was the moment I knew I had finally cracked the code. It wasn’t about some fancy bakery secret or a complicated technique. It was about one simple, almost stupidly easy trick that changed everything. And no, it doesn’t involve a kitchen towel.
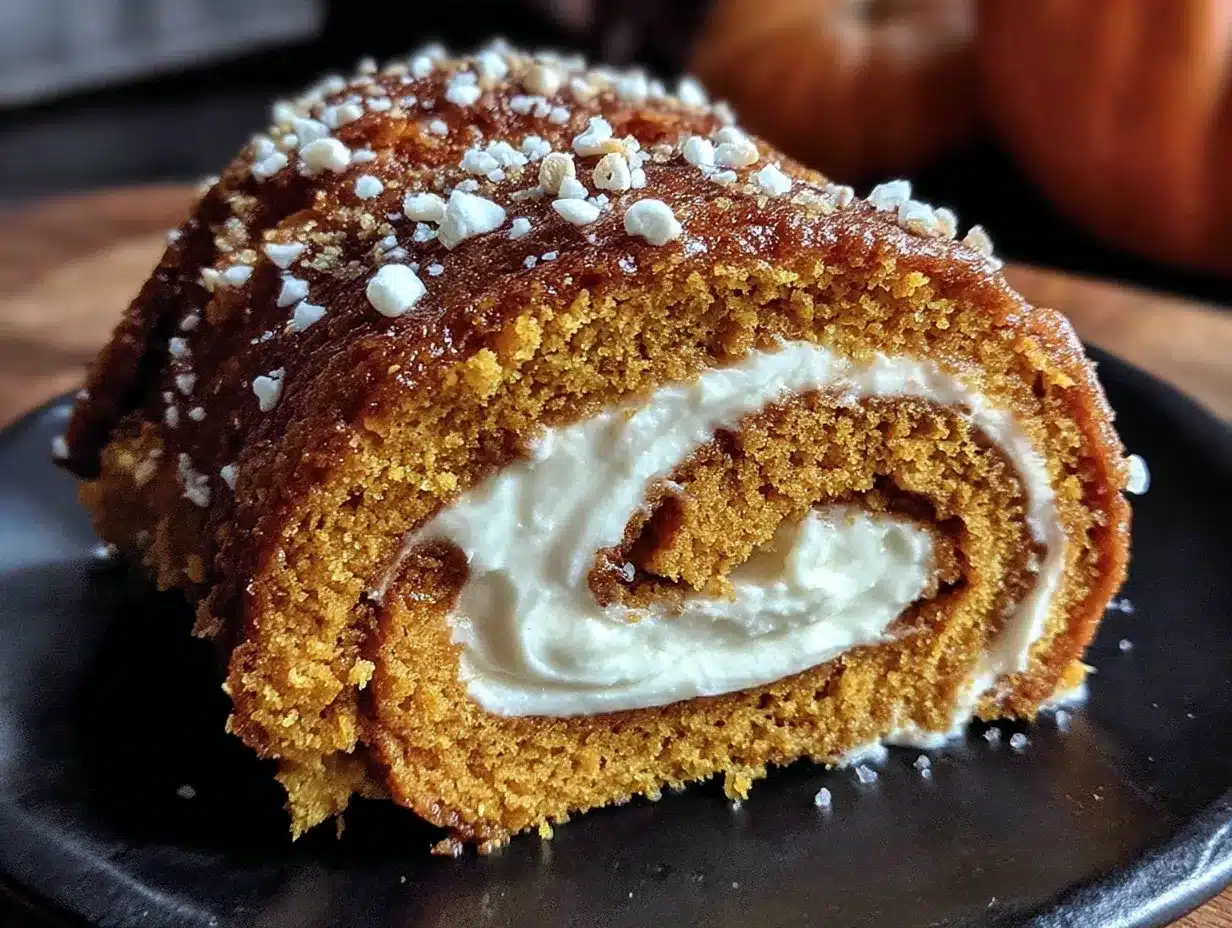
You know that feeling when you want to make something impressive, something that looks like it came from a magazine, but you’re terrified it will fall apart the second you try to roll it? I’ve been there, staring at a perfectly baked pumpkin sheet cake, knowing that the next sixty seconds would determine if I’d be serving a beautiful spiral or a pile of spiced crumbs. This pumpkin roll with cream cheese filling is that dessert. It’s the one that gets the “oohs” and “ahhs” at Thanksgiving, the one that disappears first from the dessert table, and the one people beg you to bring to every fall gathering. But let’s be real—it’s also the one that can make a grown baker cry.
The thing is, a perfect pumpkin roll isn’t about luck. It’s about understanding a few key moments in the process and knowing exactly what to look for. After more test batches than I care to admit (my neighbors were very happy, by the way), I found a method that works every single time. No cracks, no tears, just that gorgeous, tight spiral of spiced pumpkin cake wrapped around a cloud of tangy cream cheese filling. This is the recipe that finally made me feel like I could make anything. And I promise, it will do the same for you.
Why You’ll Love This Recipe
This isn’t just another pumpkin roll recipe floating around the internet. This is the one I developed after months of trial and error, testing everything from different flour ratios to rolling temperatures. I’ve been baking for over a decade, and I’ve learned that the difference between a dessert that’s “good” and one that’s “can-I-have-the-recipe” good is usually just a few small, intentional choices. This recipe is built on those choices.
- No-Crack Guarantee: The method I use here is a game-changer. You will not need to wrestle with a cracked cake or patch it together with frosting. It works because we focus on the cake’s flexibility while it’s still warm.
- Simple Pantry Ingredients: You probably have almost everything you need already. No weird specialty flours or hard-to-find extracts. It’s real, honest baking.
- Perfect for Fall Gatherings: This is the dessert that screams “autumn.” It’s elegant enough for a Thanksgiving table but simple enough for a cozy Sunday night treat.
- Crowd-Pleasing Flavor: The pumpkin cake is perfectly spiced—not too heavy, not too sweet—and the cream cheese filling is that perfect tangy balance that cuts through the richness. Kids and adults both go crazy for it.
- Make-Ahead Magic: This roll actually tastes better the next day. The flavors meld together, and the cake gets even more tender. It’s the perfect stress-free dessert for entertaining.
What makes this recipe different is the specific timing and technique for rolling the cake while it’s still warm, using a clean kitchen towel dusted with powdered sugar. It’s not a new idea, but the way I execute it—letting the cake cool just enough to handle while still retaining its flexibility—is the key. You won’t find a dry, cracked cake here. Just a beautiful, flawless spiral that will make you look like a professional baker.
Honestly, this is the kind of recipe that makes you close your eyes after the first bite. It’s comfort food at its finest—a little bit of nostalgia, a whole lot of flavor, and the satisfaction of knowing you made something truly special.
What Ingredients You Will Need
This recipe uses simple, wholesome ingredients to create that perfect pumpkin roll. Each one plays a specific role in the texture and flavor, so let’s break it down. You might be surprised at how a few pantry staples can come together to make something this beautiful.
For the Pumpkin Cake
- ¾ cup all-purpose flour – Spoon and level it for the most accurate measurement. Too much flour will make the cake dense and prone to cracking.
- 1 teaspoon baking powder – This gives the cake just enough lift to be light but still flexible.
- ½ teaspoon baking soda – Works with the acidity in the pumpkin to create a tender crumb.
- ½ teaspoon salt – Balances the sweetness and enhances all the warm spices.
- 1 teaspoon ground cinnamon – The backbone of the spice blend. I prefer using a fresh jar for the best flavor.
- ½ teaspoon ground ginger – Adds a little warmth and zing.
- ¼ teaspoon ground nutmeg – Freshly grated is amazing here, but pre-ground works perfectly fine.
- ⅛ teaspoon ground cloves – Just a pinch. It’s potent, but it rounds out the spice profile beautifully.
- 1 cup granulated sugar – Provides sweetness and structure.
- 3 large eggs, room temperature – Room temperature eggs incorporate more air into the batter, making the cake lighter. Take them out of the fridge about 30 minutes before you start.
- ⅔ cup canned pumpkin puree – Make sure you get 100% pure pumpkin puree, not pumpkin pie filling. The pie filling has added sugar and spices that will throw off the recipe. I recommend Libby’s for consistent results.
- 1 teaspoon vanilla extract – Adds depth and rounds out the pumpkin flavor.
- Powdered sugar for dusting – You’ll need about ¼ cup for the towel and for rolling. It prevents sticking and adds a touch of sweetness.
For the Cream Cheese Filling
- 8 ounces cream cheese, softened – Full-fat cream cheese is non-negotiable here. Low-fat versions have too much water and will make the filling runny. Let it sit out for at least an hour to soften properly.
- ¼ cup unsalted butter, softened – Adds richness and helps the filling hold its shape. I use Challenge or Kerrygold butter for the best flavor.
- 1 teaspoon vanilla extract – Pure vanilla extract makes a difference here.
- 1 cup powdered sugar, sifted – Sifting prevents any lumps from forming in your smooth filling.
Substitution Guidance: If you need a dairy-free option, you can use a high-quality dairy-free cream cheese and vegan butter, but the texture will be slightly different. For a gluten-free version, swap the all-purpose flour with a 1:1 gluten-free baking flour blend that contains xanthan gum. I’ve had good luck with Bob’s Red Mill 1:1 Baking Flour. The cake will be a bit more delicate, so handle it gently.
Equipment Needed
You don’t need a ton of fancy gadgets for this pumpkin roll, but having the right tools makes the process so much smoother. Here’s what you’ll need:
- 10×15-inch jelly roll pan – This is the standard size for a pumpkin roll. A different size will change the thickness of the cake and affect how it rolls. If you don’t have one, a rimmed baking sheet of similar dimensions will work.
- Parchment paper – This is your best friend for getting the cake out of the pan cleanly. Don’t skip it. I always cut a piece that’s slightly larger than the pan so it comes up the sides a bit.
- Clean kitchen towel – A lint-free cotton or linen towel is ideal. Terry cloth towels can leave fuzz on the cake. I have a specific “pumpkin roll towel” that I only use for this purpose.
- Electric mixer – A hand mixer or stand mixer both work great. You’ll need it for both the cake batter and the filling.
- Rubber spatula – For gently folding the flour mixture into the batter without deflating it.
- Cooling rack – Essential for letting the rolled cake cool completely before filling.
- Sharp knife or serrated knife – For slicing clean slices without smashing the roll.
- Large offset spatula – Makes spreading the cream cheese filling even and easy. A butter knife works in a pinch, but the offset spatula is worth it.
I remember my first pumpkin roll attempt—I used a flimsy baking sheet that warped in the oven, and the cake baked unevenly. A good quality, sturdy jelly roll pan is a worthwhile investment if you plan on making these often. Budget-friendly options at stores like Target or Walmart work just fine, just make sure it’s not too thin.
Preparation Method
Alright, let’s get to the good part. Follow these steps carefully, and you’ll have a perfect pumpkin roll every single time. I’ll walk you through it like we’re in the kitchen together.
- Preheat and Prep: Preheat your oven to 375°F (190°C). Line your 10×15-inch jelly roll pan with parchment paper, letting it hang over the edges by about an inch. Lightly spray the parchment with non-stick cooking spray. This ensures the cake releases perfectly.
- Mix the Dry Ingredients: In a medium bowl, whisk together the flour, baking powder, baking soda, salt, cinnamon, ginger, nutmeg, and cloves. Set this aside. Whisking aerates the flour and ensures the spices are evenly distributed.
- Beat the Eggs and Sugar: In a large bowl, beat the eggs and granulated sugar together with an electric mixer on medium-high speed for about 2-3 minutes. The mixture should become thick, pale, and ribbon-like—when you lift the beaters, the batter should fall back into the bowl in a slow, thick ribbon. This is crucial for the cake’s structure.
- Add the Pumpkin and Vanilla: Beat in the pumpkin puree and vanilla extract on low speed until just combined. Don’t overmix here. You want a uniform batter, but you don’t want to deflate the air you just incorporated.
- Fold in the Dry Ingredients: Gently fold the flour mixture into the wet ingredients using a rubber spatula. Use a light hand and fold just until you no longer see streaks of flour. A few small lumps are okay. Overmixing will develop the gluten and make the cake tough.
- Bake the Cake: Pour the batter into the prepared pan and spread it evenly into the corners with your offset spatula. It will be a thin layer—that’s exactly what you want. Bake for 13-15 minutes, or until the top of the cake springs back when lightly touched. The edges will start to pull away from the pan slightly.
- The No-Crack Rolling Method: This is the most important step. While the cake is baking, lay your clean kitchen towel flat on the counter and dust it generously with powdered sugar. As soon as the cake comes out of the oven, run a knife around the edges to loosen it. Invert the hot cake directly onto the prepared towel. Carefully peel off the parchment paper. Starting at one of the short ends, roll the cake and towel together into a tight log. Roll it while the cake is still hot—this sets the shape and prevents cracks. Let the rolled cake cool completely on a wire rack, seam-side down. This takes about 1-2 hours. Do not unroll it while it’s warm!
- Make the Cream Cheese Filling: While the cake is cooling, make the filling. In a large bowl, beat the softened cream cheese and butter together on medium speed until smooth and creamy, about 2 minutes. Beat in the vanilla extract. Gradually add the sifted powdered sugar, beating on low speed until incorporated, then increase to medium and beat for another 2 minutes until the filling is light and fluffy.
- Assemble the Roll: Once the cake is completely cool, carefully unroll it. It might try to curl back up, that’s normal. Spread the cream cheese filling evenly over the entire surface of the cake, leaving a ½-inch border around the edges. Using the towel to help you, gently re-roll the cake, this time without the towel. Roll it as tightly as you can without squeezing the filling out. Place the roll seam-side down on a serving platter or a piece of plastic wrap.
- Chill and Serve: Wrap the pumpkin roll tightly in plastic wrap and refrigerate for at least 1 hour, or up to overnight. Chilling firms up the filling and makes slicing much easier. Before serving, you can dust the top with a little extra powdered sugar for a beautiful finish.
Sensory Cues: When the cake is done, it should smell incredibly fragrant with pumpkin and spice. The top will be a deep, golden orange and spring back when you gently poke it. When you’re folding the batter, it should be thick and smooth, not runny. If it seems too thin, you might have overmixed or your eggs were too large.
Cooking Tips & Techniques
I’ve made my fair share of mistakes with pumpkin rolls, and I’ve learned something from every single one. Here are the tips that will save you from the same heartache.
The Biggest Mistake: Overbaking. I cannot stress this enough. A pumpkin roll that is overbaked will be dry and brittle. It will crack the moment you try to roll it, no matter how careful you are. Pull the cake out of the oven when it’s just set and springy. The edges might look slightly darker, but the center should still be soft. Trust the 13-15 minute window and check it at 13 minutes. Every oven is different, so get to know yours.
Rolling While Hot is Non-Negotiable. I learned this the hard way. If you let the cake cool flat, it will set in that flat shape and be impossible to roll without cracking. The steam from the hot cake makes it pliable. That initial roll with the towel sets the memory of the cake, so it unrolls and re-rolls beautifully later.
Don’t Skip the Powdered Sugar. Dusting the towel generously with powdered sugar does two things: it prevents the cake from sticking to the towel, and it adds a thin layer of sweetness to the outside of the cake. I’ve tried using a tea towel without sugar, and it was a sticky disaster.
Room Temperature Ingredients Matter. For the filling, cold cream cheese and butter will result in a lumpy, grainy mess. They need to be truly softened to room temperature to cream together smoothly. For the cake, room temperature eggs incorporate more air, giving you a lighter texture. Plan ahead and set everything out an hour before you start baking.
Multitasking Strategy: While the cake is baking, get your towel and powdered sugar ready. While the rolled cake is cooling, make the filling. This way, everything is ready to go when you need it, and you aren’t rushing around at the last minute.
Variations & Adaptations
Once you master the basic pumpkin roll, the possibilities are endless. Here are a few of my favorite twists to keep things interesting.
- Chocolate Pumpkin Roll: Replace ¼ cup of the all-purpose flour with ¼ cup of unsweetened cocoa powder. The chocolate and pumpkin combo is surprisingly delicious and looks stunning with the white cream cheese filling.
- Spiced Maple Cream Cheese Filling: Add 2 tablespoons of pure maple syrup and ¼ teaspoon of maple extract to the cream cheese filling. It adds a whole new layer of autumn flavor that pairs perfectly with the pumpkin.
- Gluten-Free Version: As mentioned, use a 1:1 gluten-free baking flour blend. I’ve also had success using almond flour, but the texture is more delicate, so you need to be extra gentle when rolling.
- Vegan Pumpkin Roll: Use a flax egg (1 tablespoon ground flaxseed mixed with 3 tablespoons water per egg) and a vegan cream cheese and butter for the filling. The cake will be a bit more fragile, but the flavor is still fantastic.
- Pumpkin Roll with Nut Filling: Sprinkle ½ cup of finely chopped pecans or walnuts over the cream cheese filling before rolling. The crunch adds a wonderful texture contrast.
I once made a pumpkin roll with a bourbon-infused cream cheese filling for a holiday party, and it was a huge hit. Just add 1-2 tablespoons of good bourbon to the filling. It adds a warm, sophisticated note that adults will love.
Serving & Storage Suggestions
This pumpkin roll is best served cold, straight from the refrigerator. The filling is firm and the cake is perfectly tender. I like to slice it with a sharp, serrated knife, wiping the blade clean between each cut for the neatest slices.
Presentation Ideas: Dust the top with a little extra powdered sugar just before serving. You can also drizzle a simple caramel sauce over the slices or add a dollop of whipped cream and a sprinkle of cinnamon. For a truly stunning dessert table, arrange the slices on a beautiful platter with fresh cranberries and rosemary sprigs.
Complementary Dishes: This pumpkin roll is wonderful on its own, but it also pairs beautifully with a cup of hot coffee, spiced chai, or a glass of cold milk. It’s a perfect ending to a hearty fall meal like cozy stuffed pepper soup or a simple roast chicken dinner.
Storage Instructions: Store the pumpkin roll tightly wrapped in plastic wrap in the refrigerator for up to 5 days. The flavors actually deepen and meld together over the first 24 hours, so it’s even better the next day. You can also freeze the pumpkin roll for up to 3 months. Wrap it tightly in plastic wrap, then a layer of aluminum foil. Thaw it overnight in the refrigerator before slicing and serving.
Reheating: I actually prefer this roll cold, but if you want a slightly warmer dessert, you can microwave a slice for about 10-15 seconds. Just be careful not to overheat it, or the filling can become runny.
Nutritional Information & Benefits
While this is definitely a treat, it’s not without some redeeming qualities. The pumpkin itself is a nutritional powerhouse.
- Estimated per slice (based on 10 slices): Calories: 320, Fat: 16g, Carbohydrates: 42g, Protein: 5g, Sugar: 32g. These are estimates and will vary based on specific ingredients used.
- Health Benefits of Pumpkin: Pumpkin is packed with vitamin A (beta-carotene), which is great for eye health and immune function. It’s also a good source of fiber and potassium.
- Dietary Considerations: This recipe can be adapted to be gluten-free or vegan as mentioned above. It is not low-carb or keto-friendly due to the sugar and flour.
- Potential Allergens: This recipe contains wheat (gluten), dairy, and eggs. Be sure to check all labels if you are making substitutions for allergies.
I love knowing that even when I’m indulging in a slice of this pumpkin roll, I’m getting a little dose of a superfood. It’s my favorite kind of dessert—one that feels both decadent and a little bit virtuous.
Conclusion
This pumpkin roll with cream cheese filling is more than just a dessert. It’s a statement. It says you took the time, you cared enough to make something beautiful, and you mastered a technique that intimidates even experienced bakers. But with this no-crack method, it becomes approachable, achievable, and honestly, kind of fun.
I love this recipe because it reminds me that sometimes the most impressive things come from the simplest adjustments. It’s not about being a perfect baker; it’s about knowing a few clever tricks. I hope you give this a try and see that beautiful, flawless spiral form right before your eyes. And when it does, I want to hear about it!
Have you tried this recipe? Did it work for you? Did you add your own twist? Drop a comment below and let me know. Share your photos with me on social media—I love seeing your creations. And if you enjoyed this, you might also love making a batch of thick, gooey Levain Bakery copycat cookies for another show-stopping treat. Happy baking, friends!
Frequently Asked Questions
Why did my pumpkin roll crack?
The most common reason is overbaking. If the cake bakes too long, it becomes dry and loses its flexibility. Always check it at the 13-minute mark. Another reason could be that you tried to roll it after it had cooled completely. Rolling while it’s still hot from the oven is essential for preventing cracks.
Can I use fresh pumpkin puree instead of canned?
You can, but I don’t recommend it for this recipe. Fresh pumpkin puree has a much higher water content than canned, which can make the cake soggy and affect its structure. If you must use fresh, you’ll need to strain it through a cheesecloth-lined sieve for several hours to remove as much liquid as possible.
How do I get clean slices without squishing the roll?
Use a sharp serrated knife and use a gentle sawing motion. Wipe the blade clean with a damp paper towel between each slice. Chilling the roll for at least an hour (or overnight) firms up the filling and makes slicing much cleaner.
Can I make this pumpkin roll ahead of time?
Absolutely! In fact, it’s better the next day. You can make the entire roll, wrap it tightly in plastic wrap, and refrigerate it for up to 5 days. You can also freeze it for up to 3 months. Just thaw it overnight in the fridge before serving.
My cream cheese filling is too runny. What went wrong?
This usually happens if the cream cheese or butter wasn’t properly softened, or if you used low-fat cream cheese. Low-fat cream cheese has a higher water content and won’t hold its structure. Make sure both are at room temperature and beat them together until they are light and fluffy before adding the powdered sugar.
Pin This Recipe!
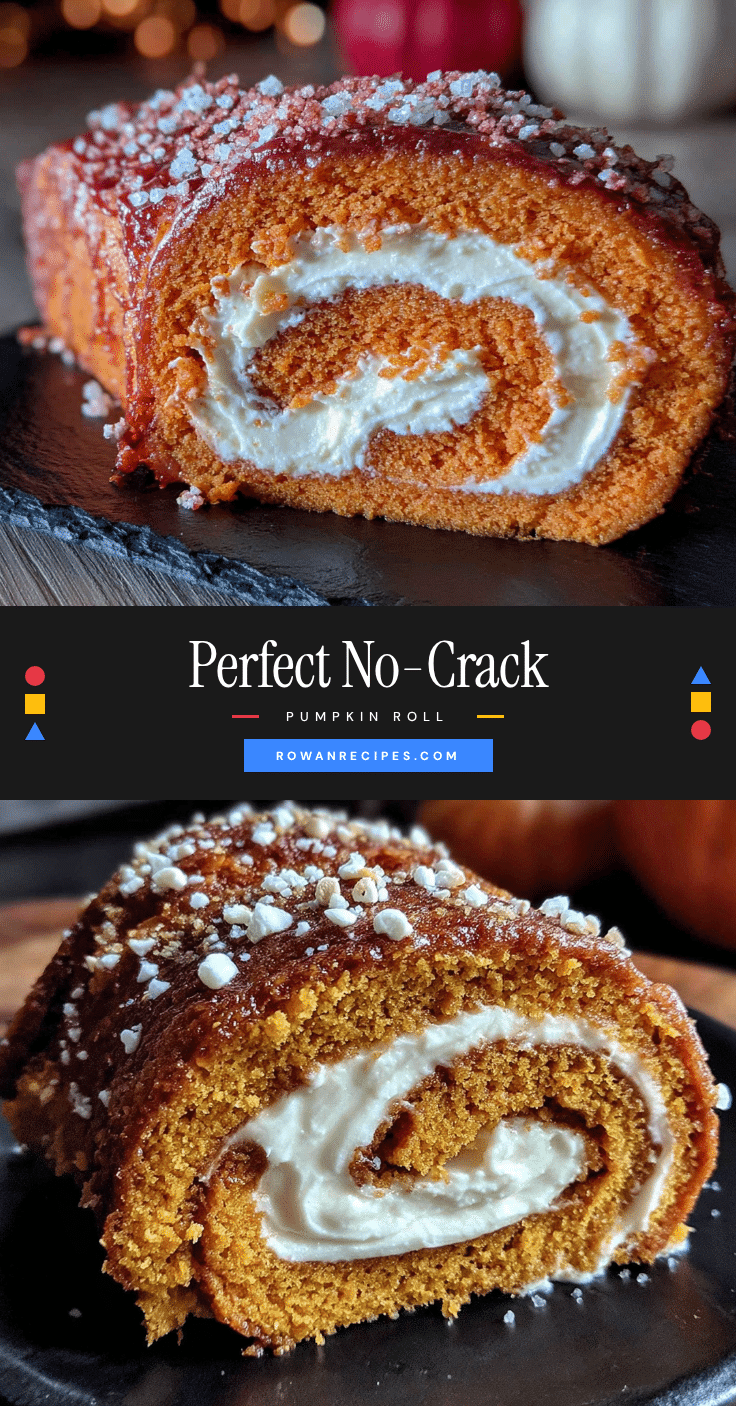
Perfect Pumpkin Roll No-Crack Method Easy Homemade Recipe
This pumpkin roll with cream cheese filling is the dessert that gets the ‘oohs’ and ‘ahhs’ at Thanksgiving. With a no-crack guarantee and simple pantry ingredients, this recipe makes a beautiful, flawless spiral every time.
- Prep Time: 20 minutes
- Cook Time: 15 minutes
- Total Time: 1 hour 35 minutes (includes cooling and chilling)
- Yield: 10 servings 1x
- Category: Dessert
- Cuisine: American
Ingredients
- ¾ cup all-purpose flour
- 1 teaspoon baking powder
- ½ teaspoon baking soda
- ½ teaspoon salt
- 1 teaspoon ground cinnamon
- ½ teaspoon ground ginger
- ¼ teaspoon ground nutmeg
- ⅛ teaspoon ground cloves
- 1 cup granulated sugar
- 3 large eggs, room temperature
- ⅔ cup canned pumpkin puree (100% pure, not pumpkin pie filling)
- 1 teaspoon vanilla extract
- ¼ cup powdered sugar (for dusting)
- 8 ounces cream cheese, softened
- ¼ cup unsalted butter, softened
- 1 teaspoon vanilla extract
- 1 cup powdered sugar, sifted
Instructions
- Preheat your oven to 375°F (190°C). Line a 10×15-inch jelly roll pan with parchment paper, letting it hang over the edges by about an inch. Lightly spray the parchment with non-stick cooking spray.
- In a medium bowl, whisk together the flour, baking powder, baking soda, salt, cinnamon, ginger, nutmeg, and cloves. Set aside.
- In a large bowl, beat the eggs and granulated sugar together with an electric mixer on medium-high speed for about 2-3 minutes until thick, pale, and ribbon-like.
- Beat in the pumpkin puree and vanilla extract on low speed until just combined.
- Gently fold the flour mixture into the wet ingredients using a rubber spatula until just combined. Do not overmix.
- Pour the batter into the prepared pan and spread it evenly. Bake for 13-15 minutes, or until the top springs back when lightly touched.
- While the cake is baking, lay a clean kitchen towel flat on the counter and dust it generously with powdered sugar.
- As soon as the cake comes out of the oven, run a knife around the edges to loosen it. Invert the hot cake directly onto the prepared towel. Carefully peel off the parchment paper.
- Starting at one of the short ends, roll the cake and towel together into a tight log. Let the rolled cake cool completely on a wire rack, seam-side down, for 1-2 hours.
- While the cake is cooling, make the filling: In a large bowl, beat the softened cream cheese and butter together on medium speed until smooth and creamy, about 2 minutes. Beat in the vanilla extract. Gradually add the sifted powdered sugar, beating on low until incorporated, then increase to medium and beat for another 2 minutes until light and fluffy.
- Once the cake is completely cool, carefully unroll it. Spread the cream cheese filling evenly over the entire surface, leaving a ½-inch border around the edges.
- Using the towel to help you, gently re-roll the cake without the towel, rolling as tightly as possible without squeezing out the filling. Place seam-side down on a serving platter.
- Wrap the pumpkin roll tightly in plastic wrap and refrigerate for at least 1 hour, or up to overnight. Before serving, dust with extra powdered sugar if desired.
Notes
Roll the cake while it is still hot from the oven to prevent cracks. Use full-fat cream cheese for the filling to avoid a runny consistency. The pumpkin roll tastes even better the next day. For a gluten-free version, use a 1:1 gluten-free baking flour blend. For a dairy-free version, use high-quality dairy-free cream cheese and vegan butter.
Nutrition
- Serving Size: 1 slice
- Calories: 320
- Sugar: 32
- Sodium: 280
- Fat: 16
- Saturated Fat: 9
- Carbohydrates: 42
- Fiber: 2
- Protein: 5
Keywords: pumpkin roll, pumpkin dessert, fall dessert, Thanksgiving dessert, no-crack pumpkin roll, cream cheese filling, pumpkin cake roll