The first time I attempted this fluffy foolproof crepe cake with whipped cream layers, I was honestly skeptical. Crepes have always seemed a bit intimidating—thin, delicate, requiring that perfect wrist flick. But one evening, with too much leftover batter from a rushed brunch and a fridge full of whipping cream, I decided to stack those crepes with clouds of lightly sweetened whipped cream, just to see what would happen. What happened was pure magic.
At first, the crepes looked a little uneven and the layers weren’t perfectly slick, but that didn’t matter. Each bite was a soft, pillowy hug with just the right touch of sweetness and creaminess. It turned out to be the dessert that made me rethink what “easy” can mean in the kitchen. Since then, this crepe cake has become my go-to for unexpected guests—or when I just want to impress without the fuss. Layers of airy crepes and whipped cream feel fancy but come together without stress, and honestly, the subtle vanilla notes make it feel like a little celebration every time.
What’s funny is how one accidental extra batch of crepes turned into a cake that friends started asking for again and again—there’s something about that soft texture and creamy layers that just sticks with you. No fancy equipment, no complicated fillings, just simple ingredients that you probably have right now. For me, it’s that quiet realization that sometimes the best desserts are the ones that don’t need to be perfect to be unforgettable.
Why You’ll Love This Fluffy Foolproof Crepe Cake Recipe
After perfecting this fluffy foolproof crepe cake with whipped cream layers over several weekends and a handful of late-night experiments, I’m confident it stands out in a crowded world of layered desserts. Here’s why this recipe has earned a permanent spot in my recipe box:
- Quick & Easy: The batter comes together in under 15 minutes, and crepes cook in just a couple of minutes each. Perfect for busy evenings or last-minute celebrations.
- Simple Ingredients: No need to hunt down exotic items—just eggs, flour, milk, sugar, and cream. Pantry staples that you likely already have.
- Perfect for Any Occasion: Whether it’s a casual weekend brunch or a special dessert for a holiday gathering, this crepe cake fits right in without fuss.
- Crowd-Pleaser: Kids, adults, picky eaters—everyone loves the fluffy layers combined with smooth whipped cream.
- Unbelievably Delicious: The light vanilla-scented crepes paired with lightly sweetened, airy whipped cream make every bite melt in your mouth. It’s comfort food with a delicate twist.
What sets this apart? It’s the technique of folding the batter just enough to keep it airy and the secret to perfectly whipped cream that holds its shape but isn’t heavy. Plus, layering the crepes while they’re still slightly warm helps them meld together gently without sliding apart. It’s not just another crepe cake—it’s the one that got me hooked and keeps me coming back.
Honestly, it feels like a little piece of calm and indulgence after a hectic day—no stress, just simple pleasure. If you’ve ever felt nervous about making crepes, this recipe will quietly change your mind.
What Ingredients You Will Need
This recipe sticks to simple, wholesome ingredients that deliver a soft, tender crepe and a fluffy whipped cream filling. Most are pantry staples, and substitutions are easy if you’re adapting for dietary needs.
- For the Crepe Batter:
- All-purpose flour – 1 cup (120g), sifted for smooth batter
- Eggs – 3 large, room temperature (helps create a lighter texture)
- Whole milk – 1 1/4 cups (300ml), you can use almond or oat milk for dairy-free
- Sugar – 2 tablespoons, adds a subtle sweetness
- Unsalted butter – 2 tablespoons, melted and slightly cooled (I prefer Kerrygold for richness)
- Vanilla extract – 1 teaspoon, for that gentle aromatic touch
- Salt – 1/4 teaspoon, balances sweetness
- For the Whipped Cream Layers:
- Heavy whipping cream – 2 cups (480ml), cold (chilled cream whips best)
- Powdered sugar – 3 tablespoons, sifted (for smooth sweetness)
- Vanilla extract – 1 teaspoon, to complement the crepes
If you’re looking to make this gluten-free, swapping all-purpose flour with a 1:1 gluten-free baking flour works well—just make sure it contains xanthan gum for structure. For a dairy-free option, use coconut cream whipped to stiff peaks instead of heavy cream, and your preferred plant-based milk in the batter.
Pro tip: Fresh, cold eggs and milk at room temperature make the batter silkier and the crepes more tender. I keep my eggs out for 30 minutes before mixing.
Equipment Needed
- Non-stick crepe pan or a 8-10 inch (20-25 cm) skillet – a flat bottom is best for even cooking
- Mixing bowls – medium and large, preferably glass or metal for whipping cream
- Whisk or electric mixer – electric mixer speeds up whipping cream, but a sturdy whisk works fine if you have the patience
- Measuring cups and spoons – for accurate ingredients
- Spatula – thin and flexible for flipping crepes gently
- Ladle or 1/4 cup (60ml) measuring cup – for pouring batter evenly
- Cooling rack or plate – to stack crepes and cool slightly before assembling
If you don’t have a crepe pan, a regular non-stick skillet works just fine—just make sure it heats evenly. I’ve found that a silicone spatula helps flip crepes without tearing, especially when you’re new to it. For whipping cream, a chilled metal bowl speeds things up, and if you don’t have an electric mixer, resting your arm and pacing yourself with a balloon whisk is the way to go.
Preparation Method

- Prepare the batter: In a medium bowl, whisk together the sifted flour, sugar, and salt. In a separate large bowl, beat the eggs lightly. Gradually add the milk and vanilla extract to the eggs, mixing gently.
- Combine wet and dry: Slowly pour the wet mixture into the dry ingredients while whisking continuously to avoid lumps. Once smooth, stir in the melted butter. The batter should be thin and pourable—if too thick, add a splash more milk. Let it rest 20-30 minutes at room temperature; this helps the flour absorb liquids and relaxes gluten for tender crepes.
- Cook the crepes: Heat your non-stick pan over medium heat and lightly grease with butter or oil using a paper towel. Pour about 1/4 cup (60ml) of batter into the pan, tilting and swirling to cover the surface evenly. Cook for 1-2 minutes until edges lift slightly and the bottom is golden. Flip carefully with a spatula and cook for another 30 seconds. Transfer to a plate and let cool slightly. Repeat until all batter is used (about 12-15 crepes).
- Whip the cream: Chill your mixing bowl and beaters in the fridge for 10 minutes before whipping. Pour the cold heavy cream into the bowl, add vanilla and powdered sugar, then beat on medium-high speed until soft peaks form. Be careful not to overwhip—stop when the cream holds its shape but is still smooth.
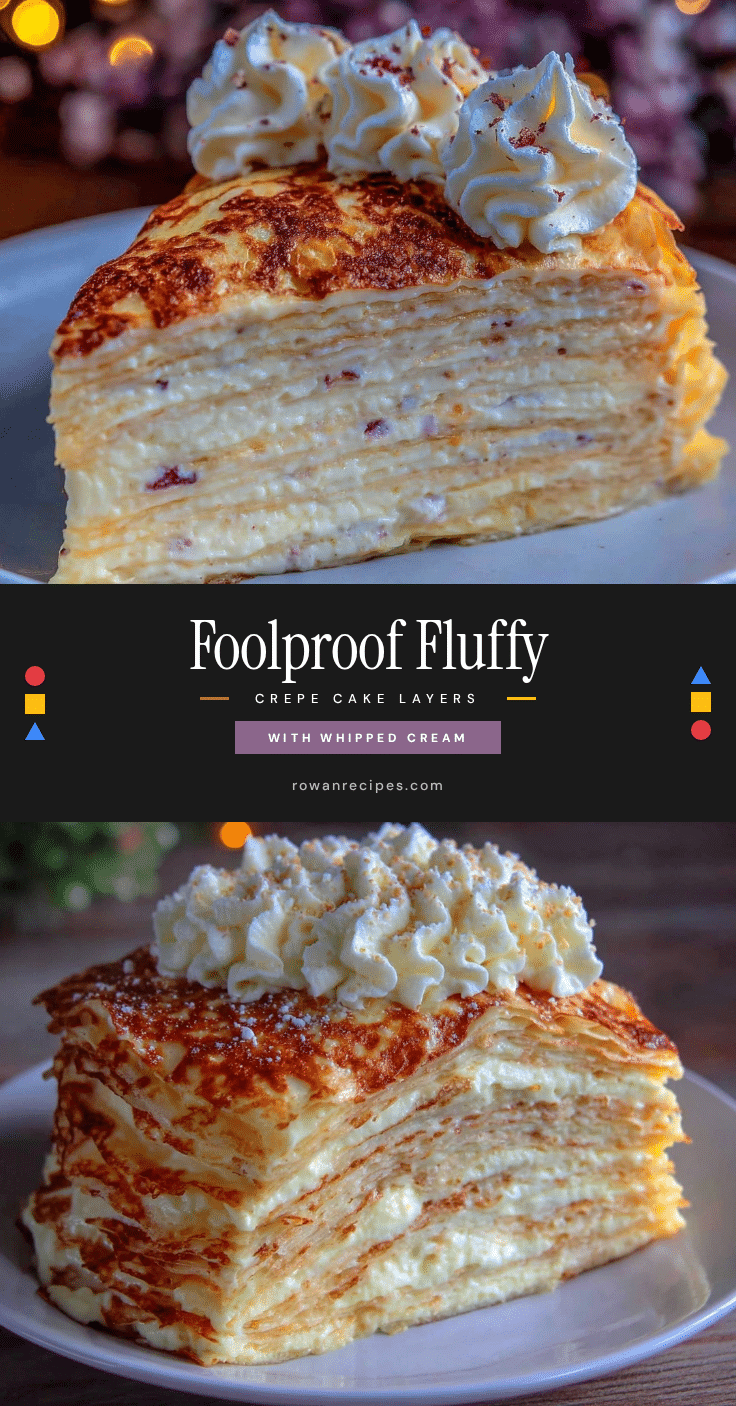
- Assemble the cake: On a serving plate, place one crepe and spread a thin, even layer of whipped cream (about 2 tablespoons). Continue layering crepes and whipped cream, gently pressing down as you go to keep the cake stable. The final crepe should be topped with a generous layer of cream.
- Chill and serve: For best results, refrigerate the crepe cake for at least 1 hour before slicing. This lets the layers meld together and makes cutting easier. Use a sharp serrated knife, wiping between cuts if needed.
Watch for spots where the batter may pool—swirling quickly right after pouring helps keep crepes thin and even. If crepes tear, don’t sweat it—they’re going under layers of cream anyway!
Cooking Tips & Techniques
Making crepes might seem tricky, but a few tips make all the difference. First, letting the batter rest is key to avoiding rubbery crepes. It gives the flour time to hydrate fully and results in tender, flexible layers.
Temperature control is everything. Medium heat works best; too hot and crepes burn before they cook through, too low and they dry out or stick. I learned the hard way that patience beats rushing here—wait for the pan to heat evenly.
When flipping, use a thin, flexible spatula and lift gently from the edges. If you’re nervous, try sliding the spatula under the crepe completely before flipping it in one smooth motion.
Whipping cream requires cold tools—warm bowls or beaters can slow the process and cause the cream to turn buttery. Keep an eye on the texture; soft peaks hold their shape but still look glossy.
Stacking the cake while crepes are still slightly warm helps them adhere better without sliding. If your layers separate, a gentle press with your hands or a spatula fixes it right up.
Lastly, slice the cake with a serrated knife to keep edges neat, and don’t rush the chilling step—it really brings the flavors and textures together.
Variations & Adaptations
This fluffy foolproof crepe cake is a fantastic base for creativity. Here are some ways to switch it up:
- Fruit Layers: Add fresh berries, sliced bananas, or thin apple slices between whipped cream layers for natural sweetness and texture.
- Chocolate Twist: Mix 2 tablespoons of cocoa powder into the crepe batter for chocolate crepes, or fold in mini chocolate chips into the whipped cream.
- Dairy-Free Version: Use coconut milk in the batter and whip chilled coconut cream as the filling. It’s a tropical treat that’s just as fluffy.
- Nutty Flavor: Sprinkle crushed toasted hazelnuts or almonds between layers for crunch and a subtle nutty note.
- Seasonal Spice: Add a pinch of cinnamon or cardamom to the batter for warmth, perfect for fall or winter celebrations.
Personally, I once tried layering the cake with a thin spread of homemade lemon curd under the whipped cream for a bright, tangy surprise. It was a hit and added just the right zing.
Serving & Storage Suggestions
This crepe cake is best served chilled or at room temperature. The cream softens slightly after sitting out for 10-15 minutes, making each slice melt in your mouth. For a beautiful presentation, dust the top with powdered sugar or garnish with fresh fruit and mint leaves.
Pair this cake with a cup of coffee, tea, or a light dessert wine for a cozy afternoon treat or elegant finish to a meal.
Store leftovers covered tightly in the fridge for up to 3 days. The flavors actually deepen after a day, but the crepes can start to soften too much after that.
If you want to prepare ahead, assemble the cake and freeze it wrapped well in plastic wrap and foil for up to 1 month. Thaw overnight in the fridge and gently refresh the whipped cream topping before serving.
This cake travels well for potlucks or picnics, just keep it chilled until serving.
Nutritional Information & Benefits
Each slice (assuming 12 servings) of this crepe cake contains approximately 220 calories, 8g of fat, 28g of carbohydrates, and 5g of protein. The recipe offers a moderate amount of calcium and vitamin A from the milk and cream.
Using whole milk and real cream means this dessert provides some fat-soluble vitamins and a satisfying source of energy. The recipe can be modified to lower fat by swapping half the cream for Greek yogurt, which also adds protein.
This recipe is naturally gluten-containing but can be adapted with gluten-free flour blends for those with sensitivities. It’s free from nuts unless you add them yourself, making it suitable for most diets.
Enjoying this crepe cake in moderation fits well within a balanced diet, offering a delightful treat that feels indulgent without being overly heavy.
Conclusion
This fluffy foolproof crepe cake with whipped cream layers is one of those recipes that quietly wins you over with its simplicity and charm. It’s approachable enough for a weeknight experiment yet impressive enough for guests. I love how it balances lightness and richness in every bite, making it a dessert I keep coming back to.
Feel free to make it your own—add flavors, fruits, or textures that speak to you. Just remember the basics: tender crepes, soft whipped cream, and a little patience. You’ll be surprised how easily it all comes together.
Give it a try, and if you’ve enjoyed recipes like creamy garlic butter Tuscan shrimp or the cozy stuffed pepper soup from this site, this crepe cake will fit right into your repertoire. I’d love to hear how you customize it or your tips for getting those crepes just right!
Here’s to sweet moments and easy homemade treats that bring a little joy to your day.
Frequently Asked Questions
- Can I make the crepes ahead of time?
Yes, crepes can be made a day ahead and stored in an airtight container in the fridge. Layer parchment paper between them to prevent sticking. - How do I prevent crepes from tearing?
Use a non-stick pan, lightly grease, and cook over medium heat. Avoid flipping too early; wait until the edges lift easily. - What if my whipped cream doesn’t thicken?
Make sure your cream and mixing bowl are cold. If it still doesn’t thicken, it may be expired or too warm; try chilling everything longer. - Can I substitute heavy cream with something lighter?
You can use mascarpone whipped with a little milk or Greek yogurt, but the texture will be denser and less fluffy. - How should I slice the crepe cake for clean pieces?
Use a sharp serrated knife and wipe it clean between cuts. Chill the cake well before slicing to firm up the layers.
Pin This Recipe!
Fluffy Foolproof Crepe Cake Recipe Easy Step-by-Step with Whipped Cream Layers

A simple and easy crepe cake recipe featuring layers of airy vanilla-scented crepes and lightly sweetened whipped cream. Perfect for any occasion, this dessert is both impressive and fuss-free.
- Prep Time: 15 minutes
- Cook Time: 30 minutes
- Total Time: 1 hour 45 minutes
- Yield: 12 servings 1x
- Category: Dessert
- Cuisine: French
Ingredients
- 1 cup (120g) all-purpose flour, sifted
- 3 large eggs, room temperature
- 1 1/4 cups (300ml) whole milk (or almond/oat milk for dairy-free)
- 2 tablespoons sugar
- 2 tablespoons unsalted butter, melted and slightly cooled
- 1 teaspoon vanilla extract
- 1/4 teaspoon salt
- 2 cups (480ml) heavy whipping cream, cold
- 3 tablespoons powdered sugar, sifted
- 1 teaspoon vanilla extract
Instructions
- Prepare the batter: In a medium bowl, whisk together the sifted flour, sugar, and salt. In a separate large bowl, beat the eggs lightly. Gradually add the milk and vanilla extract to the eggs, mixing gently.
- Combine wet and dry: Slowly pour the wet mixture into the dry ingredients while whisking continuously to avoid lumps. Once smooth, stir in the melted butter. The batter should be thin and pourable—if too thick, add a splash more milk. Let it rest 20-30 minutes at room temperature.
- Cook the crepes: Heat your non-stick pan over medium heat and lightly grease with butter or oil using a paper towel. Pour about 1/4 cup (60ml) of batter into the pan, tilting and swirling to cover the surface evenly. Cook for 1-2 minutes until edges lift slightly and the bottom is golden. Flip carefully with a spatula and cook for another 30 seconds. Transfer to a plate and let cool slightly. Repeat until all batter is used (about 12-15 crepes).
- Whip the cream: Chill your mixing bowl and beaters in the fridge for 10 minutes before whipping. Pour the cold heavy cream into the bowl, add vanilla and powdered sugar, then beat on medium-high speed until soft peaks form. Stop when the cream holds its shape but is still smooth.
- Assemble the cake: On a serving plate, place one crepe and spread a thin, even layer of whipped cream (about 2 tablespoons). Continue layering crepes and whipped cream, gently pressing down as you go to keep the cake stable. Top the final crepe with a generous layer of cream.
- Chill and serve: Refrigerate the crepe cake for at least 1 hour before slicing. Use a sharp serrated knife, wiping between cuts if needed.
Notes
Let the batter rest 20-30 minutes for tender crepes. Use medium heat to avoid burning. Chill bowl and beaters before whipping cream. Stack crepes while slightly warm to help layers meld. Use a serrated knife for clean slices. Cake can be made ahead and refrigerated or frozen.
Nutrition
- Serving Size: 1 slice (1/12 of cak
- Calories: 220
- Fat: 8
- Carbohydrates: 28
- Protein: 5
Keywords: crepe cake, whipped cream, easy dessert, layered cake, vanilla crepes, fluffy crepes, foolproof crepe recipe