The first time I made this decadent espresso tiramisu cheesecake delight, it wasn’t some grand plan or fancy occasion—honestly, it was a “let’s just try this” moment after a long, messy day. I was craving that rich coffee kick from tiramisu but didn’t want to fuss with soaking ladyfingers or layering delicate mascarpone. What if I could bring that creamy, dreamy tiramisu vibe into a cheesecake form? It started as a little experiment in my quiet kitchen, the hum of the espresso machine buzzing softly as I blended cream cheese and whipped mascarpone together.
At first, I was skeptical—could this really pull off the classic tiramisu charm but with a cheesecake’s velvety texture? The answer came with the first forkful: a luscious, slightly boozy espresso flavor swirled into smooth cheesecake, with a hint of cocoa dusted on top. It was unlike any dessert I’d made before—comforting yet sophisticated, indulgent but surprisingly easy to assemble. Since then, I’ve found myself baking this cheesecake more times than I can count, often bringing it to friends’ dinners or savoring it on lazy weekend afternoons paired with a strong cup of coffee.
This espresso tiramisu cheesecake delight has stuck with me because it’s that rare dessert that feels like a treat and a hug all at once. It’s perfect for those moments when you want something a little special without the fuss. Plus, the way the espresso seeps into the crust and the cheesecake layers is pure magic. Honestly, if you appreciate a good coffee dessert, this recipe will quickly become a favorite to turn to—whether it’s for impressing guests or just treating yourself after a hectic day.
It’s a quiet little joy that I’m excited to share—no fancy tricks, just rich flavor and smooth texture that stick with you long after the last bite.
Why You’ll Love This Decadent Espresso Tiramisu Cheesecake Delight
You know, not every cheesecake recipe hits the mark the way this one does. After testing and tweaking this espresso tiramisu cheesecake delight multiple times, I can honestly say it stands out for all the right reasons:
- Quick & Easy: You can pull this creamy cheesecake together in under 45 minutes, making it doable even on busy evenings or when last-minute guests pop by.
- Simple Ingredients: No need for exotic pantry hunts—just everyday staples like cream cheese, espresso, mascarpone, and a few extras you probably already have.
- Perfect for Special Occasions: Whether it’s a dinner party, holiday gathering, or a quiet weekend treat, this cheesecake delivers that wow factor without stress.
- Crowd-Pleaser: I’ve served this at family get-togethers and potlucks, and it consistently disappears fast—kids and adults both love it.
- Unbelievably Delicious: The marriage of espresso’s bold bitterness and the cheesecake’s silky sweetness is a match made in dessert heaven.
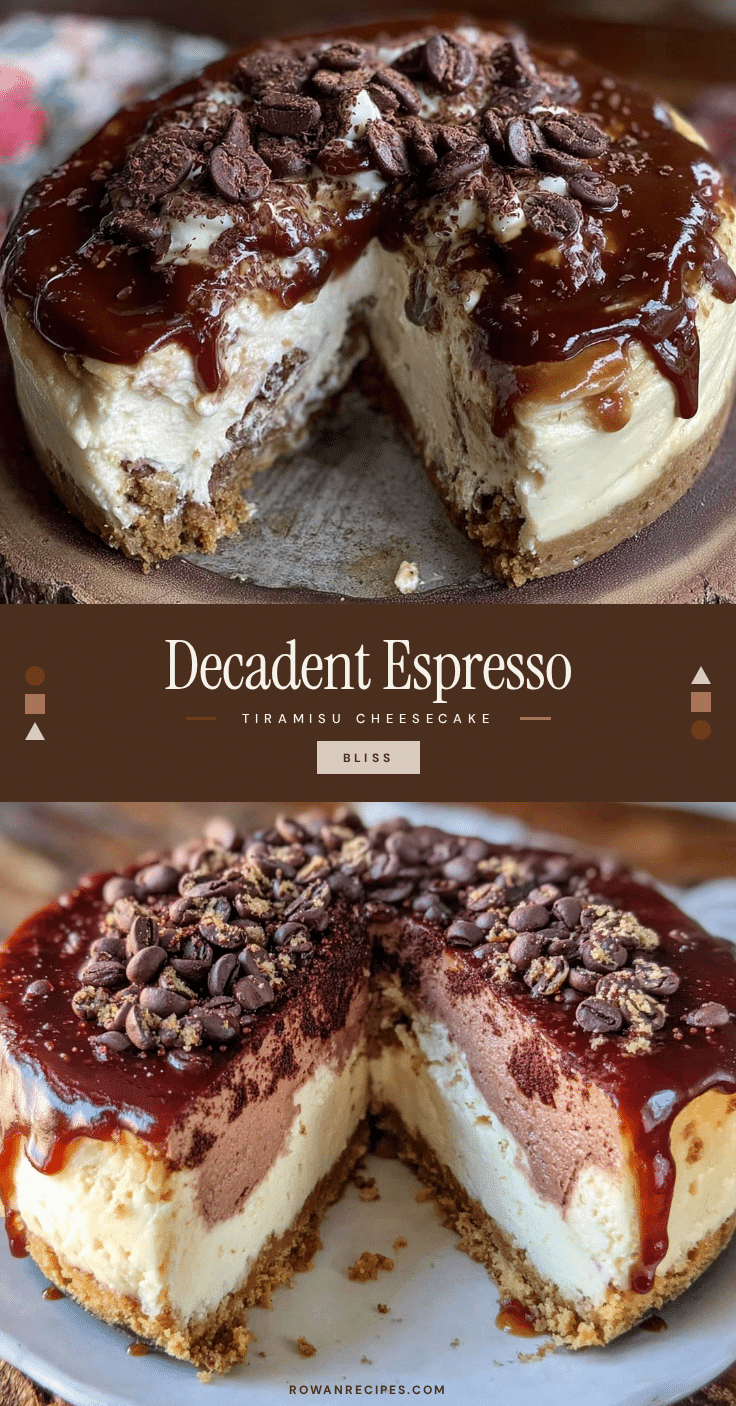
What really makes this recipe shine is the layering technique I settled on—infusing the crust with espresso powder and folding mascarpone into the cheesecake batter for that authentic tiramisu richness. This isn’t just another coffee cheesecake; it’s a dessert that captures tiramisu’s soul in a sliceable form. I even swapped out traditional ladyfingers for a buttery, espresso-kissed crust that stays perfectly crisp under the creamy layers.
Honestly, every bite feels like closing your eyes in contentment after a long day. It’s indulgent without being over-the-top, which is why I keep coming back to it. And if you ever need a break from savory dinners like the creamy cheesy taco pasta or something with a little more zest like the sheet pan honey mustard chicken, this cheesecake is just the sweet finish you’re craving.
What Ingredients You Will Need for Decadent Espresso Tiramisu Cheesecake Delight
This recipe uses simple, wholesome ingredients to deliver bold espresso flavor and that satisfying tiramisu texture without the fuss. Most items are pantry staples, and you can easily swap a few if needed.
- For the Crust:
- 1 ½ cups (150g) graham cracker crumbs or digestive biscuits, finely crushed
- 2 tbsp instant espresso powder (for that bold coffee kick)
- ¼ cup (50g) granulated sugar
- 6 tbsp (85g) unsalted butter, melted (adds richness and holds crust together)
- For the Cheesecake Filling:
- 16 oz (450g) cream cheese, softened (I recommend Philadelphia for best texture)
- 8 oz (225g) mascarpone cheese, room temperature (key for that tiramisu creaminess)
- ¾ cup (150g) granulated sugar
- 3 large eggs, room temperature
- 2 tbsp all-purpose flour (helps with structure)
- 2 tbsp strong brewed espresso, cooled (adds authentic coffee flavor)
- 1 tsp vanilla extract
- 2 tbsp coffee liqueur or Marsala wine (optional, but gives that traditional tiramisu touch)
- For the Topping:
- Unsweetened cocoa powder, for dusting
- Dark chocolate shavings or curls (optional garnish)
If you want to make this gluten-free, almond flour works beautifully in place of graham cracker crumbs. For a dairy-free twist, swap cream cheese and mascarpone with coconut cream-based alternatives, but honestly, the texture won’t be quite the same. When I make this in summer, I sometimes add a handful of fresh raspberries on top—an unexpectedly delightful contrast to the rich coffee flavors.
Equipment Needed
- 9-inch (23 cm) springform pan: Essential for easy removal of the cheesecake without damaging its delicate edges.
- Electric mixer or stand mixer: To thoroughly blend cream cheese and mascarpone into a smooth, lump-free batter.
- Mixing bowls: One or two medium-sized bowls for crust and filling preparation.
- Measuring cups and spoons: For precise ingredient amounts—the key to cheesecake success.
- Spatula: Silicone spatula for folding ingredients gently without deflating the batter.
- Wire rack: To cool the cheesecake properly after baking.
If you don’t have a springform pan, a regular cake pan lined with parchment paper can work—but be extra careful when removing the cheesecake. Also, I’ve used both handheld and stand mixers for this recipe; the stand mixer makes it easier to get that perfectly smooth batter, but a handheld one does the job fine if you’re patient. A quick tip: keep your mascarpone at room temperature so it blends effortlessly without lumps.
Preparation Method

- Preheat the oven: Set it to 325°F (160°C). Grease your 9-inch springform pan and line the bottom with parchment paper for easier release.
- Make the crust: In a medium bowl, mix the graham cracker crumbs, instant espresso powder, sugar, and melted butter until the mixture feels like wet sand. Press this firmly into the bottom of the pan, using the back of a spoon or a flat-bottomed glass. Bake for 10 minutes, then remove and let it cool slightly while you prepare the filling.
- Prepare the filling: In your mixer bowl, beat the softened cream cheese and mascarpone together until silky smooth and lump-free, about 3 minutes. Gradually add sugar and continue beating until fully incorporated. Add eggs one at a time, beating gently after each addition. Stir in flour, espresso, vanilla, and coffee liqueur (if using). Avoid overmixing at this stage to keep the batter airy and not dense.
- Assemble and bake: Pour the filling over the cooled crust and smooth the top with a spatula. Bake for 50-60 minutes. The edges should look set, but the center will still jiggle slightly when you gently shake the pan—this signals perfect creamy texture after chilling.
- Cool and chill: Let the cheesecake cool on a wire rack for about an hour. Then refrigerate for at least 4 hours, preferably overnight, to let flavors meld and the texture firm up beautifully.
- Finish with topping: Just before serving, dust the top generously with unsweetened cocoa powder and scatter dark chocolate shavings for a little extra decadence.
If you spot cracks forming on top, don’t worry—dusting cocoa powder and serving chilled usually hides them well. For a smooth finish, you can run a hot knife around the edges before loosening the springform pan. Trust me, the texture here is worth the wait.
Cooking Tips & Techniques
One thing I learned the hard way is never to rush the chilling process. Cheesecake needs time to set properly, especially when you’re blending mascarpone and espresso for that tiramisu effect. Otherwise, you risk a runny mess instead of that creamy delight.
When mixing the batter, scrape the sides of your bowl frequently to avoid lumps and ensure an even blend. Also, don’t be tempted to overbeat once the eggs are added—it can introduce too much air and cause cracking during baking.
Using room temperature ingredients is a game changer here. Cold cream cheese or mascarpone makes mixing a chore and often leads to uneven texture. Letting eggs sit out for about 30 minutes before starting helps, too.
For the espresso flavor, I recommend brewing strong espresso or using a good quality instant espresso powder—not just regular coffee. It gives that deep roast punch without watering down the batter. When dusting cocoa on top, use a fine mesh sieve to avoid clumps.
Finally, if you want a neater slice, dip your knife in hot water and wipe it clean between cuts. It’s a small step but makes serving this cheesecake feel a little more elegant—perfect if you’re bringing it to a party.
Variations & Adaptations
This espresso tiramisu cheesecake delight can be customized in a few fun ways to suit your cravings or dietary needs:
- Chocolate Lover’s Version: Fold in ½ cup (85g) of mini chocolate chips or finely chopped bittersweet chocolate into the filling for extra richness. Swap the cocoa dusting for a drizzle of chocolate ganache.
- Alcohol-Free Option: Simply leave out the coffee liqueur or Marsala wine and replace with an equal amount of brewed espresso or strong coffee. The flavor remains vibrant and kid-friendly.
- Low-Carb Adaptation: Use almond flour for the crust and a sugar substitute like erythritol in the filling. I’ve tried this version and it keeps the cheesecake creamy while cutting carbs.
- Seasonal Twist: Add a layer of fresh sliced strawberries or raspberries between the crust and filling for a pop of bright color and tartness that pairs wonderfully with coffee notes.
Personally, I’ve made a version where I swapped out the crust for crumbled chocolate cookies—talk about decadent! It’s perfect if you love a rich chocolate and coffee combo. You can also turn this into mini cheesecakes by baking in muffin tins lined with cupcake papers, great for parties or portion control.
Serving & Storage Suggestions
This espresso tiramisu cheesecake delight is best served chilled, straight from the fridge, so the layers hold their shape and the flavors are fully developed. I like slicing it into generous wedges and pairing it with a dollop of lightly whipped cream or a scoop of vanilla bean ice cream on the side.
It pairs beautifully with a simple espresso or a creamy cappuccino, making it a perfect after-dinner treat or weekend indulgence. For a little contrast, fresh berries on the side add a fresh note that cuts through the richness.
Store leftovers in an airtight container in the refrigerator for up to 4 days. The flavor actually deepens after a day or two, so if you can wait, it’s worth it! This cheesecake also freezes well—wrap slices tightly in plastic wrap and foil, and freeze for up to 2 months. Thaw overnight in the fridge before serving.
When reheating, I wouldn’t recommend it—this cheesecake shines cold. But if you want to soften it a bit, let it sit at room temperature for 20-30 minutes before serving. The texture will be creamy, not melted.
Nutritional Information & Benefits
Each slice of this decadent espresso tiramisu cheesecake delight provides a balanced energy boost with protein from cream cheese and mascarpone, plus antioxidants from the espresso and cocoa. The espresso adds a natural metabolism lift and mood enhancement without excess sugar.
Here’s an approximate breakdown per slice (based on 12 servings):
| Calories | 320 |
|---|---|
| Protein | 7g |
| Fat | 24g |
| Carbohydrates | 18g |
| Sugar | 13g |
This recipe is naturally gluten-containing unless you swap the crust, and contains dairy and eggs, so not suitable for vegan or dairy-free diets without substitutions. From a wellness perspective, it’s a treat worth savoring mindfully—perfect as an occasional indulgence that satisfies coffee and dessert cravings in one.
Conclusion
This decadent espresso tiramisu cheesecake delight is one of those recipes that quickly became a staple in my dessert repertoire. It’s approachable, packed with rich coffee flavor, and smooth enough to please even the fussiest cheesecake fans. The balance between the espresso-infused crust and the creamy mascarpone-cheesecake filling is a little slice of heaven that I find impossible to resist.
I encourage you to make it your own—try swapping toppings, tweaking sweetness, or even turning it into mini cheesecakes for sharing. It’s a recipe that invites creativity without demanding perfection.
For me, this cheesecake feels like a warm coffeehouse hug on a plate, and I hope it brings you that same cozy satisfaction. After all, desserts are best when they’re made with a little love and a lot of flavor.
Would love to hear how your version turns out or any fun twists you try—drop a comment or share your photos if you feel like it!
FAQs About Decadent Espresso Tiramisu Cheesecake Delight
Can I make this espresso tiramisu cheesecake ahead of time?
Absolutely! It actually tastes better after chilling overnight, which gives the flavors time to meld and the texture to firm up perfectly.
What if I don’t have mascarpone cheese?
You can substitute an equal amount of additional cream cheese, but mascarpone adds that signature silky tiramisu texture and richness that’s hard to replicate.
How do I avoid cracks on the cheesecake surface?
Don’t overmix the batter, bake at a moderate temperature (325°F/160°C), and avoid sudden temperature changes. Cooling the cheesecake gradually and not opening the oven door during baking helps too.
Is there an alcohol-free version of this recipe?
Yes! Just skip the coffee liqueur or Marsala wine and replace with extra brewed espresso or strong coffee for the same depth of flavor without the alcohol.
Can I use instant coffee instead of espresso?
Instant espresso powder is best since it’s more concentrated and less bitter than regular instant coffee. If you’re using instant coffee, use a bit less and taste as you go to avoid overpowering bitterness.
Pin This Recipe!
Decadent Espresso Tiramisu Cheesecake
A rich and creamy espresso tiramisu cheesecake that combines the bold coffee flavor of tiramisu with the smooth texture of cheesecake, perfect for special occasions or a comforting treat.
- Prep Time: 15 minutes
- Cook Time: 1 hour 10 minutes
- Total Time: 5 hours 25 minutes
- Yield: 12 servings 1x
- Category: Dessert
- Cuisine: Italian-inspired
Ingredients
- 1 ½ cups (150g) graham cracker crumbs or digestive biscuits, finely crushed
- 2 tbsp instant espresso powder
- ¼ cup (50g) granulated sugar
- 6 tbsp (85g) unsalted butter, melted
- 16 oz (450g) cream cheese, softened
- 8 oz (225g) mascarpone cheese, room temperature
- ¾ cup (150g) granulated sugar
- 3 large eggs, room temperature
- 2 tbsp all-purpose flour
- 2 tbsp strong brewed espresso, cooled
- 1 tsp vanilla extract
- 2 tbsp coffee liqueur or Marsala wine (optional)
- Unsweetened cocoa powder, for dusting
- Dark chocolate shavings or curls (optional garnish)
Instructions
- Preheat the oven to 325°F (160°C). Grease a 9-inch springform pan and line the bottom with parchment paper.
- In a medium bowl, mix graham cracker crumbs, instant espresso powder, sugar, and melted butter until mixture resembles wet sand. Press firmly into the bottom of the pan. Bake for 10 minutes, then cool slightly.
- In a mixer bowl, beat cream cheese and mascarpone until smooth and lump-free, about 3 minutes. Gradually add sugar and beat until incorporated. Add eggs one at a time, beating gently after each. Stir in flour, espresso, vanilla, and coffee liqueur if using. Avoid overmixing.
- Pour filling over cooled crust and smooth the top. Bake for 50-60 minutes until edges are set but center jiggles slightly.
- Cool cheesecake on a wire rack for about an hour, then refrigerate for at least 4 hours or overnight.
- Before serving, dust top with unsweetened cocoa powder and scatter dark chocolate shavings.
Notes
Use room temperature cream cheese, mascarpone, and eggs for smooth batter. Avoid overmixing after adding eggs to prevent cracks. Brew strong espresso or use good quality instant espresso powder for best flavor. Dust cocoa powder with a fine mesh sieve. For neat slices, dip knife in hot water and wipe clean between cuts. Chilling overnight improves texture and flavor.
Nutrition
- Serving Size: 1 slice (1/12 of che
- Calories: 320
- Sugar: 13
- Fat: 24
- Carbohydrates: 18
- Protein: 7
Keywords: espresso, tiramisu, cheesecake, coffee dessert, easy dessert, creamy cheesecake, mascarpone, espresso powder