“Are these really going to look like eyeballs?” my youngest asked, peering skeptically at the bowl of marbled cake crumbs and frosting. Honestly, I wasn’t sure myself when I first tried making these monster eyeball cake pops. It started one chaotic evening as I scrambled to find a last-minute Halloween treat that was fun, easy, and just a little bit spooky. The kids were bouncing off the walls, and I was desperately searching the pantry, hoping for a quick fix. I grabbed a box of chocolate cake mix, some candy melts, and some edible markers on a whim. The result? A batch of quirky eyeball cake pops that looked like little monsters had come to life on sticks.
What surprised me most was how the simple ingredients turned into something so wildly fun and festive. The kids couldn’t get enough, and suddenly, making monster eyeball cake pops became a repeat event in our house (more than once in a week, I admit). The best part? The mess was manageable, and the process was oddly calming amidst the Halloween frenzy. There’s just something about rolling those cake crumbs into balls and decorating each one with a little personality that feels like crafting with a purpose.
These monster eyeball cake pops stuck with me because they aren’t just candy-coated sweets. They’re a way to bring a little laughter and creativity to a spooky season without fuss or stress. Plus, they can easily charm guests at any Halloween party or school event. If you’ve ever fretted over complicated Halloween desserts, this recipe is a gentle reminder that sometimes the best treats come from a bit of improvisation and a whole lot of fun. You might even find yourself making these long after October 31st, just because.
Why You’ll Love This Recipe
Making these monster eyeball cake pops feels like being part mad scientist and part artist in the kitchen. I’ve tested this recipe several times to get the texture just right and to nail the spooky-but-cute look that kids and adults both adore. Here’s why this recipe stands out:
- Quick & Easy: From crumb to decorated pop in under 45 minutes. Perfect for last-minute party prep or Halloween snack cravings.
- Simple Ingredients: No need for specialty stores—cake mix, frosting, candy melts, and a few edible decorations are enough.
- Perfect for Halloween Parties: Fun finger food that’s both spooky and sweet, a total hit at school events or neighborhood gatherings.
- Crowd-Pleaser: The combination of moist cake and creamy coating always gets rave reviews from kids (and grown-ups who sneak a few).
- Unbelievably Delicious: The cake crumb base blended with frosting creates a moist and flavorful pop that’s decadent without being overwhelming.
What really makes this recipe different is the creative freedom you get with decorating. You can make each eyeball unique—glossy, drippy, bloodshot, or eerily calm. I like to use a mix of candy melts and edible markers to add dimension and character. Plus, I prefer using Duncan Hines cake mix for its rich flavor and moist crumb, but any brand works fine. The frosting’s creaminess binds everything perfectly, so don’t skimp on that part.
Honestly, these monster eyeball cake pops aren’t just treats; they’re a little project to enjoy with family or friends. They bring a smile with every bite and a bit of Halloween mischief to your table.
What Ingredients You Will Need
This recipe uses simple, pantry-friendly ingredients that come together to create a playful and tasty Halloween treat. You’ll find most of these in your kitchen already, and substitutions are easy if you want to tweak the flavor or dietary profile.
- Chocolate cake mix (one box, about 15.25 oz / 432 g) – I recommend Duncan Hines for moistness and flavor
- Eggs (as per cake mix instructions, usually 3 large, room temperature)
- Vegetable oil (as per cake mix instructions, about 1/3 cup / 80 ml)
- Water (as per cake mix instructions, about 1 cup / 240 ml)
- Vanilla frosting (about 1 cup / 240 g) – store-bought or homemade; this binds the crumbs and adds sweetness
- White candy melts (12 oz / 340 g) – for coating the eyeballs, you can use almond bark if preferred
- Black edible markers or black decorating gel – essential for drawing pupils and veins
- Red decorating gel – for adding bloodshot veins and spooky effect
- Candy eyeballs (optional) – can be used instead of drawing eyeballs for a quick alternative
- Green and purple candy melts (optional) – for colorful monster variations
- Wilton or similar lollipop sticks – sturdy enough to hold the cake pops
- Sprinkles or edible glitter (optional) – for extra spooky or magical flair
If you want a gluten-free option, look for a gluten-free cake mix or bake a gluten-free cake from scratch. For a dairy-free variation, swap the frosting with a coconut or vegan alternative and use dairy-free candy melts.
Equipment Needed
- Mixing bowls: One large for batter, another for mixing cake crumbs and frosting.
- Baking pan: A standard 9×13 inch (23×33 cm) cake pan to bake the cake evenly.
- Electric mixer or hand whisk: Helps mix cake batter smoothly and whip frosting if homemade.
- Cooling rack: To cool the cake completely before crumbling.
- Baking sheet: Lined with parchment paper for setting cake pops before dipping.
- Microwave-safe bowls: For melting candy melts gently without burning.
- Lollipop sticks: Essential for holding the eyeballs; bamboo sticks work well.
- Edible markers or decorating tools: For fine details on the eyeballs.
- Styrofoam block or cake pop stand: To hold cake pops upright while drying – if you don’t have one, a glass or cup works fine.
Personally, I find silicone mixing bowls easier to clean after the sticky frosting and crumbs. When melting candy melts, low power intervals in the microwave prevent overheating. If you don’t have edible markers, a toothpick dipped in food coloring gel can substitute for drawing fine lines.
Preparation Method
- Bake the cake: Prepare the cake batter according to the box instructions—usually combining cake mix, eggs (3 large), oil (1/3 cup / 80 ml), and water (1 cup / 240 ml). Pour into a greased 9×13 inch (23×33 cm) pan and bake at 350°F (175°C) for 30-35 minutes or until a toothpick comes out clean. Cool completely on a rack (about 1 hour). This step is crucial because warm cake will make the pops fall apart.
- Crumble the cake: Once cooled, crumble the cake into fine crumbs using your hands or a fork in a large bowl. Avoid big chunks to keep the cake pops smooth.
- Mix with frosting: Add about 1 cup (240 g) of vanilla frosting to the cake crumbs. Mix gently with a spoon or your hands until the mixture holds together when pressed. If too dry, add a little more frosting (a tablespoon at a time). The texture should be moist but not sticky.
- Form the eyeballs: Roll the mixture into 1.5-inch (4 cm) balls and place them on a parchment-lined baking sheet. Chill in the fridge for at least 30 minutes to firm up. This step helps the pops hold their shape during coating.
- Prepare the sticks: Melt a few tablespoons of white candy melts in a microwave-safe bowl (microwave in 20-second bursts, stirring between). Dip the tip of each lollipop stick into the melted candy and insert halfway into each chilled cake ball. Return to the fridge for 10 minutes to set the stick.
- Coat the eyeballs: Melt the remaining white candy melts until smooth. Dip each cake pop into the coating, letting excess drip off. Place back on parchment to dry upright (styrofoam block or glass). If coating thickens, remelt gently.
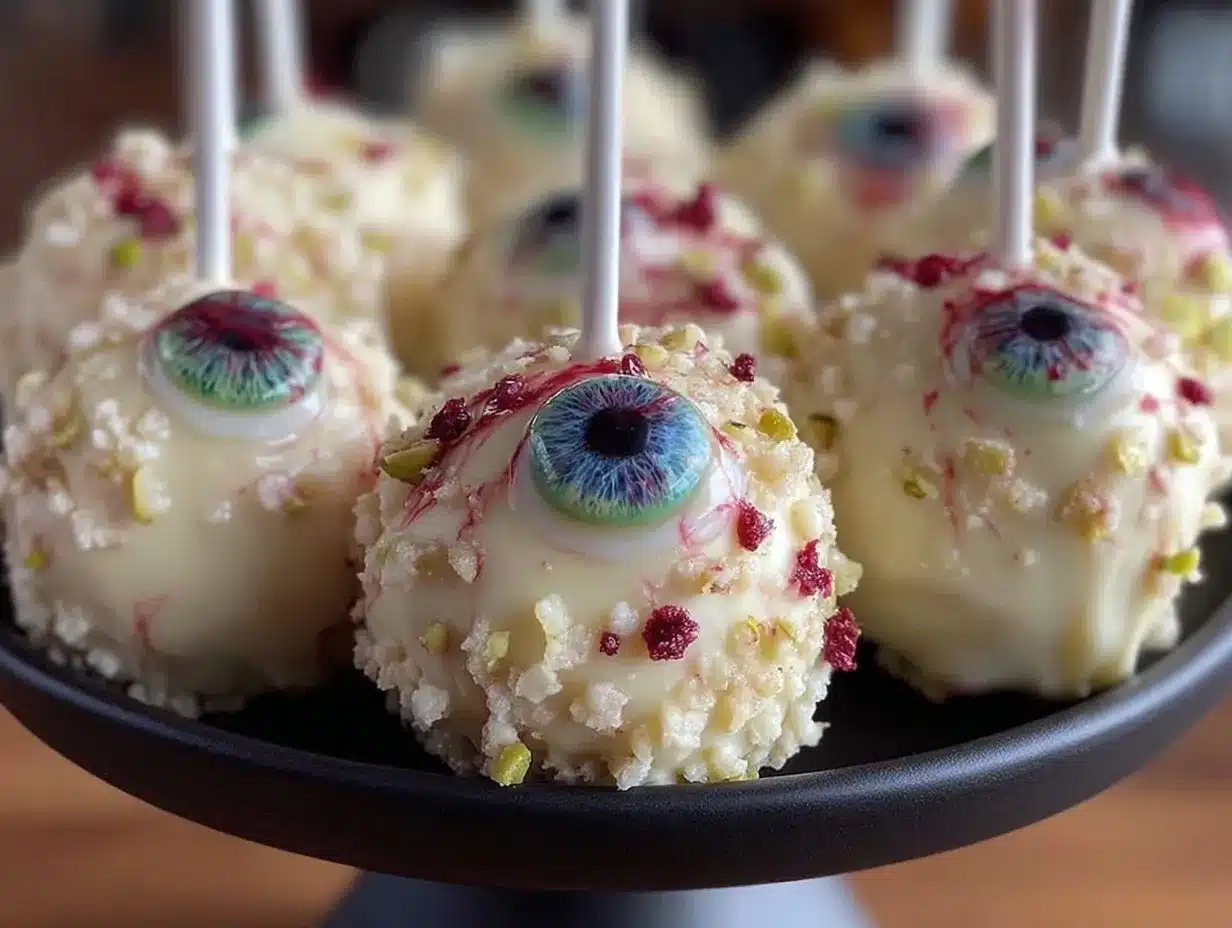
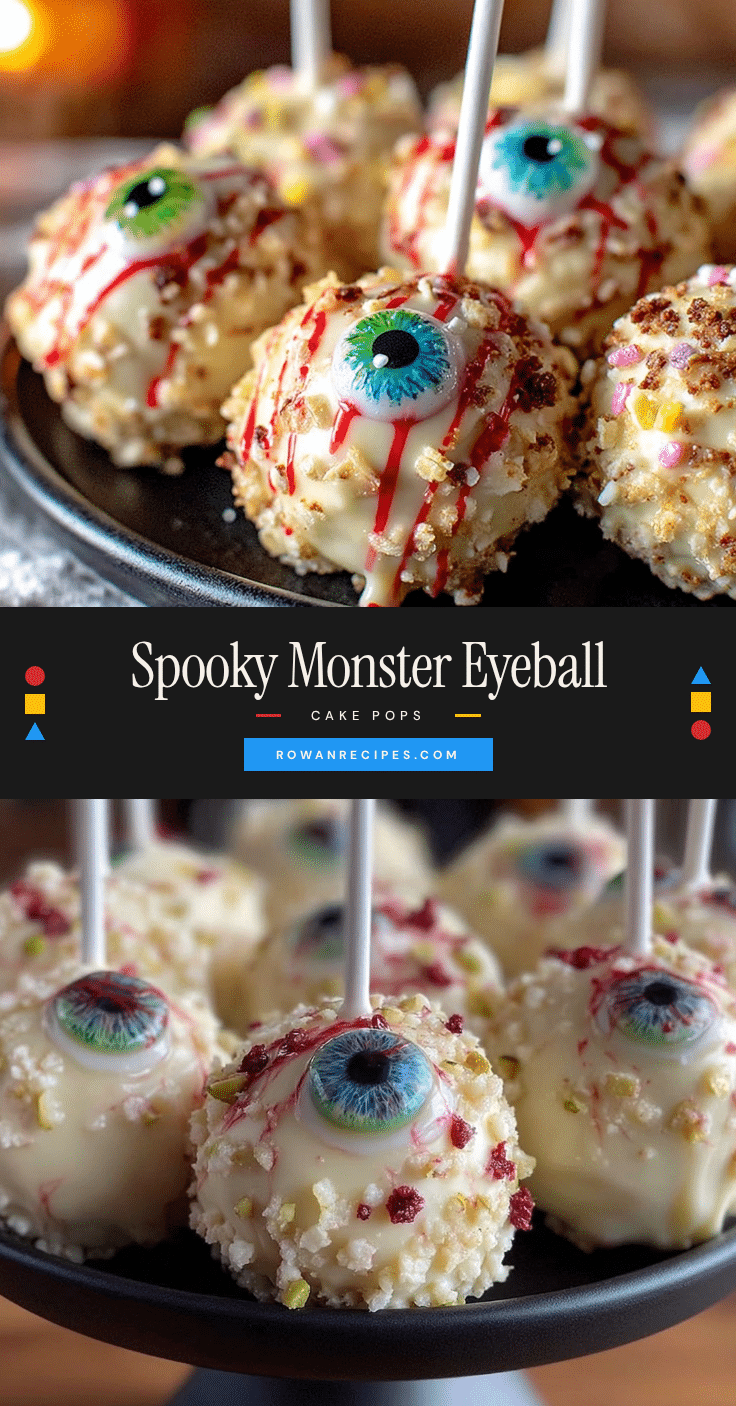
- Decorate the eyeballs: Once coating is set (about 15-20 minutes), use edible markers or decorating gels to draw pupils and bloodshot veins. For a creepy effect, try red gel trails or a green tint for monster vibes. Add candy eyeballs for an easier design if preferred.
- Final touches: Optionally, sprinkle with edible glitter or colored sugar before coating dries completely for a little sparkle.
Tip: If the cake balls crack while coating, chilling them longer usually helps. Also, keep the candy melts warm by placing the bowl over warm water while working.
Cooking Tips & Techniques
Working with cake pops can feel fiddly at first, but a few tricks will make your monster eyeball cake pops shine every time. Here are some lessons from my experience:
- Use room temperature ingredients: Eggs and frosting at room temperature mix better, making a smoother batter and crumb mixture.
- Don’t over-mix cake crumbs and frosting: Mix until just combined. Too much can make the pops dense and heavy.
- Chill thoroughly: This is key. Cold cake balls hold shape better when dipped. I often freeze mine 10 minutes extra if the weather is warm.
- Melting candy melts: Go slow in the microwave and stir often to avoid grainy or burnt candy. If candy thickens during dipping, gently reheat.
- Dip quickly and confidently: Dipping slowly causes cracks. Lift the pop straight up and tap off excess gently with a side-to-side motion.
- Work in batches: Too many cake balls at once can cause coating to harden before dipping, leading to uneven coverage.
- Decorating: Edible markers work best after the coating is fully dry. For gel, pipe thin veins and dots for the creepiest effect.
Funny enough, my first attempt ended with a lot of cracked balls and smeared decorations, but I learned to embrace the imperfections—they add character! Timing is crucial, so prep your workspace before dipping, and keep your tools handy.
Variations & Adaptations
One of the coolest things about monster eyeball cake pops is how easy it is to customize and adapt them for different tastes and dietary needs:
- Flavor Variations: Swap chocolate cake for red velvet or funfetti for a colorful surprise inside. Vanilla or lemon cake also works well with white candy melts coating.
- Colorful Monsters: Use green, purple, or orange candy melts instead of white to create different monster skins. Mix and match veins and pupils with contrasting colors for a wild effect.
- Dietary Adjustments: Use gluten-free cake mix and dairy-free frosting with vegan candy melts for allergy-friendly pops. Almond flour cake can also work if baked separately.
- Decorating Alternatives: Instead of drawing eyes, use edible candy eyes in various sizes for a quick spooky look. You can also add mini chocolate chips or sprinkles for texture.
- Cooking Method: While traditional baking is preferred, you can make cake crumbs from leftover cupcakes or even use brownie mix for a fudgier pop.
I once made a batch using mint-flavored frosting and green candy melts for a “swamp monster” theme that was a hit at a neighborhood party. Don’t be afraid to get creative—these cake pops welcome it!
Serving & Storage Suggestions
Monster eyeball cake pops are best served chilled or at room temperature. I find serving them on a fun Halloween-themed platter or stuck upright in a decorated Styrofoam block looks festive and keeps them from rolling away.
They pair wonderfully with drinks like cold apple cider, pumpkin spice lattes, or even a simple glass of milk for the kids. If you’re putting together a spooky dessert table, they complement treats like crispy mac and cheese cups or creamy cheesy taco pasta for a full spread.
For storage, keep cake pops in an airtight container in the fridge for up to 5 days. If you want to prepare them ahead, you can freeze them for up to 2 weeks—just thaw in the fridge before serving. When reheating, avoid microwaving as the candy coating can melt. Instead, let them come to room temperature slowly for the best texture.
Flavors tend to mellow and deepen after a day in the fridge, so sometimes the second-day pops taste even better. Just don’t wait too long, or the coating can get sticky.
Nutritional Information & Benefits
While monster eyeball cake pops are definitely a treat, here’s a rough estimate of their nutritional profile per pop (assuming 20 pops per batch):
| Nutrient | Per Cake Pop |
|---|---|
| Calories | 120-150 kcal |
| Fat | 6-8 g |
| Sugar | 15-18 g |
| Protein | 1-2 g |
The cake base provides carbohydrates and some protein, while the frosting and candy melts add sweetness and fat. If you use homemade frosting with less sugar or alternative sweeteners, you can adjust the sugar content.
Key ingredients like eggs and milk contribute to protein and calcium. Using dark chocolate cake mix or adding cocoa powder can add antioxidants. For allergy-conscious bakers, gluten-free and dairy-free adaptations make these treats accessible.
Personally, I enjoy these cake pops as a festive indulgence balanced with wholesome meals such as my easy crispy sheet pan honey mustard chicken. It’s all about balance and fun in the kitchen!
Conclusion
These perfect monster eyeball cake pops are a playful, easy way to bring Halloween spirit to your table without complicated baking or decorating skills. They offer a sweet, slightly spooky treat that’s fun to make with kids or friends, and they’re flexible enough for all kinds of flavor twists and dietary needs.
Personally, I love how these pops turn a simple cake mix into a creative project that sparks laughter and a little healthy competition over who makes the creepiest eyeball. They’re proof that sometimes the best festive treats come from a bit of imagination and a lot of frosting.
Give this recipe a try, tweak it your way, and let me know how your monster eyeballs turned out in the comments! Halloween just got a whole lot tastier—and a little bit stranger.
FAQs About Monster Eyeball Cake Pops
How long do monster eyeball cake pops stay fresh?
Stored airtight in the fridge, they stay fresh for up to 5 days. For longer storage, freeze them for up to 2 weeks and thaw in the fridge before serving.
Can I use homemade cake instead of boxed cake mix?
Absolutely! Homemade cake works great as long as it’s moist and crumbled finely. Adjust frosting amount as needed to get the right texture.
What if I don’t have edible markers for decorating?
You can use food-safe decorating gels with a fine tip or even a toothpick dipped in food coloring to draw pupils and veins.
Can I make these cake pops dairy-free or gluten-free?
Yes! Use gluten-free cake mix and dairy-free frosting plus vegan candy melts to adapt to those needs without losing flavor or texture.
How do I prevent cake pops from falling off the sticks?
Chill the cake balls well before inserting sticks and dip the stick tips in melted candy before inserting to help them stick better.
Pin This Recipe!
Monster Eyeball Cake Pops
Fun and spooky Halloween cake pops made from chocolate cake crumbs coated in candy melts and decorated to look like monster eyeballs. Easy to make and perfect for parties or school events.
- Prep Time: 20 minutes
- Cook Time: 35 minutes
- Total Time: 1 hour 55 minutes
- Yield: 20 cake pops 1x
- Category: Dessert
- Cuisine: American
Ingredients
- 1 box chocolate cake mix (about 15.25 oz / 432 g), Duncan Hines recommended
- 3 large eggs, room temperature
- 1/3 cup vegetable oil (about 80 ml)
- 1 cup water (about 240 ml)
- 1 cup vanilla frosting (about 240 g), store-bought or homemade
- 12 oz white candy melts (about 340 g), or almond bark
- Black edible markers or black decorating gel
- Red decorating gel
- Candy eyeballs (optional)
- Green and purple candy melts (optional)
- Wilton or similar lollipop sticks
- Sprinkles or edible glitter (optional)
Instructions
- Bake the cake: Prepare the cake batter according to box instructions by combining cake mix, eggs, oil, and water. Pour into a greased 9×13 inch pan and bake at 350°F (175°C) for 30-35 minutes or until a toothpick comes out clean. Cool completely on a rack (about 1 hour).
- Crumble the cake: Once cooled, crumble the cake into fine crumbs in a large bowl, avoiding big chunks.
- Mix with frosting: Add about 1 cup of vanilla frosting to the cake crumbs. Mix gently until the mixture holds together when pressed. Add more frosting if too dry.
- Form the eyeballs: Roll the mixture into 1.5-inch (4 cm) balls and place on a parchment-lined baking sheet. Chill in the fridge for at least 30 minutes.
- Prepare the sticks: Melt a few tablespoons of white candy melts in a microwave-safe bowl. Dip the tip of each lollipop stick into the melted candy and insert halfway into each chilled cake ball. Return to fridge for 10 minutes to set.
- Coat the eyeballs: Melt remaining white candy melts until smooth. Dip each cake pop into the coating, letting excess drip off. Place upright on parchment to dry.
- Decorate the eyeballs: Once coating is set (15-20 minutes), use edible markers or decorating gels to draw pupils and bloodshot veins. Add candy eyeballs if preferred.
- Final touches: Optionally sprinkle with edible glitter or colored sugar before coating dries completely.
Notes
Use room temperature eggs and frosting for better mixing. Chill cake balls thoroughly before dipping to prevent cracking. Melt candy melts slowly in microwave in short bursts and stir often. If coating thickens, gently reheat. Dip cake pops quickly and confidently to avoid cracks. Work in batches to prevent candy melts from hardening. Edible markers work best after coating is fully dry. Toothpicks dipped in food coloring gel can substitute for edible markers.
Nutrition
- Serving Size: 1 cake pop
- Calories: 135
- Sugar: 16.5
- Fat: 7
- Protein: 1.5
Keywords: Halloween, cake pops, monster eyeball, spooky treats, easy dessert, kids party, candy melts, chocolate cake