“You really gotta try these arepas,” my coworker said, sliding a warm one across the break room table. I eyed the golden corn cake skeptically—just a simple, crispy something on a paper plate. I wasn’t sure if this was just another carb to pass the time or something special. But honestly, the moment I bit into that crispy exterior and soft, tender inside, I was hooked. It wasn’t fancy, just easy, straightforward, and downright satisfying.
Back in my tiny apartment kitchen, I tried to recreate that magic, fiddling with the cornmeal just enough to get the perfect balance—crispy on the outside but moist and fluffy inside. It felt like a little secret, this recipe for easy crispy simple arepas Colombian corn cakes. They became my go-to when I was craving something comforting but didn’t want to fuss too much.
There’s something quietly grounding about making these. Maybe it’s the smell of the cornmeal toasting in the pan or the way they puff up just a bit when cooking. I never really thought I’d become obsessed with a humble corn cake, but here I am, making them multiple times a week. It’s that kind of recipe that feels like a cozy hug, you know? And that’s why it’s stuck with me.
These arepas have a way of making ordinary moments feel a little more special, without trying too hard. So, if you want something simple, crispy, and honestly addictive, let’s talk about this easy crispy simple arepas Colombian corn cakes recipe that’s become a quiet favorite in my kitchen.
Why You’ll Love This Recipe
After testing this easy crispy arepas recipe countless times, I can say it’s one of those dishes that hits every note—comfort, crunch, and simplicity without compromise. Whether you’re a seasoned home cook or just starting out, these Colombian corn cakes are a total win.
- Quick & Easy: Takes under 30 minutes from mixing to golden perfection, perfect for busy weeknights or last-minute cravings.
- Simple Ingredients: No need for fancy or hard-to-find items; just basic pantry staples like precooked cornmeal and a few kitchen essentials.
- Perfect for Any Occasion: Whether you’re hosting brunch, looking for a cozy dinner side, or packing snacks for the day, these arepas fit right in.
- Crowd-Pleaser: Every time I bring these to gatherings, they vanish fast—kids and adults alike can’t get enough.
- Unbelievably Delicious: The crispy crust combined with the tender, slightly chewy inside is pure comfort food magic.
What sets this recipe apart? It’s the little tweaks that make the texture just right—like the exact water-to-cornmeal ratio and a quick pan-sear that locks in that crispy exterior. I also love how forgiving these arepas are; you can play around with fillings or toppings without losing that classic Colombian soul.
This isn’t just another corn cake recipe; it’s the one I trust when I want something familiar, fast, and incredibly tasty. Honestly, after the first bite, you’ll understand why these easy crispy simple arepas Colombian corn cakes have become such a staple in my kitchen.
What Ingredients You Will Need
This recipe uses simple, wholesome ingredients to deliver bold flavor and satisfying texture without the fuss. Most are pantry staples, and you can tweak a few items to fit what you have on hand.
- Precooked Cornmeal (Masarepa): 2 cups (250g) – this is the key ingredient; I prefer Goya brand for the best texture.
- Warm Water: 2 cups (475ml) – helps hydrate the cornmeal properly for soft, pliable dough.
- Salt: 1 teaspoon – enhances flavor without overpowering.
- Vegetable Oil or Butter: 3 tablespoons – for frying and getting that golden crust (use avocado oil for a healthier option).
- Optional Fillings or Toppings: shredded cheese (queso fresco or mozzarella), cooked meats, or avocado slices – adds extra richness and personalization.
If you want to keep it gluten-free, this recipe fits perfectly since it’s naturally corn-based. For dairy-free, swap butter with a plant-based alternative or just use oil. In summer, I love topping mine with fresh tomato salsa for a bright contrast.
Feel free to experiment with fillings—on one lazy weekend, I stuffed my arepas with black beans and a little cheese, and that combo was a game-changer. It’s simple, but the ingredients come together to create something unexpectedly satisfying.
Equipment Needed
- Mixing Bowl: A large bowl for combining the cornmeal and water comfortably.
- Measuring Cups & Spoons: For accurate ingredient amounts—precision helps with texture.
- Non-stick Skillet or Cast Iron Pan: Essential for frying the arepas evenly and getting that golden, crispy crust. I personally prefer cast iron because it holds heat well.
- Spatula or Tongs: To flip the arepas without breaking them apart.
- Kitchen Towels or Paper Towels: For blotting excess oil after frying.
If you don’t have a cast iron pan, a heavy-bottomed non-stick skillet works fine, but watch the heat carefully to avoid burning. A budget-friendly tip: warming the pan well before cooking helps create that perfect crust without sticking.
Preparation Method
- Combine Dry Ingredients: In a large mixing bowl, add 2 cups (250g) of precooked cornmeal and 1 teaspoon of salt. Stir gently to distribute the salt evenly.
- Add Warm Water Slowly: Pour 2 cups (475ml) of warm water gradually into the cornmeal while stirring with your hand or a spoon. This prevents lumps and ensures the dough hydrates evenly. The dough should be soft but not sticky, like a thick playdough. Let it rest for 5 minutes to allow the cornmeal to fully absorb the water.
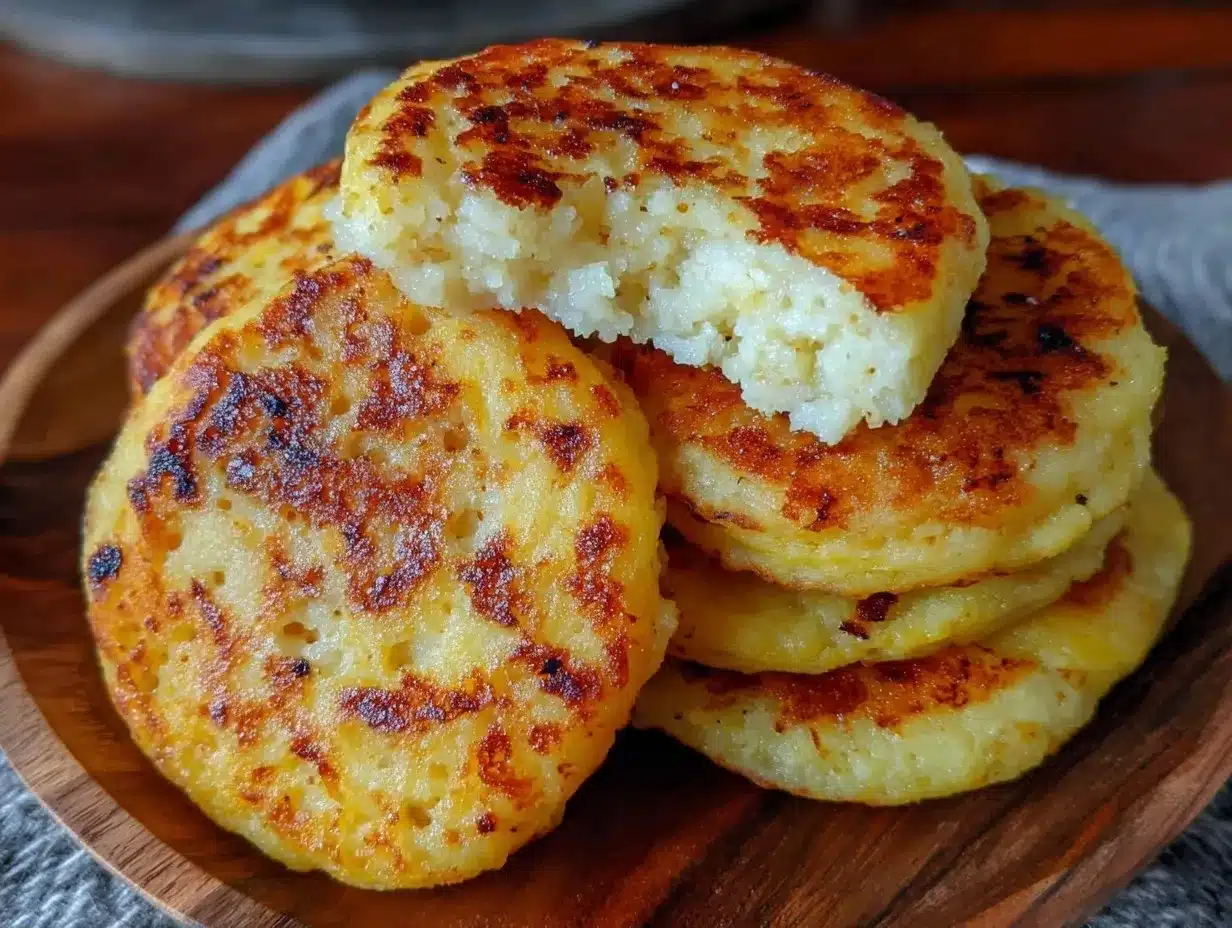
- Shape the Arepas: Divide the dough into 6-8 equal portions, rolling each into a ball about the size of a golf ball. Flatten each ball into a patty roughly ½ inch (1.3 cm) thick and 3-4 inches (7.5-10 cm) wide. Don’t worry if the edges crack slightly—that’s normal and doesn’t affect the final result.
- Heat the Pan: Place your skillet over medium heat and add 2 tablespoons of oil or butter. Let it get hot but not smoking—around 350°F (175°C) is ideal for frying.
- Cook the Arepas: Add the arepas to the pan without overcrowding. Fry for about 5-6 minutes on the first side until the bottom is golden and crispy. Flip carefully using a spatula or tongs, then cook another 5 minutes on the other side. Lower the heat slightly if they’re browning too fast but still feel raw inside.
- Finish on Low Heat: After both sides are golden, reduce the heat to low and cover the pan. Cook for an extra 5-7 minutes, flipping once halfway through. This step helps the arepas cook through without burning the crust.
- Drain and Serve: Remove the arepas and place them on paper towels to soak up excess oil. Serve warm with your favorite toppings or fillings.
Pro Tip: If your dough feels too dry or cracks excessively, add a tablespoon of water and knead gently. If it’s too wet and sticky, sprinkle in a little more cornmeal. The dough should hold together well but not be crumbly.
Cooking Tips & Techniques
Getting the perfect crispy arepas is a bit of an art, but here’s what I’ve learned through trial (and error!). First, patience is key. Don’t rush the resting time after mixing the dough—it’s what prevents a gritty texture.
When frying, medium heat is your friend. Too hot and the outside burns before the inside cooks; too low and you’ll get a pale, soggy crust. I like to keep an eye on the color and smell—they should smell toasty and look golden, not burnt.
Flipping gently is important—these corn cakes are sturdy but can break if handled roughly. Using a thin, wide spatula lets you flip without cracking.
One mistake I made early on was skipping the low-heat finish with the lid on. That step cooks them through nicely so the inside is soft and not doughy. It’s a small detail that makes a big difference.
Also, try to avoid overcrowding the pan. Giving each arepa space helps maintain the right temperature and crispiness.
For multitasking, I often prepare the dough while my honey mustard chicken is roasting—both dishes come together quickly and complement each other beautifully.
Variations & Adaptations
These arepas are incredibly versatile—you can tweak them to suit dietary needs, seasonal ingredients, or flavor preferences.
- Stuffed Arepas: After shaping, press in shredded cheese or cooked meats like pulled pork before frying for a melty surprise inside.
- Vegan & Dairy-Free: Skip butter and use olive or avocado oil. You can also add nutritional yeast to the dough for a cheesy hint without dairy.
- Sweet Arepas: Add a tablespoon of sugar and a pinch of cinnamon to the dough, then top with honey or jam for a breakfast twist.
- Gluten-Free & Low-Carb: Naturally gluten-free due to cornmeal. For a lower-carb version, try mixing in almond flour but expect a different texture.
- Seasonal Toppings: Summer calls for fresh avocado and tomato salsa, while fall pairs well with sautéed mushrooms and melted cheese.
Personally, I’ve tried adding cooked bacon bits and a bit of jalapeño to the dough for a little kick. It was unexpected but absolutely delicious. Feel free to experiment and find your favorite combo.
Serving & Storage Suggestions
Arepas are best served warm, right off the pan, when the crust is still crisp and the inside is soft and tender. I like to slice mine open and stuff them with creamy avocado, a dollop of sour cream, or even a fried egg for breakfast vibes.
They pair beautifully with dishes like slow cooker French dip sandwiches or alongside a fresh salad for a light meal.
To store, let the arepas cool completely, then place them in an airtight container in the fridge for up to 3 days. Reheat in a skillet over medium heat to bring back the crispiness—microwaving tends to make them soggy, which is a bummer.
They also freeze well. Wrap each arepa individually in plastic wrap and place in a freezer bag. When ready to eat, thaw at room temperature and reheat in a pan.
Over time, the flavors deepen slightly, especially if you add cheese or meats inside, so leftovers often taste even better the next day if reheated right.
Nutritional Information & Benefits
Each easy crispy simple arepa Colombian corn cake contains roughly 150-180 calories depending on size and toppings. They provide a good source of complex carbohydrates and fiber from the cornmeal, making them satisfying without being heavy.
Cornmeal is naturally gluten-free and contains essential nutrients like iron, magnesium, and B vitamins. Using vegetable oil or butter adds healthy fats, especially if you choose options like avocado oil.
For those watching carbs, these arepas are moderate and easy to pair with protein-rich fillings to balance the meal.
Just a heads-up: these contain corn, so anyone with corn allergies should avoid them. Otherwise, they’re a wholesome choice that fits well in balanced diets.
From a wellness perspective, I love that these arepas offer comfort food vibes without guilt—they’re simple, real food with minimal processing.
Conclusion
Easy crispy simple arepas Colombian corn cakes have quietly become my comfort food staple. They’re straightforward, fast, and come out perfectly crispy every time with just a handful of basic ingredients. What I love most is how they adapt beautifully to whatever mood or meal I’m in—stuffed, plain, sweet, or savory.
Give yourself room to experiment and make this recipe your own. Whether it’s a quick snack or part of a full spread, these arepas bring a little taste of Colombia’s heart to your kitchen. I hope you enjoy them as much as I do—warm, crunchy, and full of simple goodness.
If you try this recipe, I’d love to hear how you make it your own. Feel free to share your variations or questions below. Cooking is best when shared, after all!
FAQs About Easy Crispy Arepas Recipe
What type of cornmeal is best for making arepas?
Use precooked cornmeal specifically labeled as “masarepa” or “harina precocida,” like Goya brand. It ensures the right texture and consistency.
Can I bake arepas instead of frying?
Yes! Bake them at 375°F (190°C) for about 25-30 minutes, flipping halfway. The texture will be less crispy but still delicious.
How do I know when arepas are cooked through?
They should have a golden crust on both sides and sound hollow when tapped. Finishing on low heat with a lid helps cook the inside fully.
Can I make the dough ahead of time?
Yes, you can prepare the dough and refrigerate it for up to 24 hours. Bring it to room temperature before shaping and cooking.
What can I serve with arepas for a complete meal?
Arepas go great with eggs, avocado, shredded meats, or even alongside dishes like creamy cheesy taco pasta for a hearty, satisfying meal.
Pin This Recipe!

Easy Crispy Arepas Recipe Perfect Colombian Corn Cakes

A simple and straightforward recipe for crispy Colombian arepas with a tender inside, perfect for quick meals or snacks.
- Prep Time: 10 minutes
- Cook Time: 20 minutes
- Total Time: 30 minutes
- Yield: 6-8 arepas 1x
- Category: Side Dish
- Cuisine: Colombian
Ingredients
- 2 cups (250g) precooked cornmeal (masarepa), preferably Goya brand
- 2 cups (475ml) warm water
- 1 teaspoon salt
- 3 tablespoons vegetable oil or butter (avocado oil recommended for healthier option)
- Optional fillings or toppings: shredded cheese (queso fresco or mozzarella), cooked meats, avocado slices
Instructions
- In a large mixing bowl, combine 2 cups (250g) of precooked cornmeal and 1 teaspoon of salt. Stir gently to distribute the salt evenly.
- Gradually pour 2 cups (475ml) of warm water into the cornmeal while stirring with your hand or a spoon to prevent lumps. The dough should be soft but not sticky, like thick playdough. Let rest for 5 minutes.
- Divide the dough into 6-8 equal portions, roll each into a ball about the size of a golf ball, then flatten into patties about ½ inch (1.3 cm) thick and 3-4 inches (7.5-10 cm) wide. Edges may crack slightly, which is normal.
- Heat a skillet over medium heat and add 2 tablespoons of oil or butter. Heat until hot but not smoking (around 350°F / 175°C).
- Add arepas to the pan without overcrowding. Fry for 5-6 minutes on the first side until golden and crispy. Flip carefully and cook another 5 minutes on the other side. Adjust heat if browning too fast.
- Reduce heat to low, cover the pan, and cook for an additional 5-7 minutes, flipping once halfway through to ensure they cook through without burning.
- Remove arepas and place on paper towels to drain excess oil. Serve warm with desired toppings or fillings.
Notes
If dough is too dry or cracks, add a tablespoon of water and knead gently. If too wet and sticky, add more cornmeal. Resting the dough prevents gritty texture. Finish cooking on low heat with lid to ensure inside is cooked through. Avoid overcrowding pan for best crispiness.
Nutrition
- Serving Size: 1 arepa
- Calories: 150180
- Sugar: 1
- Sodium: 300
- Fat: 7
- Saturated Fat: 1.5
- Carbohydrates: 22
- Fiber: 3
- Protein: 3
Keywords: arepas, Colombian corn cakes, crispy arepas, easy arepas recipe, cornmeal cakes, gluten-free, vegetarian