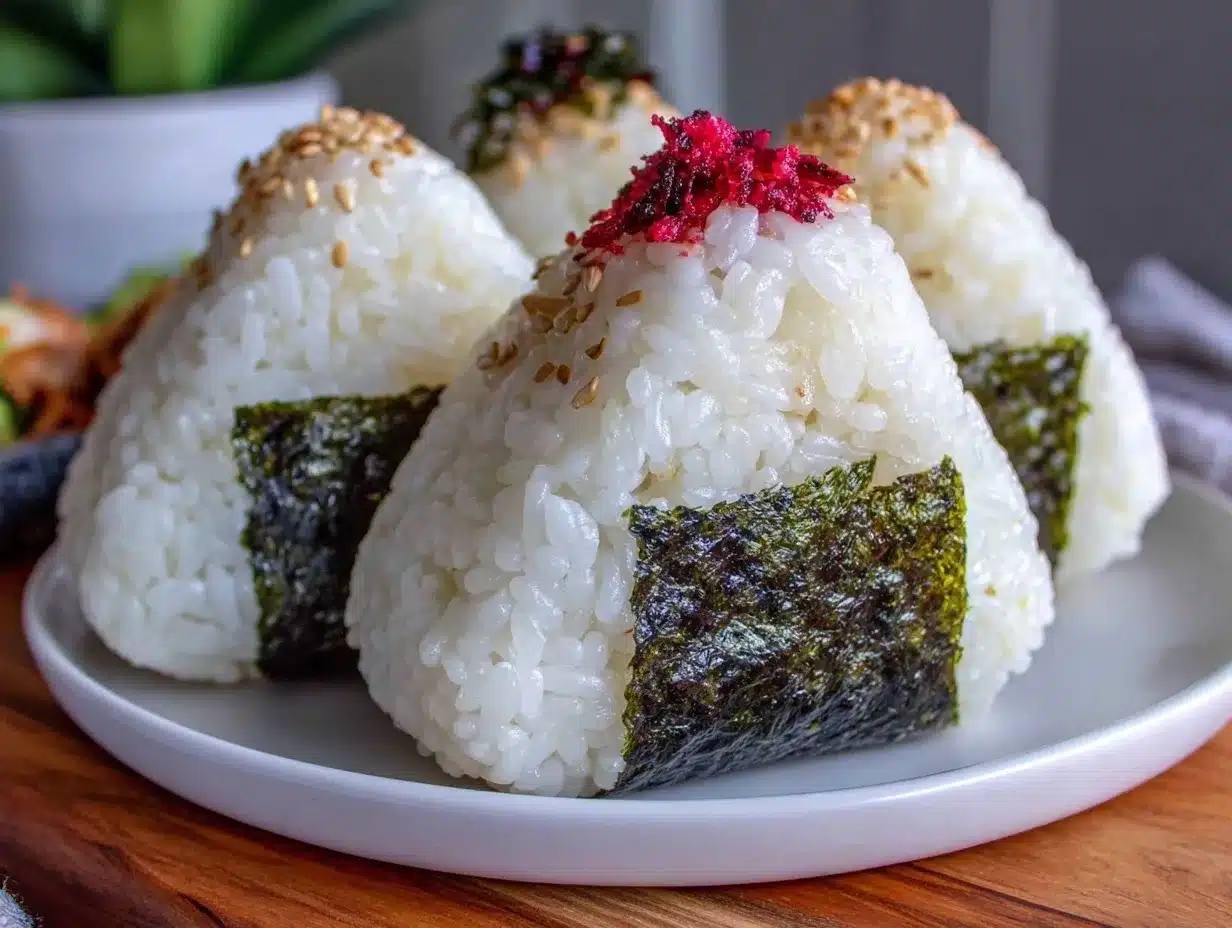
“You really don’t need fancy gadgets to make something great,” I muttered to myself as I clumsily shaped my first onigiri rice ball. Honestly, my kitchen was a mess, and I wasn’t even sure if I was doing it right. But that’s the charm of the Easy Japanese Onigiri Rice Ball Trio for Beginners—it’s forgiving, simple, and surprisingly satisfying. I remember sitting at my tiny kitchen table, rice-sticky fingers and all, with three little rice balls lined up like tiny edible treasures. The smell of toasted seaweed and the faint hint of vinegar in the rice took me somewhere warm and comforting, and I realized I’d stumbled on something worth repeating.
It wasn’t some complicated sushi roll or elaborate dinner, just humble rice shaped with care. And honestly, that quiet moment of accomplishment—making these onigiri by hand—felt like a small but meaningful victory. Once you get the hang of it, this trio becomes your go-to snack or lunchbox hero. Whether you’re a beginner or just looking for a quick Japanese-inspired bite, this recipe has that perfect balance of ease and authenticity. It’s like a little trip to Japan without leaving your kitchen, and the best part is, it’s never intimidating.
So, if you’ve ever hesitated to try making onigiri because it seemed too tricky or time-consuming, trust me—the Easy Japanese Onigiri Rice Ball Trio for Beginners will gently change your mind. It’s cozy, approachable, and kind of addictive in the best way. I’m pretty sure these rice balls will find their way into your regular rotation, just like they did for me.
Why You’ll Love This Recipe
After making onigiri more times than I can count, I can honestly say this recipe hits the sweet spot for beginners and casual cooks alike. Here’s why it’s a keeper:
- Quick & Easy: You can whip up the trio in under 30 minutes, which is perfect for when you’re juggling dinner plans or need a last-minute snack that feels special.
- Simple Ingredients: No need for exotic items—just plain short-grain rice, a few pantry staples like soy sauce and salmon flakes, and nori seaweed sheets. Most of these you probably already have, or can find at your local grocery store.
- Perfect for Lunchboxes and Picnics: These onigiri are portable, mess-free, and satisfying. I pack them for quick lunches or pair with a bowl of miso soup for a light dinner.
- Crowd-Pleaser: Whether you’ve got kids or coworkers, these rice balls always disappear fast. The trio offers variety—classic salmon, umeboshi plum, and seaweed soy—so everyone finds a favorite.
- Unbelievably Delicious: The texture of perfectly cooked sticky rice wrapped in toasted nori, with savory or tangy fillings, is comfort food with an elegant twist.
This recipe stands apart because it emphasizes the right rice texture and gentle shaping—no fancy molds needed. Plus, the fillings are thoughtfully balanced for flavor and ease. I’ve tweaked the seasoning so it’s just right, not too salty or bland. Honestly, it’s the kind of recipe that makes you close your eyes after the first bite and smile, knowing you nailed it. For a fuss-free Japanese snack, it’s hard to beat.
What Ingredients You Will Need
This Easy Japanese Onigiri Rice Ball Trio uses simple, wholesome ingredients to deliver bold flavor and satisfying texture without any fuss. Most of these are pantry staples or easy to source from an Asian market.
- Short-Grain Japanese Rice (2 cups / 360g) – This is key for the right sticky texture. I prefer Nishiki brand for consistent results.
- Rice Vinegar (3 tbsp) – Adds that subtle tang and shine to the rice. Use unseasoned and mix with a pinch of sugar and salt.
- Salt (1 tsp) – For seasoning the rice and your hands to prevent sticking.
- Fillings (choose any or all):
- Flaked cooked salmon (about ½ cup / 120g) – Fresh or canned, lightly seasoned with soy sauce.
- Umeboshi plum paste (2 tbsp) – Tart and salty, it adds a bright punch.
- Furikake seasoning (2 tbsp) – Japanese rice seasoning with seaweed, sesame, and dried fish flakes for an umami boost.
- Nori seaweed sheets (3 sheets, cut into strips) – Toasted for wrapping and added flavor.
- Soy sauce (to taste) – Optional, for dipping.
Substitution tips: If you want a gluten-free option, choose tamari instead of soy sauce. For a vegan twist, swap salmon with sautéed shiitake mushrooms seasoned with sesame oil and soy sauce. And if you don’t have umeboshi, try a dab of miso paste for a different tangy note.
Equipment Needed
- Rice Cooker or Heavy Pot: A rice cooker is the easiest way to get perfectly cooked sticky rice, but a heavy-bottomed pot with a tight lid works too.
- Mixing Bowl: For seasoning the rice with vinegar and salt.
- Wooden Paddle or Rice Spatula: Helps fold the rice without smashing the grains.
- Plastic Wrap: Optional, but useful for shaping rice balls neatly without sticking to your hands.
- Sharp Knife: For cutting nori sheets into strips.
Personally, I find a rice cooker indispensable for this recipe—once you try it, you don’t want to go back. If you’re on a budget, a heavy pot with a tight lid is just fine, but watch the heat carefully to avoid burning. And don’t skip the rice paddle! It makes mixing much easier and keeps the rice fluffy.
Preparation Method
- Cook the rice: Rinse 2 cups (360g) of short-grain Japanese rice under cold water until the water runs clear to remove excess starch. Drain well, then cook in a rice cooker or pot with 2 ½ cups (600ml) water. This should take about 20 minutes.
- Prepare the seasoning: While the rice cooks, mix 3 tablespoons rice vinegar, 1 teaspoon salt, and 1 teaspoon sugar in a small bowl until dissolved. The balance here is subtle—too much vinegar can overpower, so taste as you go.
- Season the rice: Once the rice is cooked, transfer it to a large bowl and gently fold in the vinegar mixture using a wooden paddle or spatula. Be careful not to mash the grains—just fold and fan to cool the rice to room temperature. This step takes about 5 minutes.
- Prepare the fillings: Flake cooked salmon and season lightly with soy sauce. Keep umeboshi plum paste ready in a small bowl. Cut nori sheets into 1-inch (2.5 cm) wide strips.
- Shape the onigiri: With slightly salted hands (to prevent sticking), scoop about ½ cup (90g) of rice. Flatten it gently in your palm, add about 1 tablespoon of your chosen filling in the center, then mold the rice around it into a triangle or ball shape, about 3 inches (7.5 cm) wide. Cover with a strip of nori seaweed. Repeat for the other two fillings, making a trio.
- Serve: Arrange the trio on a plate with a little extra soy sauce on the side if desired. These rice balls can be enjoyed immediately or packed for later.
Tip: If your hands get too sticky, wet them lightly with water mixed with a pinch of salt. This keeps the rice from clinging to your fingers. It might feel awkward at first, but shaping onigiri becomes second nature fast!
Cooking Tips & Techniques
One trick I learned the hard way is not to over-handle the rice. You want to keep the grains intact for that satisfying chewy texture. Pressing too hard will turn the onigiri dense and gummy, which nobody wants.
Also, seasoning the rice while it’s still warm makes the vinegar absorb better, but be sure to cool it enough before shaping so it doesn’t stick excessively. I like to fan the rice as I fold—this also helps it cool faster and gives a nice sheen.
When wrapping with nori, toast the sheets briefly over a low flame or in a dry pan. This crisps them up and boosts their flavor. If the nori gets soggy, your rice balls will lose that pleasant contrast of texture.
Don’t rush the shaping step. Taking a few extra seconds to form a tight seal around the filling keeps everything neat and prevents leaks. If you want to prep in advance, wrap each onigiri tightly in plastic wrap to keep them fresh.
For multitasking, I often prepare a quick sheet pan dinner while the rice cooks. This way, a full meal is ready with minimal fuss.
Variations & Adaptations
While this recipe offers a classic trio, there’s plenty of room to play around:
- Vegetarian: Swap salmon for sautéed shiitake mushrooms or grilled eggplant with miso glaze—both add umami punch without meat.
- Spicy: Mix a bit of sriracha or togarashi chili powder into the rice or fillings for a subtle heat kick.
- Seasonal: In summer, try fresh cucumber and sesame seeds inside for a refreshing crunch. Or use pickled radish for a tangy twist.
- Gluten-Free: Use tamari instead of soy sauce, and double-check furikake seasoning for gluten content.
- Rice Alternatives: If you want something lower-carb, try using cauliflower rice lightly pressed and formed, though it won’t hold as well.
Personally, I once replaced the salmon with leftover garlic butter shrimp from dinner, and it made a surprisingly tasty filling combo. It’s fun to experiment!
Serving & Storage Suggestions
Onigiri are best enjoyed fresh at room temperature, but they also travel well. I like to pack them for lunchboxes or picnics with a side of pickled vegetables or a light soup.
Store leftover rice balls wrapped tightly in plastic wrap in the refrigerator for up to 24 hours. Reheat gently in the microwave for about 30 seconds, or better yet, steam briefly to keep rice moist. Avoid reheating too long or the nori will get soggy.
As they rest, the flavors meld and deepen slightly, especially if wrapped well. You might notice the vinegar tang mellowing just enough to make each bite even more comforting.
For a simple meal, pair your onigiri trio with miso soup or a refreshing cucumber salad. If you’re feeling indulgent, a side of creamy taco pasta or a crisp sheet pan dinner complements the subtle flavors beautifully.
Nutritional Information & Benefits
This onigiri trio offers a balanced, wholesome snack or light meal:
- Calories: Approximately 200-250 calories per rice ball, depending on filling.
- Carbohydrates: Primarily from sticky rice, providing sustained energy.
- Protein: Moderate amounts from salmon or furikake; vegetarian options will vary.
- Low Fat: Minimal added fat unless you choose richer fillings.
- Gluten-Free: Naturally gluten-free if you select tamari over soy sauce.
Rice is gentle on the stomach and filling without heaviness. Salmon adds omega-3 fatty acids and vitamins, while umeboshi plums provide antioxidants and aid digestion. It’s a simple, satisfying way to enjoy nutritious Japanese flavors without fuss.
Conclusion
This Easy Japanese Onigiri Rice Ball Trio for Beginners brings a little slice of Japan into your kitchen, no stress involved. It’s approachable enough for anyone to try and versatile enough to make your own. Whether you keep it classic or add your favorite twists, these rice balls never fail to impress.
I love how onigiri turns plain rice into something special with just a few thoughtful ingredients and a bit of shaping. It’s a recipe that stays with you because it’s both comforting and endlessly adaptable. Plus, it’s a fun, hands-on way to connect with food—something I always appreciate on busy days.
If you give it a go, I’d love to hear how you customize your trio or what fillings become your signature. Cooking should be joyful, and these onigiri make it easy to enjoy every step.
Happy shaping and savoring!
FAQs
What type of rice is best for making onigiri?
Short-grain Japanese rice is ideal because it’s sticky enough to hold together but still tender. Medium-grain rice can work, but long-grain won’t bind well.
Can I make onigiri ahead of time?
Yes! Onigiri can be made a few hours ahead and kept wrapped tightly at room temperature or refrigerated for up to 24 hours. Just reheat gently before eating.
How do I prevent rice from sticking to my hands?
Wet your hands with a little salted water before shaping the rice. This keeps it from sticking and seasons the rice balls lightly.
What are common fillings for onigiri?
Traditional fillings include salted salmon, umeboshi plum paste, and kombu seaweed. You can also use tuna mayo, pickled vegetables, or leftover cooked meats.
Is onigiri gluten-free?
Onigiri is naturally gluten-free if you avoid soy sauce or use gluten-free tamari. Just check seasoning labels to be sure.
Pin This Recipe!

Easy Japanese Onigiri Rice Ball Trio Recipe for Beginners Made Perfect
A simple and forgiving recipe for making traditional Japanese onigiri rice balls with three classic fillings. Perfect for beginners, quick to prepare, and ideal for snacks or lunchboxes.
- Prep Time: 10 minutes
- Cook Time: 20 minutes
- Total Time: 30 minutes
- Yield: 3 servings 1x
- Category: Snack
- Cuisine: Japanese
Ingredients
- 2 cups (360g) short-grain Japanese rice
- 3 tablespoons rice vinegar
- 1 teaspoon salt
- 1 teaspoon sugar
- ½ cup (120g) flaked cooked salmon, lightly seasoned with soy sauce
- 2 tablespoons umeboshi plum paste
- 2 tablespoons furikake seasoning
- 3 sheets nori seaweed, cut into 1-inch strips
- Soy sauce, to taste (optional)
Instructions
- Rinse 2 cups (360g) of short-grain Japanese rice under cold water until the water runs clear to remove excess starch. Drain well.
- Cook the rice in a rice cooker or heavy pot with 2 ½ cups (600ml) water for about 20 minutes.
- While the rice cooks, mix 3 tablespoons rice vinegar, 1 teaspoon salt, and 1 teaspoon sugar in a small bowl until dissolved.
- Once the rice is cooked, transfer it to a large bowl and gently fold in the vinegar mixture using a wooden paddle or spatula without mashing the grains. Fan the rice to cool to room temperature (about 5 minutes).
- Prepare the fillings: flake cooked salmon and season lightly with soy sauce; have umeboshi plum paste ready; cut nori sheets into strips.
- With slightly salted hands, scoop about ½ cup (90g) of rice, flatten it in your palm, add about 1 tablespoon of chosen filling in the center, then mold the rice around it into a triangle or ball shape about 3 inches (7.5 cm) wide.
- Wrap each shaped rice ball with a strip of toasted nori seaweed.
- Repeat for the other two fillings to make a trio.
- Serve immediately with soy sauce on the side if desired, or pack for later.
Notes
Wet your hands with salted water before shaping to prevent sticking. Toast nori sheets briefly for best texture and flavor. Avoid over-handling rice to keep grains intact. Onigiri can be made ahead and stored wrapped in plastic wrap for up to 24 hours in the refrigerator. Reheat gently to avoid soggy nori.
Nutrition
- Serving Size: One rice ball (appro
- Calories: 200250
- Sugar: 23
- Sodium: 300400
- Fat: 24
- Saturated Fat: 0.51
- Carbohydrates: 4045
- Fiber: 12
- Protein: 610
Keywords: onigiri, Japanese rice balls, easy onigiri recipe, beginner Japanese recipe, rice ball trio, salmon onigiri, umeboshi plum, furikake, nori, gluten-free snack