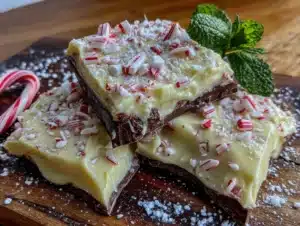
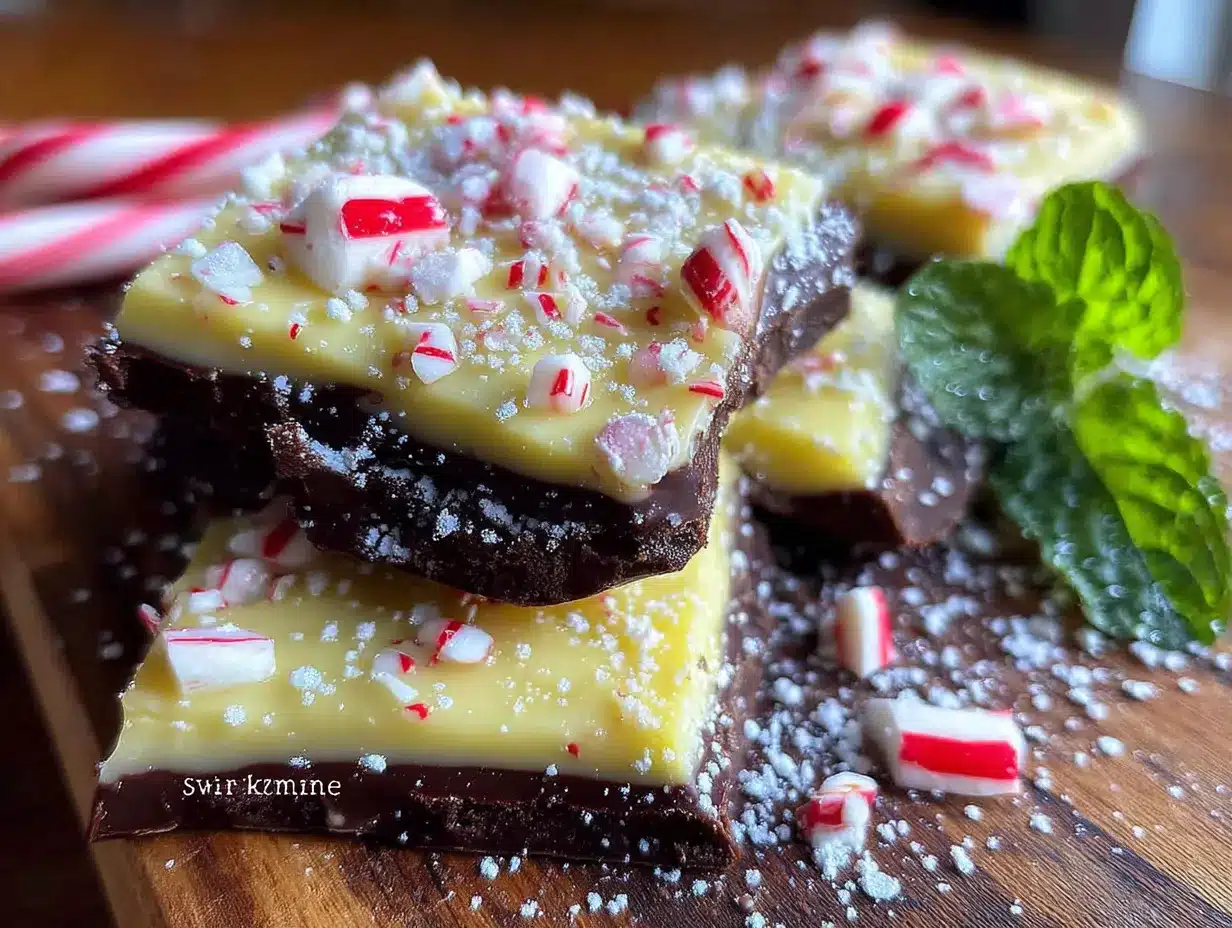
Marta watched me staring at her counter, where a tray of something impossibly shiny and cracked sat cooling. She didn’t say anything at first. Then she broke off a piece—the snap slicing through her quiet kitchen—and handed it to me without a word. That first bite was a shock. The dark chocolate hit first, deep and almost serious, and then the white chocolate melted in behind it, creamy and sweet, with little bits of peppermint crunching between my teeth. I think I actually said “whoa” out loud.
Marta is my neighbor from two doors down. She’s originally from Poland, though she’s lived here longer than I have. We talk over the fence about tomatoes in the summer, and she once helped me chase a runaway chicken down the alley. She’s not the type to offer recipes freely—she cooks the way she talks, direct and without fuss. But that day, she saw me eyeing her peppermint bark and just shrugged. “It’s nothing,” she said. “Chocolate and candy. You can do it.”
Honestly, I didn’t believe her at first. The bark looked so polished, so professional, like something you’d pay twelve dollars for in a tin from the mall. But she was right. It really is nothing—just three ingredients, a little patience, and a trick or two about temperature. I’ve made it every December since then, and let me tell you, it’s become my secret weapon for holiday gifting, classroom treats, and those evenings when you just need something sweet without turning on the mixer. Maybe you’ve been there—staring down a long to-do list and wishing you could make something that looks impressive without actually being hard. This is that recipe. Marta taught me that the best gifts from the kitchen don’t have to be complicated. They just have to be made with a little care.
Why You’ll Love This Recipe
Let’s be real for a second. Between school concerts, work deadlines, and the endless parade of holiday parties, who has time for a fussy dessert that requires a candy thermometer and a PhD in pastry? This peppermint bark is the opposite of that. It’s the kind of recipe you can make while the kids are doing homework or while you’re catching up on a podcast. And it delivers every single time.
- Quick & Easy: From start to finish, you’re looking at about 20 minutes of active work. The rest is just waiting for chocolate to set. You can literally make it during a lunch break.
- Simple Ingredients: Dark chocolate chips, white chocolate chips, and candy canes. That’s it. No heavy cream, no corn syrup, no special extracts you’ll never use again. If you have a pantry, you probably have most of this already.
- Perfect for the Holidays: This bark is the MVP of cookie exchanges, teacher gifts, and hostess presents. It travels well, it doesn’t spoil, and it looks like you fussed when you absolutely did not.
- Crowd-Pleaser: I have literally never seen a piece of this bark left on a plate. Kids love the crunch and the sweetness. Adults love that it’s not cloying. It’s the rare dessert that makes everyone happy.
- Unbelievably Delicious: The contrast between the rich, slightly bitter dark chocolate and the sweet, creamy white chocolate is a classic for a reason. Add the cool burst of peppermint, and you’ve got a flavor combination that’s genuinely addictive.
What makes this version different from the rest? It’s the layering technique. Instead of swirling the chocolates together (which can look messy), you let the dark chocolate set completely before spreading the white chocolate on top. That clean, sharp line is what gives the bark that professional look. Plus, I’ve tested this with different brands of chocolate, and I’ll share exactly which ones work best so you don’t end up with a seized, grainy mess. This isn’t just another recipe—it’s the one I’ve perfected over years of holiday baking, and it’s the one you’ll come back to year after year.
What Ingredients You Will Need
This recipe is a masterclass in simplicity. Every ingredient has a specific job, and there’s no room for fakes or substitutes if you want that perfect snap and creamy melt. Here’s what you’ll need to gather:
- 12 ounces (340g) dark chocolate chips or bars, chopped: I recommend Ghirardelli 60% Cacao Bittersweet Chocolate Chips. They melt smoothly, have a deep flavor that stands up to the sweetness of the white chocolate, and they’re widely available. If you use a bar, chop it into small, even pieces so it melts evenly. Avoid chocolate with less than 50% cacao—it will be too sweet and won’t provide the necessary contrast.
- 12 ounces (340g) white chocolate chips or bars, chopped: This is where quality matters most. Not all white chocolate is created equal. Look for one that contains real cocoa butter (it will say so on the label). Ghirardelli White Chocolate Premium Baking Chips are my go-to. Avoid “white morsels” or “vanilla chips” that are mostly oil and sugar—they won’t melt properly and will leave a waxy film in your mouth. If you’re using a bar, chop it finely.
- 4 to 6 large candy canes (about 1/2 cup or 60g crushed): You need the real thing, not imitation peppermint candies. The flavor is brighter and more natural. You can buy pre-crushed peppermint, but honestly, crushing your own is more satisfying and lets you control the texture. I like to leave some bigger pieces for crunch and some fine dust for color.
- 1 teaspoon (5ml) coconut oil or vegetable shortening (optional, for smoother melting): This is my secret weapon. A tiny bit of fat helps the chocolate melt more smoothly and gives the bark a beautiful sheen. It’s not strictly necessary, but it does make a difference, especially with white chocolate which can be finicky.
Ingredient Selection Tips: When buying dark chocolate, check the ingredient list. You want chocolate that lists cocoa mass or chocolate liquor first, not sugar. For white chocolate, the first ingredient should be cocoa butter. If you see palm oil or other vegetable oils, put it back. Trust me on this—I learned the hard way after a batch of white chocolate turned into a grainy, clumpy mess. Also, make sure your candy canes are fresh. Stale ones lose their peppermint punch and can taste a little like cardboard.
Substitution Guidance: If you need a dairy-free version, use dark chocolate that’s labeled dairy-free (many are) and a dairy-free white chocolate alternative. Enjoy Life makes a good one. For a gluten-free option, you’re already in the clear—just double-check your candy canes, as some brands use wheat starch. If you don’t have candy canes, you can use hard peppermint candies, but avoid the soft, chewy kind. And if you’re really in a pinch, a few drops of pure peppermint extract mixed into the white chocolate will work, though you’ll miss the satisfying crunch.
Equipment Needed
You don’t need a fancy kitchen to make this bark. In fact, you probably own most of this already. Here’s what you’ll want to have on hand:
- A rimmed baking sheet (13×18 inch or similar): This gives you plenty of room to spread the chocolate into a thin, even layer. If you don’t have a rimmed sheet, a large flat plate or even a cutting board will work in a pinch.
- Parchment paper: Non-negotiable. The chocolate will stick to anything else. Wax paper can melt, and aluminum foil can tear. Parchment is your friend.
- A small saucepan or a double boiler: For melting the chocolate gently. A double boiler is ideal because it prevents the chocolate from getting too hot, but a small saucepan with an inch of simmering water and a heatproof bowl on top works just as well.
- A rubber spatula: For stirring and spreading. A silicone one is best because it won’t scratch your bowl and it’s easy to clean.
- A rolling pin or a heavy skillet: For crushing the candy canes. You can also use a food processor, but I find the manual method more therapeutic and less likely to turn everything into dust.
- A zip-top bag: For containing the candy canes while you crush them. This prevents peppermint shrapnel from flying all over your kitchen.
- A sharp knife: For cutting the finished bark into pieces. A serrated knife works best because it doesn’t shatter the chocolate.
Budget-Friendly Options: If you don’t have a double boiler, you can absolutely melt chocolate in the microwave. Use a microwave-safe bowl and heat in 30-second bursts at 50% power, stirring well between each burst. It’s faster and requires no special equipment. Just be careful not to overheat the chocolate, especially the white chocolate, which burns easily.
Preparation Method
Alright, let’s get to it. This is the part where the magic happens. Follow these steps closely, and you’ll have a beautiful tray of peppermint bark that looks like it came from a fancy bakery.
- Prepare your workspace and tools. Line your baking sheet with a sheet of parchment paper, making sure the edges hang over the sides a little. This will make it easy to lift the bark out later. Crush your candy canes by placing them in a sturdy zip-top bag and bashing them with a rolling pin or the bottom of a heavy skillet. You want a mix of small pieces and fine dust. Set aside about 2 tablespoons of the finest dust for sprinkling on top at the end. Set the rest aside for now.
- Melt the dark chocolate. Fill your small saucepan with about an inch of water and bring it to a gentle simmer. Place your dark chocolate (and 1/2 teaspoon of coconut oil if you’re using it) in a heatproof bowl and set it over the saucepan, making sure the bottom of the bowl doesn’t touch the water. Stir occasionally with your rubber spatula until the chocolate is mostly melted. Remove the bowl from the heat and continue stirring until the residual heat melts the last few pieces. The chocolate should be smooth and glossy. If you’re using the microwave, heat the chocolate in 30-second bursts at 50% power, stirring after each burst, until smooth. Do not rush this step—burnt chocolate is bitter and grainy and cannot be saved.
- Spread the dark chocolate layer. Pour the melted dark chocolate onto the center of your prepared baking sheet. Use your spatula to spread it into an even rectangle, about 1/4-inch thick. Don’t worry if the edges are a little uneven—that’s part of the charm. The shape doesn’t matter as long as the thickness is consistent. Gently tap the baking sheet on the counter a few times to release any air bubbles and to help the chocolate settle into an even layer.
- Let the dark chocolate set. Place the baking sheet in the refrigerator for about 15 to 20 minutes, or until the chocolate is firm to the touch. It should be solid, not tacky. If you press it gently with your finger, it should leave no mark. Don’t leave it in the fridge for too long, or it can become too hard and brittle, which makes spreading the next layer difficult.
- Melt the white chocolate. While the dark chocolate is setting, clean your bowl and spatula thoroughly. Any trace of dark chocolate will discolor the white layer. Melt the white chocolate using the same gentle method—either over simmering water or in the microwave with 30-second bursts. Add the remaining 1/2 teaspoon of coconut oil if you’re using it. White chocolate is more delicate than dark, so watch it carefully. It can go from perfectly melted to grainy and seized in seconds. Stir until smooth and glossy.
- Spread the white chocolate layer. Remove the baking sheet from the refrigerator. Pour the melted white chocolate over the set dark chocolate layer. Gently spread it into an even layer, being careful not to disturb the dark chocolate underneath. Again, aim for about 1/4-inch thickness. Try to cover the dark chocolate completely, but don’t stress if a tiny bit peeks through at the edges—it looks rustic and homemade.
- Add the peppermint topping. Immediately sprinkle the crushed candy canes (including the reserved fine dust) evenly over the wet white chocolate. Press them in gently with your fingers or the back of a spoon so they stick. Work quickly, because the white chocolate will start to set as soon as it hits the cold dark chocolate layer.
- Let the bark set completely. Return the baking sheet to the refrigerator for at least 1 hour, or until both layers are completely firm. You can leave it overnight if you’re making it ahead of time. The bark should be hard and snappy when you lift a corner.
- Break or cut the bark. Once the bark is fully set, lift it out of the baking sheet using the parchment paper. Place it on a cutting board. You can either break it into irregular, rustic pieces with your hands (this is my preferred method—it looks more natural) or use a sharp serrated knife to cut it into neat squares or rectangles. If you’re cutting, use a gentle sawing motion to avoid shattering the chocolate. Store the pieces in an airtight container.
Sensory Cues: When you’re melting the dark chocolate, you’ll know it’s ready when it looks like thick, dark syrup and smells deeply of cocoa. The white chocolate should look like heavy cream and smell sweet and milky. When you break the finished bark, listen for that clean, sharp snap—it’s the sound of perfectly tempered chocolate. If the bark bends instead of snapping, it wasn’t set long enough.
Cooking Tips & Techniques
I’ve made this recipe more times than I can count, and I’ve made every mistake in the book so you don’t have to. Here are the things I wish someone had told me the first time.
The Biggest Mistake: Overheating the Chocolate. I cannot stress this enough. Chocolate is not forgiving. If you overheat it, the cocoa butter separates from the cocoa solids, and you end up with a thick, grainy, unworkable mess. Always melt chocolate slowly and gently. If you see any steam rising from the bowl, you’ve gone too far. Take it off the heat immediately and stir in a handful of unmelted chocolate chips to bring the temperature down.
The Second Biggest Mistake: Getting Water in the Chocolate. Water is chocolate’s enemy. Even a single drop can cause the chocolate to “seize” and turn into a stiff, clumpy paste. Make sure your bowl and spatula are completely dry. Don’t let any steam from the simmering water get into the bowl. If your chocolate does seize, you can sometimes rescue it by stirring in a tablespoon of coconut oil or vegetable shortening, but it’s not guaranteed. Prevention is the best cure.
My Personal Failure: The first time I made this, I was in a hurry and decided to melt the white chocolate in the microwave on full power. I walked away for 45 seconds. When I came back, it was a scorched, lumpy disaster. I had to throw it out and start over. Now I never leave melting chocolate unattended, and I always use 50% power. Learn from my impatience!
Timing Strategy: This recipe is actually great for multitasking. While the dark chocolate layer is setting in the fridge, you can clean up your dishes, crush the candy canes, or start wrapping other gifts. The active work is minimal, but the waiting time gives you space to get other things done. I often make this while I’m also prepping a batch of cookie dough or wrapping presents.
For Perfect Snap: If you want that clean, professional snap when you break the bark, make sure both layers are fully set before you try to cut or break it. If the bark is even slightly soft, it will bend and crack messily. Patience is the secret ingredient here.
Variations & Adaptations
Once you’ve mastered the basic recipe, the possibilities are endless. Here are a few of my favorite twists.
- Dark Chocolate & Sea Salt: Before the dark chocolate sets, sprinkle a pinch of flaky sea salt (like Maldon) over the top. The salt enhances the chocolate flavor and cuts through the sweetness. It’s a sophisticated touch that takes about two seconds.
- Mint Chocolate Chip: Stir 1/4 cup of mini chocolate chips into the white chocolate layer before spreading it. The little flecks of dark chocolate add texture and a double-chocolate hit. My kids go crazy for this version.
- Peppermint Mocha: Add 1 teaspoon of instant espresso powder to the dark chocolate while it melts. The coffee doesn’t make it taste like coffee—it just deepens and enriches the chocolate flavor. It’s subtle, but it makes a difference.
- Vegan Version: Use dairy-free dark chocolate (many are accidentally vegan) and a vegan white chocolate alternative. Enjoy Life makes a good one. The rest of the ingredients are already vegan-friendly. The texture will be slightly different, but it’s still delicious.
- Different Candy: Not a fan of peppermint? Try crushed toffee bits, crushed pretzels for a sweet-salty combo, or freeze-dried raspberries for a tart contrast. Each swap creates a completely new flavor profile.
A Personal Variation: Last year, I had some leftover dark chocolate with orange zest from another project, and I used it in this bark. I added a little orange extract to the white chocolate and used crushed pistachios instead of candy canes. It was absolutely divine—like a fancy European chocolate bar. Don’t be afraid to experiment with what you have on hand.
Serving & Storage Suggestions
This bark is incredibly versatile. Here’s how to serve it and keep it fresh.
Serving: Peppermint bark is best served at room temperature. Take it out of the fridge about 10 minutes before you plan to serve it so the chocolate can soften slightly. Arrange the pieces on a pretty plate or in a festive tin. It’s perfect for holiday parties, cookie exchanges, or as a little something sweet with coffee or tea. I also love tucking a few pieces into cellophane bags tied with ribbon for last-minute gifts.
Complementary Pairings: This bark is wonderful with a hot cup of coffee, a mug of spiced chai, or a glass of cold milk. For a dessert board, arrange the pieces alongside fresh berries, dried figs, and a wedge of good aged cheese like Manchego. The sweetness of the bark balances beautifully with the sharpness of the cheese.
Storage: Store the bark in an airtight container at room temperature for up to 2 weeks. Yes, really. It won’t spoil, but it might get a little softer if your kitchen is warm. If you live in a hot climate, keep it in the refrigerator, but let it come to room temperature before serving. Do not freeze the bark—the texture will suffer, and the white chocolate can develop a chalky texture.
How Flavors Develop: Honestly, this bark tastes even better the next day. The peppermint flavor mellows and melds with the chocolate, and the texture becomes perfectly snappy. If you can resist eating it all immediately, it’s worth making it a day ahead.
Nutritional Information & Benefits
Let’s be honest—this is a treat, not a health food. But that doesn’t mean it’s completely without merit. Here’s a rough estimate for one serving (about 1 ounce or 28g, which is a small piece):
- Calories: Approximately 150-170
- Fat: 10-12g
- Carbohydrates: 18-20g
- Sugar: 15-17g
- Protein: 1-2g
Health Benefits: Dark chocolate (especially 60% cacao or higher) is a source of antioxidants called flavonoids, which are linked to heart health and improved blood flow. It also contains iron, magnesium, and zinc. Peppermint has been used for centuries to aid digestion and soothe upset stomachs. So while this bark isn’t a superfood, it’s not empty calories either. It’s a treat that offers a tiny bit of goodness along with the indulgence.
Dietary Considerations: This recipe is naturally gluten-free and nut-free (as long as your chocolate is processed in a nut-free facility). It contains dairy, so it’s not suitable for vegans or those with dairy allergies unless you use the substitutions mentioned above. It is also high in sugar, so enjoy it in moderation. My personal philosophy is that a small piece of something truly delicious is more satisfying than a large piece of something mediocre. Savor it.
Conclusion
This peppermint bark has become a non-negotiable part of my holiday season. It’s the recipe I turn to when I need a quick gift, a classroom treat, or just something to make the kitchen feel festive. It’s simple enough to make with kids, impressive enough to give as a gift, and delicious enough to disappear in minutes. Marta was right—it really is nothing. But sometimes, nothing is exactly what you need.
I encourage you to make this recipe your own. Use your favorite chocolate, experiment with different toppings, and don’t be afraid to get a little messy. The best recipes are the ones that adapt to your life, not the other way around. And if you make a batch and find yourself sneaking pieces from the container when no one’s looking? Welcome to the club.
I’d love to hear how it turns out for you. Did you try a variation? Did your family love it? Drop a comment below and let me know—your stories and ideas are what make this community so special. Happy holidays, and happy baking!
Frequently Asked Questions
Can I use milk chocolate instead of dark chocolate?
You can, but I don’t recommend it. Milk chocolate is much sweeter, and the final bark will be overwhelmingly sugary, especially with the white chocolate layer. If you prefer milk chocolate, try using a combination of half dark and half milk, or add a pinch of salt to balance the sweetness.
Why did my white chocolate seize and turn grainy?
This usually happens for one of two reasons: the chocolate got too hot, or a tiny bit of water got into the bowl. Always melt white chocolate slowly and gently, and make sure your tools are completely dry. If it does seize, you can try stirring in a teaspoon of coconut oil, but it’s often better to start over.
How do I crush candy canes without making a huge mess?
Place the candy canes in a sturdy zip-top bag and lay it flat on a cutting board. Fold a kitchen towel over the top of the bag to muffle the sound and contain any stray pieces. Then go to town with a rolling pin or the bottom of a heavy skillet. It’s oddly satisfying.
Can I make this bark ahead of time for gifting?
Absolutely. In fact, it’s better made a day or two ahead. Store it in an airtight container at room temperature, and it will stay fresh for up to two weeks. Just keep it away from heat and direct sunlight. It’s the perfect make-ahead gift.
My chocolate layers separated after I cut the bark. What went wrong?
This can happen if the white chocolate wasn’t spread while it was still warm enough to bond with the dark chocolate layer. Make sure the white chocolate is still fluid when you pour it, and press the candy cane topping in gently to help it adhere. Also, make sure the dark chocolate layer is fully set but not ice-cold when you add the white chocolate.
Pin This Recipe!

Easy Homemade Peppermint Bark: Best Dark & White Chocolate
This easy peppermint bark recipe uses just three ingredients and a simple layering technique to create a professional-looking holiday treat. Perfect for gifting, it’s quick to make and always a crowd-pleaser.
- Prep Time: 20 minutes
- Cook Time: 0 minutes
- Total Time: 1 hour 20 minutes (includes chilling)
- Yield: 24 servings 1x
- Category: Dessert
- Cuisine: American
Ingredients
- 12 ounces (340g) dark chocolate chips or bars, chopped
- 12 ounces (340g) white chocolate chips or bars, chopped
- 4 to 6 large candy canes (about 1/2 cup or 60g crushed)
- 1 teaspoon (5ml) coconut oil or vegetable shortening (optional)
Instructions
- Line a rimmed baking sheet with parchment paper. Crush candy canes in a zip-top bag with a rolling pin; set aside 2 tablespoons of fine dust for topping.
- Melt dark chocolate with 1/2 teaspoon coconut oil (if using) over simmering water or in the microwave at 50% power in 30-second bursts, stirring until smooth.
- Pour melted dark chocolate onto prepared baking sheet and spread into an even 1/4-inch thick rectangle. Tap sheet to release air bubbles.
- Refrigerate dark chocolate layer for 15-20 minutes until firm to the touch.
- Clean bowl and spatula thoroughly. Melt white chocolate with remaining 1/2 teaspoon coconut oil using the same gentle method, stirring until smooth.
- Remove baking sheet from fridge. Pour white chocolate over set dark layer and spread evenly to 1/4-inch thickness, covering completely.
- Immediately sprinkle crushed candy canes (including reserved dust) over wet white chocolate. Press gently to adhere.
- Return to refrigerator for at least 1 hour until completely firm.
- Lift bark from sheet using parchment. Break into rustic pieces or cut with a serrated knife. Store in an airtight container.
Notes
Use high-quality chocolate with real cocoa butter for best results. Avoid overheating chocolate; melt gently. For dairy-free, use dairy-free dark and white chocolate alternatives. Bark keeps at room temperature for up to 2 weeks in an airtight container.
Nutrition
- Serving Size: 1 ounce (28g) piece
- Calories: 160
- Sugar: 16
- Sodium: 20
- Fat: 11
- Saturated Fat: 7
- Carbohydrates: 19
- Fiber: 1
- Protein: 2
Keywords: peppermint bark, dark chocolate, white chocolate, candy cane, holiday dessert, easy recipe, homemade gift