Introduction
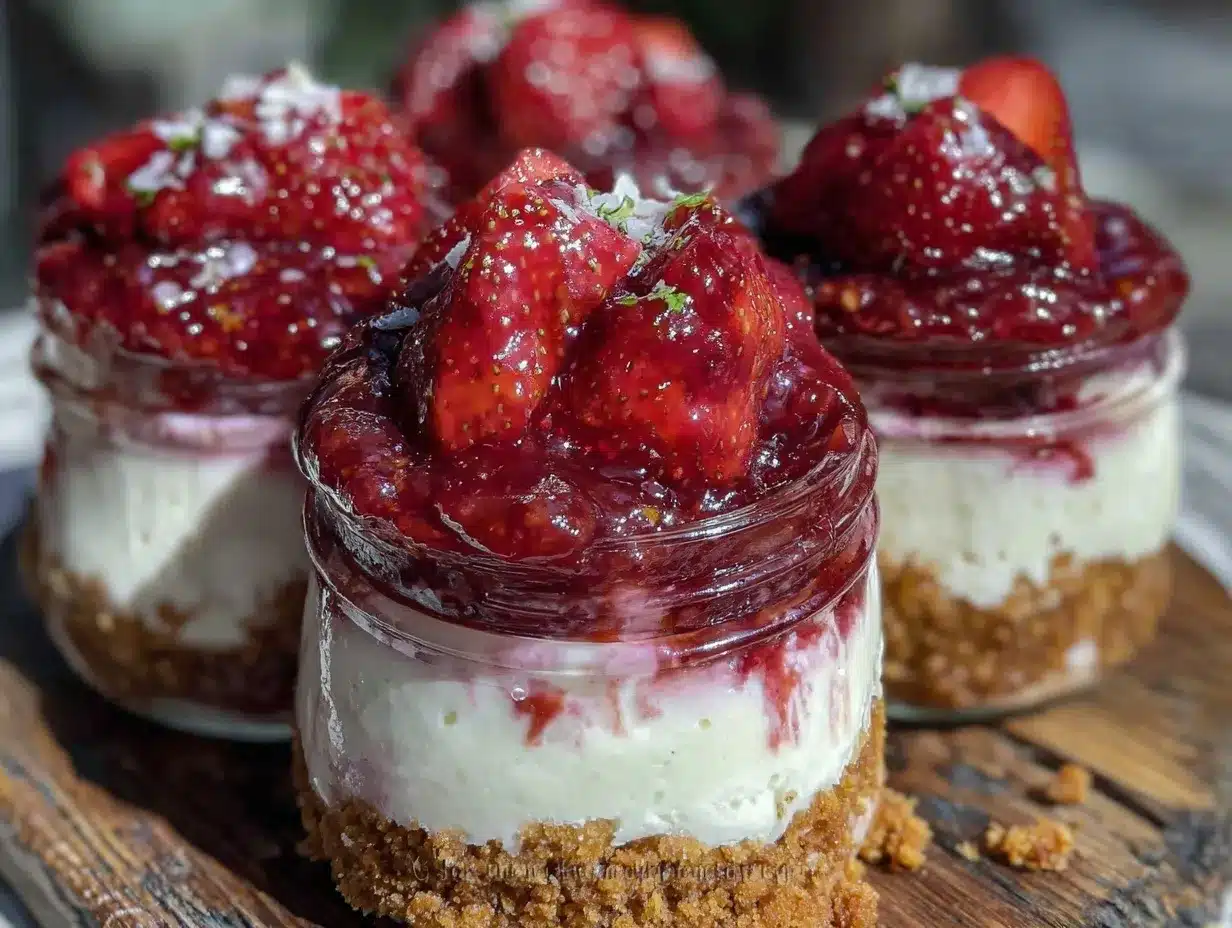
Let me tell you, the sweet aroma of fresh strawberries mingling with creamy cheesecake filling is enough to make anyone’s mouth water. The first time I whipped up these Easy No-Bake Strawberry Cheesecake Jars, it was on a scorching summer afternoon, the kind where the oven feels like an enemy. I was instantly hooked—the kind of moment where you pause, take a deep breath, and just smile because you know you’re onto something truly special. Years ago, when I was knee-high to a grasshopper, my grandma used to make a classic baked cheesecake that took hours, but this no-bake version? It’s dangerously easy and pure, nostalgic comfort in a jar.
My family couldn’t stop sneaking these jars off the counter while they cooled (and honestly, I can’t really blame them). You know what’s great? They’re perfect for potlucks, a sweet treat for your kids after school, or to brighten up your Pinterest cookie board with something a little different and fresh. After testing this recipe multiple times—in the name of research, of course—it’s become a staple for family gatherings and gifting. This recipe feels like a warm hug on a hot day, and trust me, you’re going to want to bookmark this one.
Why You’ll Love This Recipe
Honestly, this Easy No-Bake Strawberry Cheesecake Jars recipe ticks all the boxes for a fuss-free summer dessert. Here’s why you’ll be making it again and again:
- Quick & Easy: Comes together in under 20 minutes, perfect for busy weeknights or last-minute cravings.
- Simple Ingredients: No fancy grocery trips needed; you likely already have everything in your kitchen.
- Perfect for Summer: Great for backyard BBQs, picnics, or a light, refreshing dessert after a warm day.
- Crowd-Pleaser: Always gets rave reviews from kids and adults alike—sweet, creamy, and fresh.
- Unbelievably Delicious: The texture combo of crunchy graham cracker crust, silky cheesecake, and juicy strawberries is next-level comfort food.
What sets this recipe apart is the way the cheesecake filling blends cream cheese and whipped cream just right for an ultra-smooth texture, no baking required. Plus, layering it in jars makes it charming and portable—so much better than a big, clunky cheesecake. Honestly, this isn’t just another cheesecake recipe—it’s the best version you’ll find that’s light, fluffy, and bursting with fresh strawberry flavor. It’s comfort food reimagined—healthier, faster, but still soul-soothing.
What Ingredients You Will Need
This recipe uses simple, wholesome ingredients to deliver bold flavor and satisfying texture without the fuss. Most of these are pantry staples or fresh produce that you can pick up at any grocery store.
- For the Crust:
- 1 ½ cups graham cracker crumbs (about 10 full sheets; I prefer Honey Maid for the perfect crunch)
- 5 tablespoons unsalted butter, melted (adds richness and helps the crust stick together)
- 2 tablespoons granulated sugar (balances the buttery crust)
- For the Cheesecake Filling:
- 8 oz (225g) cream cheese, softened (use Philadelphia brand for best texture)
- ½ cup (120ml) heavy whipping cream, cold (whipped for fluffiness)
- ⅓ cup (40g) powdered sugar (adds sweetness without graininess)
- 1 teaspoon pure vanilla extract (for that classic cheesecake flavor)
- For the Strawberry Topping:
- 1 ½ cups fresh strawberries, hulled and sliced (in summer, local berries make all the difference)
- 2 tablespoons granulated sugar (to macerate the strawberries and bring out their natural juices)
- Optional: a squeeze of fresh lemon juice (brightens the strawberry flavor)
If you want to switch things up, you can swap graham crackers with gluten-free cookies or use coconut oil instead of butter for a dairy-free crust. The filling can also be adapted by using dairy-free cream cheese and coconut cream for a vegan twist. But honestly, this classic combo is hard to beat.
Equipment Needed
- Mixing bowls (one large for the filling, one for the crust)
- Electric mixer or hand whisk (an electric mixer makes whipping cream easier, but a sturdy whisk works too)
- Measuring cups and spoons (for precise ingredient amounts)
- Spatula (to fold in whipped cream gently)
- Small jars or dessert cups (4 to 6-ounce size, perfect for layering and serving)
- Food processor or plastic bag and rolling pin (to crush graham crackers finely)
If you don’t have a food processor, just pop the crackers in a sealed plastic bag and give them a good whack with a rolling pin or a heavy pan. Honestly, that’s what I do most days—it’s budget-friendly and easy. For whipping cream, if you’re short on time, a stand mixer will save your arm, but a balloon whisk works if you put your mind to it. Just make sure everything is cold for best results.
Preparation Method
- Prepare the Crust: In a medium bowl, combine the graham cracker crumbs, melted butter, and granulated sugar. Mix until the crumbs are evenly coated and resemble wet sand. This should take about 3-5 minutes. If the mixture feels too dry, add a tiny splash more butter (but don’t go overboard).
- Assemble the Crust in Jars: Spoon about 2 tablespoons (30g) of the crust mixture into each jar. Press down firmly with the back of a spoon or your fingers to create a compact base. This helps give you that satisfying crunch in every bite. Place jars in the fridge while you prepare the filling to let the crust set, around 10 minutes.
- Whip the Cream: Pour the cold heavy whipping cream into a chilled bowl. Using an electric mixer, beat on medium-high speed until soft peaks form, about 2-3 minutes. Stop before it gets grainy or over-whipped. Set aside.
- Make the Cheesecake Filling: In a separate large bowl, beat the softened cream cheese and powdered sugar together until smooth and creamy—about 2 minutes with a mixer. Add vanilla extract and mix again.
- Fold in Whipped Cream: Gently fold the whipped cream into the cream cheese mixture using a spatula. Take your time here—fold just until combined to keep the filling light and airy. This step usually takes 2-3 minutes.
- Layer the Filling: Spoon or pipe the cheesecake filling over the chilled crust in each jar, filling about ¾ of the way. Smooth the tops with the back of a spoon.
- Prepare the Strawberry Topping: Toss the sliced strawberries with granulated sugar and a squeeze of lemon juice in a small bowl. Let them sit for 10 minutes to macerate—this brings out the juices and sweetness.
- Add the Strawberries: Spoon the strawberry mixture over the cheesecake filling in each jar, distributing evenly. You can add a few whole berries on top for extra charm.
- Chill Before Serving: Cover the jars with lids or plastic wrap and refrigerate for at least 2 hours, or overnight if you can wait that long (trust me, it’s worth it). The flavors meld beautifully, and the texture firms up nicely.
Feeling a bit impatient? A quick 30-minute chill can work in a pinch, but the longer the better for that perfect cheesecake texture. If you notice the crust softening too much, try pressing it down again before adding the filling next time.
Cooking Tips & Techniques
When making these Easy No-Bake Strawberry Cheesecake Jars, a few tricks can make all the difference:
- Softening Cream Cheese: Let it sit at room temperature for about 30 minutes before mixing. Cold cream cheese makes lumps, and nobody wants that.
- Whipping Cream: Chill your bowl and beaters in the freezer for 10 minutes before whipping. This helps the cream whip faster and stay stable.
- Folding Technique: Use a gentle folding motion with a spatula when combining whipped cream and cream cheese mixture to keep it airy. Overmixing will deflate your filling.
- Crust Pressing: Pack the crust firmly in the jars to prevent it from crumbling when eating. A compact crust holds up better against the creamy filling.
- Strawberry Maceration: Don’t skip this step! It softens the berries and releases natural juices, making the topping juicy and flavorful.
- Chilling Time: Patience is key. The longer you chill, the better the texture and flavor marry. Overnight is ideal if you can wait.
I learned the hard way that rushing the chilling step leads to a runny mess. Also, once I tried swapping granulated sugar with honey in the filling—it just didn’t whip up right. Stick to powdered sugar for smoothness. Lastly, when layering, piping the filling with a zip-top bag snipped at the corner makes things neat and pretty, especially if you’re serving guests.
Variations & Adaptations
You can easily customize these strawberry cheesecake jars to suit different tastes or dietary needs:
- Berry Swap: Use blueberries, raspberries, or blackberries instead of strawberries for a mixed berry version. In summer, fresh berries work best; in winter, frozen ones do the trick.
- Gluten-Free: Swap graham crackers for gluten-free cookies or crushed nuts (almonds or pecans) for a nutty crust.
- Vegan/Dairy-Free: Use dairy-free cream cheese and coconut whipped cream. Substitute butter with coconut oil for the crust.
- Chocolate Twist: Add a tablespoon of cocoa powder to the crust or sprinkle mini chocolate chips between layers for an indulgent touch.
- Personal Favorite: I once added a layer of lemon curd between the crust and filling—totally unexpected but oh-so-good. It brightens the whole dessert and adds zingy contrast.
If you want to turn these into parfaits, add granola or crushed cookies between layers for crunch. Or try layering in clear glasses for a fancy presentation. The possibilities are endless!
Serving & Storage Suggestions
Serve these Easy No-Bake Strawberry Cheesecake Jars chilled straight from the fridge. The cool temperature keeps the filling firm and refreshing—perfect on a hot day. They look absolutely adorable with a fresh strawberry or mint leaf garnish on top.
Pair these jars with a cup of iced tea, sparkling lemonade, or even a light rosé wine for a grown-up summer treat. They also complement a casual brunch spread or a picnic basket nicely.
Store leftovers covered in the refrigerator for up to 3 days. The crust might soften slightly over time but remains tasty. If you want to keep them longer, they freeze well for up to a month. Just thaw overnight in the fridge before serving. Reheat? Nah, cheesecake is best cold—trust me on this one.
Flavors tend to deepen after a day, so making these a day ahead can actually make your dessert taste even better. Just don’t forget to give the jars a gentle shake before serving to redistribute any juices.
Nutritional Information & Benefits
Each jar (serving size about 1 cup/240ml) contains roughly:
| Calories | 320 kcal |
|---|---|
| Fat | 22g |
| Carbohydrates | 28g |
| Protein | 5g |
The fresh strawberries provide a boost of vitamin C and antioxidants, while the cream cheese offers protein and calcium. This dessert is indulgent but also satisfying in portion-controlled jars. For gluten-free or dairy-free options, just swap the crust and filling ingredients accordingly.
From a wellness perspective, this recipe balances sweetness with fresh fruit and avoids heavy baking fats, making it a lighter alternative to traditional cheesecakes. It’s a sweet treat that won’t leave you feeling weighed down.
Conclusion
In a nutshell, these Easy No-Bake Strawberry Cheesecake Jars are a total game-changer for summer desserts. They’re quick, simple, and absolutely delicious—plus, the jar presentation adds that extra bit of charm that makes them perfect for sharing or gifting. You can tweak the ingredients or toppings to fit your mood or dietary needs without losing that creamy, dreamy cheesecake goodness.
I love this recipe because it reminds me of those relaxed summer days with family, enjoying something sweet without the fuss. Why not give it a try? I’d love to hear how you customize yours, so drop a comment below or share your photos on social media. Go on, make a batch—you won’t regret it!
Happy no-baking and strawberry-loving!
Frequently Asked Questions
Can I make these cheesecake jars ahead of time?
Absolutely! They taste even better after chilling overnight. Just cover and refrigerate until ready to serve.
What can I substitute for graham cracker crumbs?
You can use crushed digestive biscuits, gluten-free cookies, or even finely chopped nuts for the crust.
Can I use frozen strawberries for the topping?
Yes, but thaw and drain excess liquid before adding sugar to avoid watery jars.
How long do these cheesecake jars keep in the fridge?
They’ll stay fresh for 3 days when properly covered. After that, the crust may soften but they’re still tasty.
Is it okay to use low-fat cream cheese or yogurt in the filling?
Low-fat cream cheese can work but may affect texture. Yogurt changes the flavor and consistency quite a bit, so I recommend sticking to cream cheese for best results.
Pin This Recipe!

Easy No-Bake Strawberry Cheesecake Jars
A quick and easy no-bake dessert featuring creamy cheesecake filling layered with fresh strawberries in charming jars, perfect for summer gatherings and potlucks.
- Prep Time: 15 minutes
- Cook Time: 0 minutes
- Total Time: 2 hours 15 minutes
- Yield: 6 servings 1x
- Category: Dessert
- Cuisine: American
Ingredients
- 1 ½ cups graham cracker crumbs (about 10 full sheets)
- 5 tablespoons unsalted butter, melted
- 2 tablespoons granulated sugar
- 8 oz (225g) cream cheese, softened
- ½ cup (120ml) heavy whipping cream, cold
- ⅓ cup (40g) powdered sugar
- 1 teaspoon pure vanilla extract
- 1 ½ cups fresh strawberries, hulled and sliced
- 2 tablespoons granulated sugar
- Optional: a squeeze of fresh lemon juice
Instructions
- In a medium bowl, combine graham cracker crumbs, melted butter, and granulated sugar. Mix until crumbs are evenly coated and resemble wet sand, about 3-5 minutes. Add a tiny splash more butter if mixture feels too dry.
- Spoon about 2 tablespoons (30g) of crust mixture into each jar. Press down firmly to create a compact base. Refrigerate jars for about 10 minutes to let crust set.
- Pour cold heavy whipping cream into a chilled bowl. Using an electric mixer, beat on medium-high speed until soft peaks form, about 2-3 minutes. Set aside.
- In a separate large bowl, beat softened cream cheese and powdered sugar together until smooth and creamy, about 2 minutes. Add vanilla extract and mix again.
- Gently fold whipped cream into cream cheese mixture using a spatula until combined, about 2-3 minutes.
- Spoon or pipe cheesecake filling over chilled crust in each jar, filling about ¾ of the way. Smooth tops with back of a spoon.
- Toss sliced strawberries with granulated sugar and a squeeze of lemon juice in a small bowl. Let sit for 10 minutes to macerate.
- Spoon strawberry mixture over cheesecake filling in each jar, distributing evenly. Optionally add a few whole berries on top.
- Cover jars with lids or plastic wrap and refrigerate for at least 2 hours or overnight for best texture and flavor.
Notes
Let cream cheese soften at room temperature for 30 minutes before mixing. Chill bowl and beaters before whipping cream for better results. Use gentle folding to keep filling airy. Press crust firmly in jars to prevent crumbling. Macerate strawberries to enhance flavor and juiciness. Chill jars overnight if possible for best texture. Piping filling with a zip-top bag can make layering neater.
Nutrition
- Serving Size: 1 jar (about 1 cup /
- Calories: 320
- Fat: 22
- Carbohydrates: 28
- Protein: 5
Keywords: no-bake cheesecake, strawberry cheesecake, summer dessert, easy dessert, cheesecake jars, no bake dessert, quick dessert