“You’ve got to try this mango kakigori,” my friend texted me one humid afternoon, right when the summer heat was making my apartment feel like a sauna. I was skeptical at first—shaved ice? Without a machine? Honestly, I’d always thought perfect kakigori was something you could only get in Japan or at a specialty shop with fancy equipment. But curiosity won out. The next day, I gave it a shot, and let’s just say, my skepticism melted faster than the ice on my kitchen counter.
Making this Easy Creamy Japanese Mango Kakigori without a machine turned out to be one of those happy kitchen accidents I keep coming back to. The texture was just right—light, fluffy, and creamy, with a bright mango flavor that felt like a little tropical vacation in a bowl. It’s the kind of treat you don’t expect to nail on the first try (let’s face it, I messed up the ice texture a couple times), but once you get it, you’re hooked.
What struck me most was how simple it was. No bulky machines, no complicated steps—just a few fresh ingredients, a blender, and a bit of patience. It’s become my go-to summer refreshment, especially after long days when I just want something cool and comforting without any fuss. I even found myself making it multiple times in a week, tweaking the creaminess or mango sweetness depending on my mood.
Honestly, this recipe stuck around because it’s reliable and satisfying. It’s not flashy, but it hits that perfect spot between indulgent and refreshing. And I love that it reminds me of those quiet moments—late afternoons when the sun is still warm, but you’re already planning dinner, maybe something cozy like creamy cheesy taco pasta—yet you need a little chill first. This mango kakigori is a small joy that feels personal and thoughtfully simple.
Why You’ll Love This Recipe
After testing this Easy Creamy Japanese Mango Kakigori recipe over and over (no exaggeration), I can confidently say it’s a summer staple that’s super easy to whip up, even if you’re not a dessert pro. Here’s why this recipe shines:
- Quick & Easy: You can have this creamy mango delight ready in under 20 minutes, perfect for those unexpected heat waves or last-minute cravings.
- Simple Ingredients: No hard-to-find items here. Just ripe mangoes, milk, cream, and a few pantry basics you probably already keep on hand.
- Perfect for Summer Treats: Whether you’re hosting a casual backyard hangout or just need a refreshing pick-me-up, this kakigori fits the bill.
- Crowd-Pleaser: Kids, adults, mango fans, and even those who usually skip desserts love this. It’s light but creamy, with a naturally sweet flavor.
- Unbelievably Delicious: The secret is in the creamy mango sauce and the texture of the ice, fluffy yet smooth, that melts in your mouth with every spoonful.
This recipe isn’t just any kakigori—what sets it apart is how it achieves that creamy, melt-in-your-mouth texture without a fancy machine. The trick? Crushing the ice by hand and blending fresh mango into a luscious cream sauce that feels indulgent but not heavy. It’s a balance I’ve refined through trial and error, and it’s the reason why this version feels both authentic and approachable.
It’s comfort food reimagined for hot days—lighter than ice cream but just as satisfying, and it’s flexible enough to tweak for different tastes. Honestly, after making it so often, I can say it’s the kind of recipe that’ll quietly become your summer favorite without demanding much attention.
What Ingredients You Will Need
This Easy Creamy Japanese Mango Kakigori uses straightforward ingredients that come together to create bold flavor and that perfect creamy texture, all without the fuss of special gadgets. Most are pantry staples or fresh produce you can find year-round, and there are simple swaps if needed.
- Ripe Mangoes (2 large, peeled and chopped) – Fresh is best for natural sweetness and vibrant color. If mangoes aren’t in season, frozen chunks work fine.
- Sweetened Condensed Milk (1/3 cup / 80 ml) – Adds rich sweetness and creaminess. I prefer brands like Eagle or La Lechera for consistency.
- Heavy Cream (1/2 cup / 120 ml) – Whipped lightly for that luscious texture. Can substitute with coconut cream for a dairy-free twist.
- Whole Milk (1/2 cup / 120 ml) – Helps thin the cream mixture slightly for perfect pourability.
- Ice Cubes (about 4 cups / 950 ml) – Use clear ice if possible for a cleaner look and taste. Crushed by hand or with a mallet.
- Sugar (2 tbsp / 25 g) – Optional, depending on mango sweetness. Adjust to taste.
- Fresh Lime Juice (1 tbsp / 15 ml) – Adds a subtle tang that brightens the mango flavor.
- Vanilla Extract (1 tsp / 5 ml) – Gives a gentle warmth and depth to the cream sauce.
If you want to get creative, you can swap out heavy cream with Greek yogurt for a tangier feel or try almond milk to make it lighter. Just remember, the creamy element is what makes this kakigori special, so keep some thick component in the mix.
Equipment Needed
- Blender or Food Processor: Essential for pureeing mangoes and mixing the cream sauce smoothly. I’ve found that a standard blender works just fine; no fancy high-speed model needed.
- Large Bowl: To crush the ice and mix ingredients.
- Rolling Pin or Mallet: For crushing the ice cubes if you don’t have a dedicated ice crusher. A clean kitchen towel wrapped around the ice helps keep things tidy.
- Whisk or Hand Mixer: To lightly whip heavy cream until fluffy but not stiff.
- Serving Bowls or Cups: Any small bowls or dessert cups will work beautifully—something that shows off the vibrant mango color.
If you don’t have a blender, a sturdy fork or potato masher can work but expect a chunkier texture. For the ice, crushing by hand adds a rustic feel, but if you own a food processor like the one I used for my sheet pan Italian sausage dinner, it speeds things up nicely.
Preparation Method
- Prepare the Mango Puree (about 10 minutes): Place the chopped ripe mangoes in your blender. Add the sweetened condensed milk, fresh lime juice, vanilla extract, and sugar if using. Blend until smooth and creamy. Taste and adjust sweetness or lime as needed.
- Whip the Cream (5 minutes): In a chilled bowl, whisk the heavy cream until it forms soft peaks. You don’t want it too stiff—just light and fluffy.
- Combine Cream and Mango Puree (2 minutes): Gently fold the whipped cream into the mango puree, mixing until just combined. The goal is a creamy, airy sauce that’s not overly thick.
- Crush the Ice (5-8 minutes): Place ice cubes in a large bowl wrapped with a clean kitchen towel. Use a rolling pin or mallet to gently crush the ice into fine, fluffy pieces—think snow-like texture, but if some chunks remain, that’s okay. It adds a nice contrast.
- Assemble the Kakigori (3 minutes): Spoon the crushed ice into serving bowls, packing lightly. Pour the creamy mango mixture over the ice generously, letting it seep in.
- Final Touch (optional): Garnish with small mango cubes, mint leaves, or a drizzle of extra condensed milk for added sweetness and presentation flair.
Pro tip: Serve immediately for the best texture. If it sits too long, the ice melts and the creaminess gets diluted. Also, crushing the ice by hand might take a few tries to get your preferred fluffiness, but it’s worth the effort.
Cooking Tips & Techniques
Making perfect kakigori at home without a machine can feel tricky, but a few tips learned the hard way will save you stress and yield great results:
- Ice Texture Is Key: Don’t rush crushing the ice. The finer and fluffier it is, the better it absorbs the creamy mango sauce. If your ice feels too coarse, crush it a bit more or let it sit briefly to soften just slightly.
- Whip Cream Just Right: Over-whipping the cream can make the mixture heavy and dense. Stop at soft peaks for a smooth, light texture.
- Sweetness Balance: Mangoes vary in sweetness; always taste your puree before adding sugar. Sometimes the lime juice alone brightens the flavor without needing extra sugar.
- Keep Ingredients Cold: Chill your bowls and utensils if possible. This helps keep the cream from melting too fast when combined with the ice.
- Work Quickly: Once the ice is crushed, assemble the kakigori swiftly to prevent melting and watery texture.
I remember the first time I tried making this, I crushed the ice too roughly and ended up with clumps that didn’t soak up the cream well. Since then, I learned a gentle but thorough crushing technique, and my kakigori texture improved dramatically. Also, I’ve found small adjustments—like adding a splash of vanilla extract—make a surprising difference in depth.
Variations & Adaptations
This recipe is pretty flexible, allowing you to tailor it to your preferences or dietary needs. Here are some ideas I’ve tried or thought about:
- Dairy-Free Version: Swap heavy cream for full-fat coconut cream and use coconut milk instead of whole milk. It gives a tropical vibe that pairs amazingly with mango.
- Fruity Mix-Ins: Add kiwi or strawberry puree alongside mango for a colorful, tangy twist. Perfect for summer fruit season.
- Matcha Mango Kakigori: Add a teaspoon of matcha powder to the cream mixture for a subtle green tea flavor—an elegant Japanese-inspired variation.
- Less Sweet Option: Use unsweetened condensed milk or cut back on sugar for a lighter dessert, especially if your mangoes are very ripe.
- Frozen Mango Cubes: Freeze small mango chunks and sprinkle on top for an icy, fresh texture contrast.
Once, I experimented with a savory creamy pasta dish earlier in the day, and the lightness of this mango kakigori was exactly the cool, refreshing dessert to balance that rich dinner. It’s that kind of recipe that pairs well with both casual and more elaborate meals.
Serving & Storage Suggestions
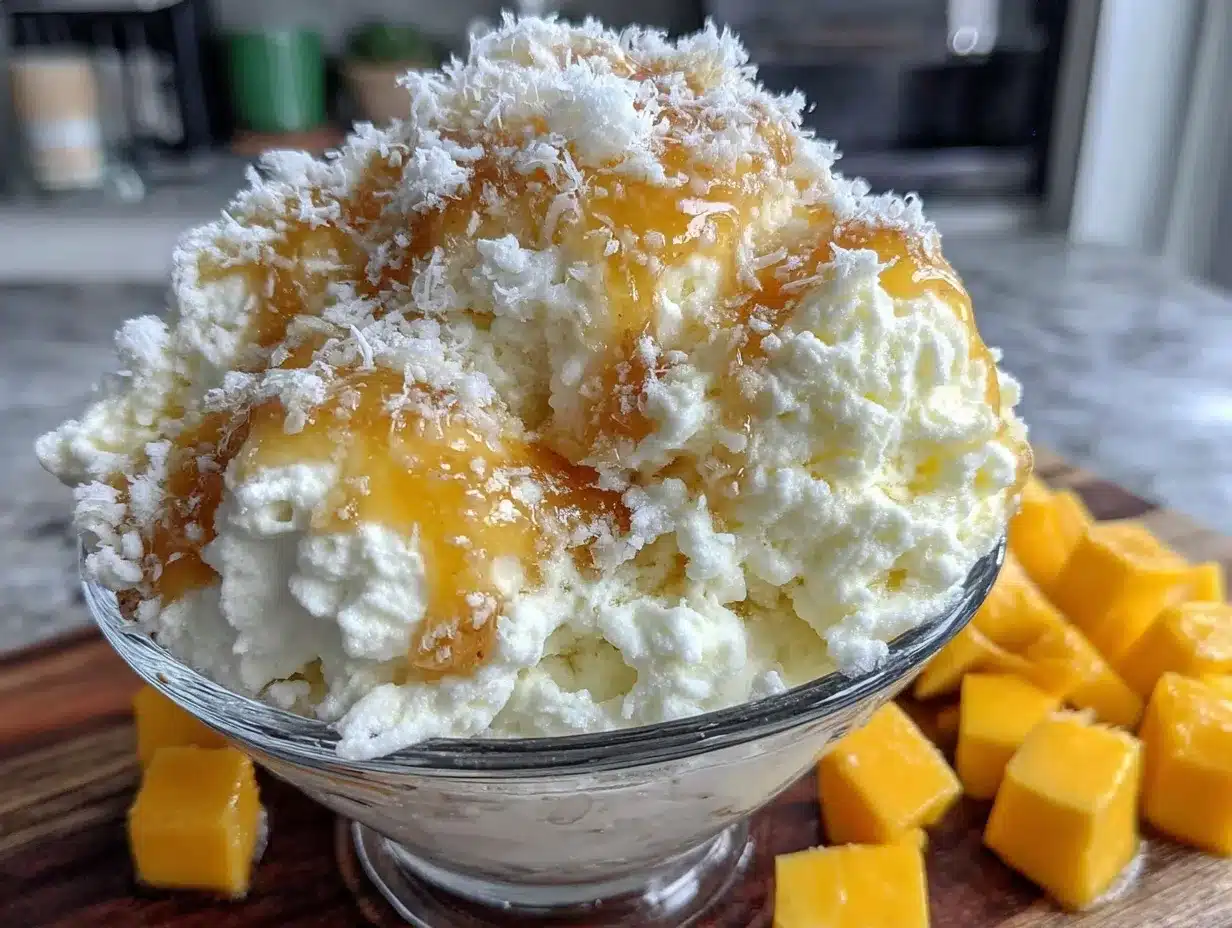
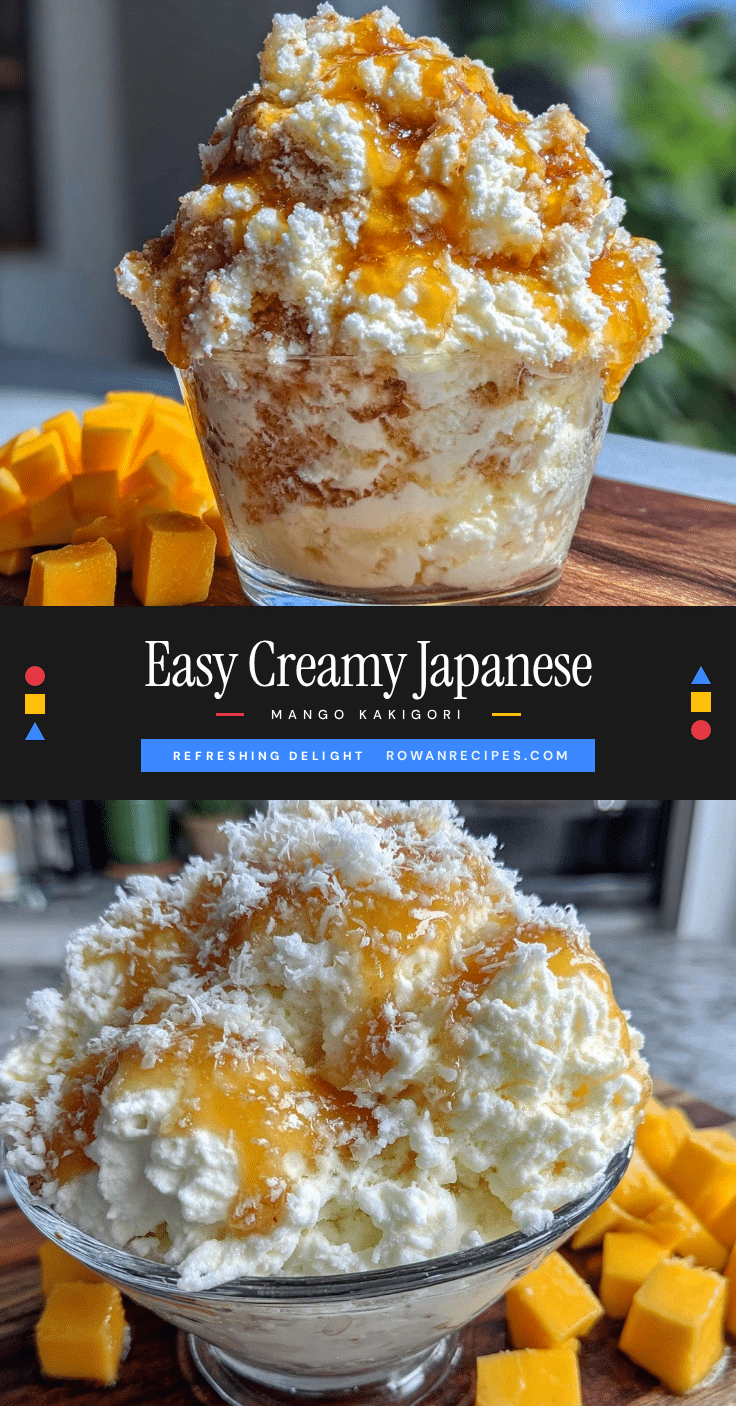
Serve your Easy Creamy Japanese Mango Kakigori immediately after assembling. The ice’s fluffy texture and creamy mango blend are at their best fresh. If you wait too long, the ice will melt, and the dish gets watery.
Presentation-wise, I love using clear glass bowls or cups so the vibrant golden mango sauce shows through. Garnishing with a few fresh mint leaves or thin slices of mango adds a pretty touch.
If you have leftovers (usually the mango cream), store it in an airtight container in the refrigerator for up to 2 days. The mango sauce can be gently stirred and drizzled over fresh crushed ice for another quick treat.
Avoid freezing the creamy mixture as the texture changes and separates. Instead, freeze extra mango puree separately to blend fresh batches later.
Nutritional Information & Benefits
This mango kakigori is a refreshing treat with moderate calories, mainly from natural sugars and cream. Here’s an estimate per serving (makes 4 servings):
| Nutrient | Amount |
|---|---|
| Calories | 180 kcal |
| Fat | 8 g |
| Carbohydrates | 25 g |
| Sugar | 22 g |
| Protein | 2 g |
Mangoes provide a good dose of vitamins A and C, along with antioxidants that support skin health and immunity. Using real fruit instead of artificial flavors means you get natural sweetness and nutrients. The cream adds calcium and a bit of protein, though it also brings saturated fat, so enjoy in moderation.
This dessert is naturally gluten-free and can be adapted to be dairy-free with coconut cream substitutions. Just watch for added sugars if you’re managing carb intake.
Conclusion
This Easy Creamy Japanese Mango Kakigori recipe is a small but delightful break from the heat that doesn’t ask much of your time or tools. It’s creamy, bright, and just cool enough to bring you back to a calm summer afternoon, even if you’re stuck indoors or juggling a busy day.
Feel free to make it your own—tweak the sweetness, try different fruits, or add a sprinkle of matcha to mix things up. Personally, I keep coming back to the classic mango version because it’s simply unbeatable in its balance of creaminess and fresh flavor.
Once you make it, I’d love to hear how you customize this recipe or what moments you pair it with—maybe after a cozy dinner of creamy crack chicken penne or a quick spicy meal. Share your experiences and keep this easy recipe in your summer rotation!
Frequently Asked Questions
Can I use frozen mango instead of fresh mango for this kakigori?
Yes, frozen mango chunks work well. Just thaw them slightly before blending so you get a smooth puree. The flavor might be a bit less vibrant than fresh, but it still tastes great.
What’s the best way to crush ice without a machine?
Wrap ice cubes in a clean kitchen towel and use a rolling pin or mallet to gently crush them. Aim for a fluffy, snow-like texture. Avoid smashing too hard or you’ll get big chunks.
Can I make this recipe vegan or dairy-free?
Absolutely! Use coconut cream instead of heavy cream and swap whole milk for coconut or almond milk. Use a dairy-free sweetened condensed milk or make your own with coconut milk and sugar.
How long can I store leftovers?
The mango cream sauce can be refrigerated in an airtight container for up to 2 days. Keep ice separate and crush fresh before serving again for best texture.
Is this recipe suitable for kids?
Definitely! The natural sweetness and creamy texture make it a kid-friendly treat. Just adjust sugar levels if your mangoes are very sweet already.
Pin This Recipe!
Easy Creamy Japanese Mango Kakigori Recipe No Machine Needed for Perfect Summer Treats
A simple and refreshing Japanese mango shaved ice dessert made creamy without a machine, perfect for hot summer days. This recipe combines fresh mango puree with whipped cream and crushed ice for a light, fluffy, and indulgent treat.
- Prep Time: 10 minutes
- Cook Time: 10 minutes
- Total Time: 20 minutes
- Yield: 4 servings 1x
- Category: Dessert
- Cuisine: Japanese
Ingredients
- 2 large ripe mangoes, peeled and chopped
- 1/3 cup (80 ml) sweetened condensed milk
- 1/2 cup (120 ml) heavy cream
- 1/2 cup (120 ml) whole milk
- about 4 cups (950 ml) ice cubes
- 2 tbsp (25 g) sugar, optional
- 1 tbsp (15 ml) fresh lime juice
- 1 tsp (5 ml) vanilla extract
Instructions
- Prepare the Mango Puree (about 10 minutes): Place the chopped ripe mangoes in your blender. Add the sweetened condensed milk, fresh lime juice, vanilla extract, and sugar if using. Blend until smooth and creamy. Taste and adjust sweetness or lime as needed.
- Whip the Cream (5 minutes): In a chilled bowl, whisk the heavy cream until it forms soft peaks. You don’t want it too stiff—just light and fluffy.
- Combine Cream and Mango Puree (2 minutes): Gently fold the whipped cream into the mango puree, mixing until just combined. The goal is a creamy, airy sauce that’s not overly thick.
- Crush the Ice (5-8 minutes): Place ice cubes in a large bowl wrapped with a clean kitchen towel. Use a rolling pin or mallet to gently crush the ice into fine, fluffy pieces—think snow-like texture, but if some chunks remain, that’s okay.
- Assemble the Kakigori (3 minutes): Spoon the crushed ice into serving bowls, packing lightly. Pour the creamy mango mixture over the ice generously, letting it seep in.
- Final Touch (optional): Garnish with small mango cubes, mint leaves, or a drizzle of extra condensed milk for added sweetness and presentation flair.
Notes
Serve immediately for best texture as the ice melts quickly. Crush ice gently to achieve a fluffy snow-like texture. Adjust sugar based on mango sweetness. For dairy-free version, substitute heavy cream with coconut cream and whole milk with coconut or almond milk. Leftover mango cream can be refrigerated up to 2 days but avoid freezing the creamy mixture.
Nutrition
- Serving Size: 1 bowl (1/4 of recip
- Calories: 180
- Sugar: 22
- Sodium: 50
- Fat: 8
- Saturated Fat: 5
- Carbohydrates: 25
- Fiber: 2
- Protein: 2
Keywords: mango kakigori, Japanese shaved ice, creamy mango dessert, summer treat, no machine kakigori, easy mango dessert, refreshing dessert