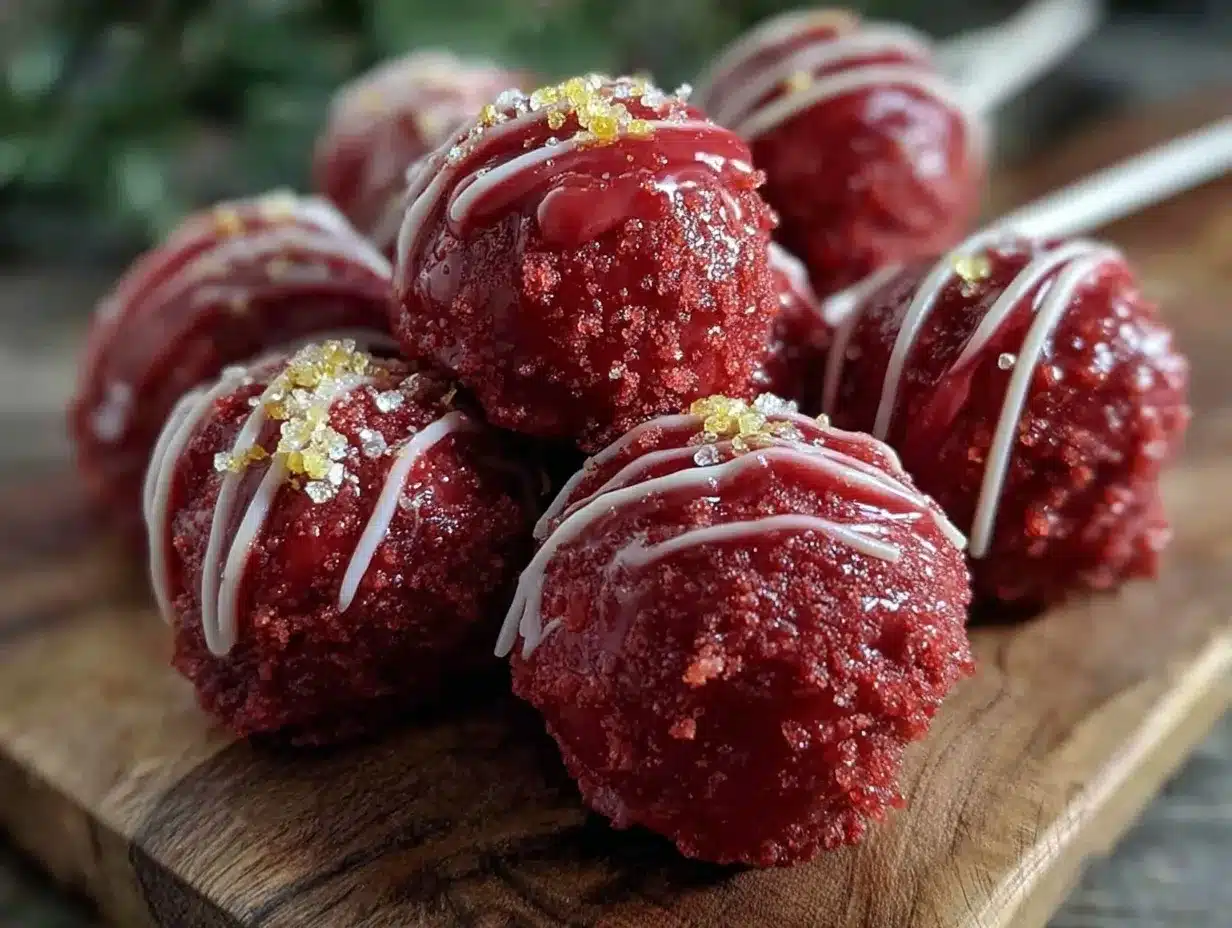
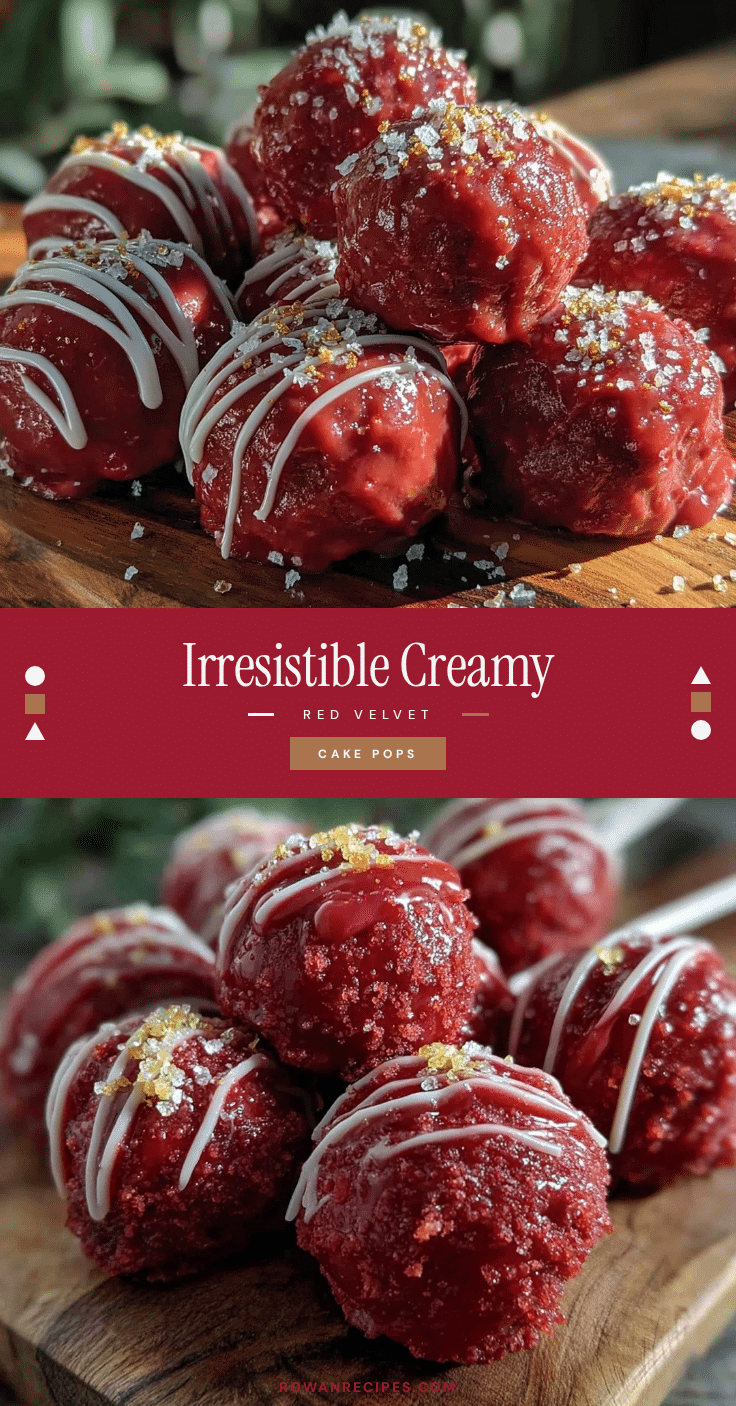
Let me tell you, the moment these creamy red velvet cake pops started melting in my mouth, I was hooked. The rich, velvety texture combined with that sweet, smooth white chocolate drizzle is enough to make anyone’s sweet tooth jump for joy. The first time I made these little delights was during a cozy rainy weekend when I was craving something both nostalgic and a tad fancy. I remember pausing after the first bite, taking a deep breath, and just smiling because, honestly, it felt like discovering a secret family treasure.
Years ago, when I was knee-high to a grasshopper, my grandma used to bake classic red velvet cake for special occasions, but cake pops? That was a modern twist that I wish I’d stumbled upon sooner. My family couldn’t stop sneaking these off the cooling rack (and I can’t really blame them). These creamy red velvet cake pops with their elegant white chocolate drizzle quickly became a staple for family gatherings and holiday gift boxes. You know what? They’re dangerously easy to make but offer pure, nostalgic comfort.
Perfect for potlucks, birthday parties, or as a sweet treat to brighten up your Pinterest cookie board, these cake pops combine the charm of homemade baked goods with a classy touch. After testing the recipe multiple times (in the name of research, of course), I can confidently say these creamy red velvet cake pops with elegant white chocolate drizzle are going to be one of your favorites, too. You’re going to want to bookmark this one.
Why You’ll Love This Recipe
Honestly, I’ve tried a handful of cake pop recipes, but this one stands out for all the right reasons. Here’s why this creamy red velvet cake pops recipe is a winner:
- Quick & Easy: Comes together in under an hour, making it perfect for busy weeknights or last-minute dessert cravings.
- Simple Ingredients: No fancy grocery trips needed; you likely already have everything in your kitchen.
- Perfect for Celebrations: Great for birthdays, bridal showers, or just a cozy weekend indulgence.
- Crowd-Pleaser: Always gets rave reviews from kids and adults alike — the creamy texture is just irresistible.
- Unbelievably Delicious: The combination of the moist red velvet cake and the silky white chocolate drizzle is next-level comfort food.
What makes this recipe different? Well, blending cream cheese into the cake crumbs ensures an ultra-smooth, creamy texture that melts on your tongue. The white chocolate drizzle isn’t just for looks either — it adds a delicate sweetness that balances the slight cocoa tang of the cake perfectly. It’s comfort food reimagined — fancy enough to impress guests but simple enough to whip up without stress. This recipe is the kind you’ll close your eyes for after the first bite.
What Ingredients You Will Need
This recipe uses simple, wholesome ingredients to deliver bold flavor and a satisfying, creamy texture without the fuss. Most are pantry staples, and substitutions are easy if needed.
- Red Velvet Cake:
- 1 box red velvet cake mix (or homemade red velvet cake crumbs from about 9 oz / 255 g baked cake)
- Ingredients to bake the cake (usually eggs, oil, water as per box instructions)
- Cream Cheese Mixture:
- 4 oz (115 g) cream cheese, softened (I recommend Philadelphia brand for smoothness)
- 2 tbsp (30 g) unsalted butter, softened (adds richness)
- 1 cup (120 g) powdered sugar, sifted (for sweetness and smooth texture)
- 1 tsp vanilla extract (pure vanilla for best flavor)
- White Chocolate Drizzle:
- 6 oz (170 g) white chocolate chips or chopped white chocolate (I prefer Ghirardelli for melting quality)
- 1 tsp coconut oil or vegetable oil (optional, for shine and smoother drizzle)
- Decorative Touches (optional):
- Red sanding sugar or sprinkles
- Edible glitter
Substitution tips: Use dairy-free cream cheese and butter alternatives for a vegan twist. Almond flour crumbs can replace cake crumbs for a low-carb option, though texture will be different. In summer, fresh strawberries finely chopped can be folded into the cream cheese mix for a fruity hint.
Equipment Needed
- Mixing bowls — a medium and a large one for mixing cake crumbs and cream cheese mixture
- Electric mixer or hand mixer — helps achieve that creamy, lump-free filling
- Baking sheet lined with parchment paper or silicone mat — for setting cake pops
- Cake pop sticks or sturdy lollipop sticks — essential for handling and dipping
- Microwave-safe bowl or double boiler — for melting white chocolate gently
- Fork or spoon — for drizzling melted chocolate elegantly
- Refrigerator space — to chill cake pops before dipping
If you don’t have cake pop sticks, toothpicks can work in a pinch, but they’re a bit less sturdy. For melting chocolate, a double boiler keeps the chocolate smooth and prevents burning, but the microwave is fine if you heat in short bursts and stir often. Silicone mats are my favorite because they’re reusable and non-stick, making cleanup a breeze.
Preparation Method
- Bake and Cool the Cake: Prepare the red velvet cake according to package instructions or your favorite recipe. Once baked, allow it to cool completely on a wire rack, about 1 hour. (Patience here pays off — warm crumbs won’t hold shape well.)
- Crumble the Cake: Break the cooled cake into fine crumbs using your hands or a fork. Aim for a texture like coarse sand — no big chunks. Approximately 9 oz (255 g) of cake crumbs is ideal.
- Make the Cream Cheese Mixture: In a medium bowl, beat the softened cream cheese and unsalted butter with an electric mixer until smooth and creamy, about 2-3 minutes. Add the powdered sugar and vanilla extract, then mix until fully combined and fluffy.
- Combine Cake and Cream Cheese: Gradually add the cake crumbs to the cream cheese mixture, folding gently with a spatula. Mix until just combined — the mixture should be moist and able to hold shape when rolled.
- Form the Cake Pops: Using a tablespoon or small cookie scoop, portion the mixture and roll into 1-inch (2.5 cm) balls with your hands. Place each ball on the prepared baking sheet.
- Chill the Cake Pops: Insert a cake pop stick into each ball, pushing about halfway through. Refrigerate the cake pops for at least 1 hour or freeze for 20 minutes to firm them up. This helps keep them intact during dipping.
- Melt the White Chocolate: Place white chocolate chips and coconut oil (if using) in a microwave-safe bowl. Heat in 20-second intervals, stirring well between each, until smooth and fully melted. Alternatively, use a double boiler over simmering water.
- Dip and Drizzle: Holding the stick, dip each cake pop into the melted white chocolate, covering completely. Let excess chocolate drip off. Place back on the lined baking sheet. Using a fork or spoon, drizzle more white chocolate elegantly over the top. Optionally, sprinkle with red sanding sugar or edible glitter while the drizzle is still wet.
- Set and Serve: Allow the white chocolate to set completely — about 30 minutes at room temperature or 15 minutes in the fridge. Serve chilled or at room temperature for the creamiest texture.
Pro tip: If the chocolate thickens while dipping, gently reheat it in 10-second bursts. Avoid overheating as it can seize. Also, work quickly during dipping to prevent cake pops warming too much and falling apart.
Cooking Tips & Techniques
Here’s the real deal from my kitchen mishaps and moments of triumph that’ll make your creamy red velvet cake pops perfect every time.
- Get the texture right: Too dry, and the pops crumble; too wet, and they won’t hold shape. If your mixture feels crumbly, add a tiny bit more cream cheese or softened butter, a teaspoon at a time.
- Chill, chill, chill: Don’t skip the chilling step before dipping. It’s the secret to pops that don’t fall apart and get that smooth coating.
- Handle with care: When dipping, hold the cake pops vertically and tap off excess chocolate gently to avoid thick, clumpy coatings.
- White chocolate can be tricky: Melt slowly and stir often. Adding a bit of coconut oil really helps create a glossy finish.
- Multitasking tip: While cake pops chill, prep your drizzle and decorations. Timing makes the process feel like a breeze rather than a scramble.
Honestly, the first time I skipped chilling, my pops turned into a gooey mess — learn from me! Also, practicing the drizzle on parchment paper first helped me get that elegant look down. You’ll be a pro in no time.
Variations & Adaptations
- Flavor twists: Add a teaspoon of espresso powder to the cream cheese mixture for a mocha vibe, or fold in crushed peppermint candies for a festive touch.
- Dietary swaps: Use gluten-free cake mix or almond flour crumbs for gluten sensitivity. Swap cream cheese with vegan cream cheese and use dairy-free white chocolate for a dairy-free version.
- Seasonal spins: In summer, swirl in some finely chopped fresh strawberries or raspberries into the mixture for a fruity surprise.
- Alternative coatings: Instead of white chocolate, try dipping in melted dark chocolate or candy melts colored to match your party theme.
- Personal favorite: I once added a touch of cinnamon and a pinch of cayenne to the cake-cream cheese mix — sounds wild, but the warmth and slight heat paired beautifully with the sweet drizzle.
Serving & Storage Suggestions
Serve these creamy red velvet cake pops chilled or at room temperature — both work beautifully. They’re perfect as a centerpiece on dessert tables or tucked into pretty gift boxes for friends.
Pair with a cup of freshly brewed coffee, a glass of cold milk, or a festive spiced tea to balance the sweetness. They also shine alongside simple vanilla or chocolate cupcakes for a varied dessert spread.
Store cake pops in an airtight container in the refrigerator for up to 5 days. For longer storage, freeze them individually wrapped in plastic wrap for up to 2 months. Thaw in the fridge overnight before serving.
Reheating isn’t really recommended — these are best enjoyed cold or at room temperature where the creamy texture truly shines. Over time, the flavors meld, making leftover pops even more delicious after a day or two.
Nutritional Information & Benefits
Each creamy red velvet cake pop (serving size about 1 pop) contains roughly 150-180 calories, depending on size and exact ingredients. They provide a modest amount of protein from cream cheese and a touch of calcium.
While definitely a treat, the recipe uses real cream cheese and butter, avoiding artificial fillers. The red velvet cake base offers a little cocoa, which contains antioxidants, and the white chocolate drizzle adds sweetness without overwhelming.
If you’re watching carbs, opting for almond flour crumbs and sugar substitutes can lower the glycemic impact. Be aware of dairy in cream cheese and chocolate if you have allergies.
Personally, I love that these cake pops bring back that cozy, homemade feeling — a little indulgence that feels like a warm hug on a chilly day.
Conclusion
In the end, these creamy red velvet cake pops with elegant white chocolate drizzle aren’t just desserts — they’re moments of joy wrapped in a bite-sized package. Whether you’re impressing guests or treating yourself, they’re a recipe worth making again and again.
Feel free to customize the drizzle, decorations, or even the cake flavor to suit your style. I adore this recipe because it’s approachable and special all at once — a rare combo that makes home baking truly satisfying.
Give it a try, share your variations, and tell me how your family reacts (bet they’ll be sneaking them before you even set them out!). Don’t forget to leave a comment or share this recipe with your fellow dessert lovers. Here’s to many sweet moments ahead!
Frequently Asked Questions
Can I use homemade red velvet cake instead of a box mix?
Absolutely! In fact, homemade cake often gives a richer flavor. Just crumble the cooled cake finely before mixing with the cream cheese.
How do I store cake pops to keep them fresh?
Keep them in an airtight container in the fridge for up to 5 days. For longer storage, freeze wrapped pops and thaw in the fridge before serving.
What if my cake pops fall off the sticks while dipping?
Chilling the cake pops thoroughly before dipping is key. Also, avoid warming the mixture with your hands — keep them cold and handle gently.
Can I make these cake pops ahead of time for a party?
Yes! They hold up well refrigerated and even frozen. Just prepare a day or two early, and store properly to keep them fresh.
Is there a way to make these dairy-free?
Swap cream cheese and butter for dairy-free versions and choose vegan white chocolate. The texture may vary slightly, but they’ll still taste delicious.
Pin This Recipe!
Creamy Red Velvet Cake Pops Recipe Easy Homemade Dessert with White Chocolate Drizzle

These creamy red velvet cake pops feature a rich, velvety texture combined with a sweet, smooth white chocolate drizzle, perfect for celebrations or cozy indulgence.
- Prep Time: 20 minutes
- Cook Time: 1 hour
- Total Time: 1 hour 20 minutes
- Yield: 24 cake pops 1x
- Category: Dessert
- Cuisine: American
Ingredients
- 1 box red velvet cake mix (or homemade red velvet cake crumbs from about 9 oz / 255 g baked cake)
- Ingredients to bake the cake (usually eggs, oil, water as per box instructions)
- 4 oz (115 g) cream cheese, softened
- 2 tbsp (30 g) unsalted butter, softened
- 1 cup (120 g) powdered sugar, sifted
- 1 tsp vanilla extract
- 6 oz (170 g) white chocolate chips or chopped white chocolate
- 1 tsp coconut oil or vegetable oil (optional)
- Red sanding sugar or sprinkles (optional)
- Edible glitter (optional)
Instructions
- Bake and cool the red velvet cake according to package instructions or your favorite recipe. Allow it to cool completely on a wire rack, about 1 hour.
- Break the cooled cake into fine crumbs using your hands or a fork, aiming for a texture like coarse sand. Approximately 9 oz (255 g) of cake crumbs is ideal.
- In a medium bowl, beat the softened cream cheese and unsalted butter with an electric mixer until smooth and creamy, about 2-3 minutes. Add the powdered sugar and vanilla extract, then mix until fully combined and fluffy.
- Gradually add the cake crumbs to the cream cheese mixture, folding gently with a spatula until just combined. The mixture should be moist and able to hold shape when rolled.
- Using a tablespoon or small cookie scoop, portion the mixture and roll into 1-inch (2.5 cm) balls with your hands. Place each ball on a baking sheet lined with parchment paper or a silicone mat.
- Insert a cake pop stick into each ball, pushing about halfway through. Refrigerate the cake pops for at least 1 hour or freeze for 20 minutes to firm them up.
- Place white chocolate chips and coconut oil (if using) in a microwave-safe bowl. Heat in 20-second intervals, stirring well between each, until smooth and fully melted. Alternatively, use a double boiler over simmering water.
- Holding the stick, dip each cake pop into the melted white chocolate, covering completely. Let excess chocolate drip off. Place back on the lined baking sheet. Using a fork or spoon, drizzle more white chocolate elegantly over the top. Optionally, sprinkle with red sanding sugar or edible glitter while the drizzle is still wet.
- Allow the white chocolate to set completely—about 30 minutes at room temperature or 15 minutes in the fridge. Serve chilled or at room temperature.
Notes
Chill cake pops thoroughly before dipping to prevent them from falling apart. Melt white chocolate slowly and stir often to avoid seizing. If chocolate thickens, reheat gently in short bursts. Handle cake pops carefully when dipping and tap off excess chocolate gently for a smooth coating.
Nutrition
- Serving Size: 1 cake pop
- Calories: 165
- Sugar: 16
- Sodium: 110
- Fat: 9
- Saturated Fat: 5
- Carbohydrates: 20
- Fiber: 0.5
- Protein: 2
Keywords: red velvet cake pops, creamy cake pops, white chocolate drizzle, easy dessert, homemade cake pops, party treats, holiday desserts