The crackle of fireworks in the distance was just the backdrop to a sticky, sweet kitchen experiment gone surprisingly right. I was halfway through a chaotic summer afternoon, juggling a loud backyard crowd and a nearly empty freezer. Honestly, I wasn’t planning on making anything fancy—just something quick, cool, and festive. Then, someone joked about red, white, and blue ice cream sandwiches, and well, the idea stuck. I wasn’t convinced at first—how good could homemade ice cream sandwiches be, especially with a patriotic twist? But after a few rounds of mixing, baking, and taste testing (and yes, a little mess), these Delicious Red, White, and Blue Ice Cream Sandwiches for Summer turned out to be a total winner. The colors were vibrant, the flavors fresh, and the whole thing felt like a little celebration in every bite.
This recipe has since become my go-to for those easy summer gatherings when the heat is on, but the vibe needs to stay cool and fun. You know, the kind of treat that makes people pause, smile, and ask for the recipe (which I happily share because, honestly, it’s too good to keep secret). It’s not just about the looks; it’s the perfect balance of creamy, fruity, and sweet sandwiched between soft, chewy cookies that don’t crumble the moment you take a bite. The best part? It’s simple enough to whip up without a fuss, even if your kitchen feels like a whirlwind on a busy day.
It’s funny how a casual suggestion can turn into a summer staple. These ice cream sandwiches stuck around because they bring a little joy—and a lot of flavor—to any sunny afternoon. They remind me that sometimes, the best recipes come from the most unexpected sparks. So, if you’re craving a festive, refreshing dessert that’s as fun to make as it is to eat, this one’s for you.
Why You’ll Love This Recipe
After testing this recipe multiple times in my kitchen (and sharing it with friends and family), I can honestly say it has a few standout qualities that make it a summer keeper:
- Quick & Easy: It comes together in about 30 minutes—not counting freezing time—so you’re never stuck in the kitchen all day when you want to enjoy the sunshine.
- Simple Ingredients: No need for exotic shopping trips; most of these are pantry staples or easy-to-find fresh items.
- Perfect for Summer Parties: Whether it’s a backyard barbecue, a Fourth of July picnic, or just a sunny weekend treat, these ice cream sandwiches scream summer fun.
- Crowd-Pleaser: Kids and adults alike always ask for seconds. The combination of fruity and creamy flavors appeals to everyone.
- Unbelievably Delicious: The soft cookies sandwiching the creamy ice cream create a texture and flavor harmony that’s downright comforting yet refreshing.
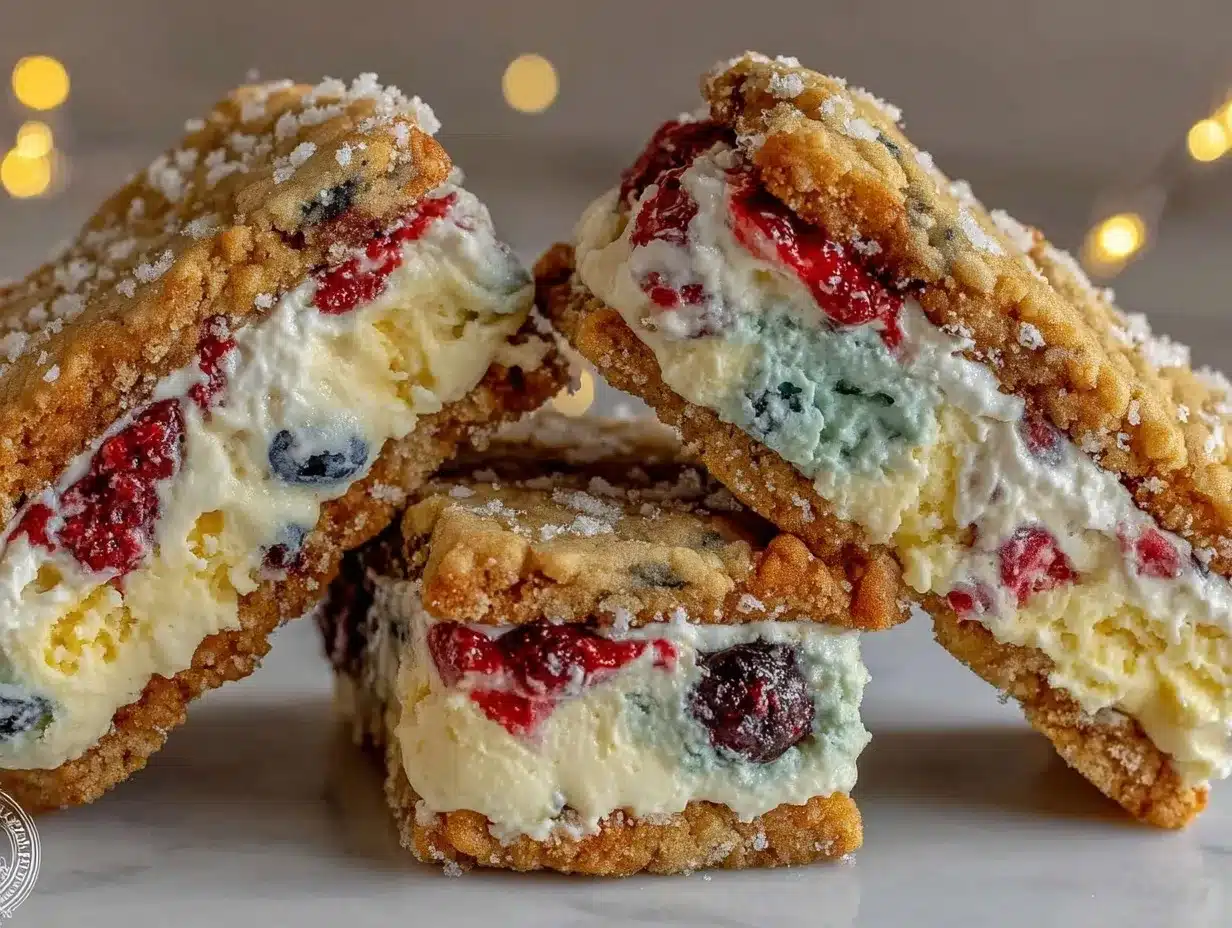
What sets this recipe apart is the way the cookie layers are made from scratch with a subtle hint of vanilla and a touch of butter, making them perfectly chewy, never dry. The red and blue layers get their color and flavor from natural fruit purees—no artificial dyes here—which adds a fresh brightness. The white layer? Classic vanilla ice cream, smooth and creamy, that brings all the elements together. I’ve even tried swapping the vanilla for a homemade coconut cream to add a tropical twist, and it worked beautifully.
Honestly, these aren’t your typical store-bought sandwiches—this is homemade magic that feels special but doesn’t require hours in the kitchen. It’s the kind of treat that makes you close your eyes after the first bite and smile, knowing you nailed that summer dessert vibe without stress.
What Ingredients You Will Need
This recipe uses simple, wholesome ingredients to deliver bold flavor and satisfying texture without fuss. Most are pantry staples, and you can easily swap a few to suit your preferences or dietary needs.
- For the Cookie Batter:
- All-purpose flour – 2 cups (240g), for that perfect chewy cookie base
- Baking powder – 1 tsp, helps the cookies rise just right
- Salt – ¼ tsp, balances the sweetness
- Unsalted butter – ¾ cup (170g), softened (I recommend Land O Lakes for consistent creaminess)
- Granulated sugar – 1 cup (200g), for sweetness and slight crisp edges
- Large egg – 1, room temperature
- Pure vanilla extract – 2 tsp, adds warmth and depth
- For Natural Coloring & Flavor:
- Strawberry puree – ½ cup (120ml) for the red cookie layer (fresh or thawed frozen works)
- Blueberry puree – ½ cup (120ml) for the blue cookie layer (same note on fresh or frozen)
- For the Filling:
- Vanilla ice cream – about 1 quart (946ml), softened slightly for easier spreading (feel free to use your favorite brand or homemade)
Ingredient Tips: If you want to keep these gluten-free, swapping the flour for a 1:1 gluten-free baking blend works well. And for a dairy-free option, use coconut or almond milk-based ice cream and vegan butter. If you can’t get fresh berries, frozen purees are a great shortcut and retain flavor nicely. For that extra fresh touch, I like to mash berries myself rather than using store-bought jams or syrups.
Equipment Needed
- Mixing bowls – medium and large sizes for separating cookie batters and mixing dough
- Electric hand mixer or stand mixer – helpful for creaming butter and sugar smoothly (but whisk and elbow grease work too)
- Baking sheets – at least two, lined with parchment paper or silicone mats to prevent sticking
- Measuring cups and spoons – for accuracy, especially with flour and baking powder
- Spatula and spoon – for mixing and spreading the ice cream
- Cooling racks – to let cookies cool completely before assembly
- Freezer-safe container – for stacking and freezing the assembled sandwiches
If you don’t have a stand mixer, no worries—an electric hand mixer or even a whisk will do, just take a bit more time to get the butter and sugar fluffy. For a budget-friendly alternative to silicone mats, parchment paper works just as well and keeps cleanup easy. When working with the purees, a small food processor or blender makes the job quicker, but mashing with a fork is fine, too.
Preparation Method
- Prepare the Cookie Dough: In a medium bowl, whisk together 2 cups (240g) all-purpose flour, 1 tsp baking powder, and ¼ tsp salt. Set aside.
- Cream Butter and Sugar: In a large bowl, beat ¾ cup (170g) softened unsalted butter and 1 cup (200g) granulated sugar until light and fluffy—about 3-4 minutes with an electric mixer. If mixing by hand, be patient; the texture matters here.
- Add Egg and Vanilla: Beat in 1 large room-temperature egg and 2 tsp pure vanilla extract until combined.
- Incorporate Dry Ingredients: Gradually add the flour mixture to the butter mixture, mixing just until combined. Don’t overmix; you want tender cookies.
- Divide Dough Evenly: Split dough into three equal parts. To one part, gently fold in ½ cup (120ml) strawberry puree for the red dough. To the second, fold in ½ cup (120ml) blueberry puree for the blue dough. Leave the last part plain for the white layer.
- Chill Dough: Wrap each dough portion separately in plastic wrap and chill in the refrigerator for at least 30 minutes. This helps the dough firm up for easier handling.
- Preheat Oven: Set oven to 350°F (175°C) and line baking sheets with parchment paper or silicone mats.
- Shape Cookies: Roll each dough color into small balls (about 1.5 tablespoons or 20g each) and place them spaced evenly on the baking sheets. Slightly flatten each ball with your palm or the bottom of a glass for uniform thickness.
- Bake: Bake one sheet at a time for 10-12 minutes until edges are set but centers remain soft. Watch closely; you don’t want crisp cookies.
- Cool Completely: Transfer baked cookies to cooling racks and let cool thoroughly before assembling.
- Assemble Ice Cream Sandwiches: Soften vanilla ice cream slightly (about 5 minutes at room temp). Spread a generous scoop onto the bottom of a red cookie, then top with a white cookie, pressing gently. Repeat the layer with blue cookies on top for a festive stack, or simply sandwich red and blue cookies with ice cream in between.
- Freeze: Place assembled sandwiches on a tray lined with parchment and freeze for at least 1 hour to firm up before serving.
Note: If the dough is too sticky after adding purees, sprinkle in a tablespoon of flour at a time until manageable. The cookies should remain soft but hold shape. Also, for even baking, rotate pans halfway through if your oven has hot spots.
Cooking Tips & Techniques
Making these red, white, and blue ice cream sandwiches is straightforward, but a few tricks help get that perfect texture and flavor every time. First, don’t skip chilling the dough. It’s tempting to bake right away, but chilling prevents spreading and keeps colors vibrant. I learned this the hard way when the first batch turned into a colorful cookie puddle!
When mixing in the fruit purees, fold gently to avoid deflating the dough. You want those lovely streaks of color, not a blended mess. If you want extra color pop, a tiny pinch of natural beet powder or freeze-dried berry powder can boost the red or blue tones without flavor loss.
Timing is everything in baking here. Cookies should look set but soft when you pull them out. They’ll firm up as they cool, so don’t overbake or you’ll lose that tender bite. Cooling fully before assembling is crucial to stop the ice cream from melting prematurely.
For assembly, soften the ice cream just enough to spread easily but not so much that it becomes soupy. Using an offset spatula works wonders for smooth, even layers. And if you want to multitask, you can bake the cookies ahead and freeze them wrapped well for up to a week—then assemble when ready.
Variations & Adaptations
One of the best things about this recipe is how adaptable it is to different tastes and dietary needs. Here are a few of my favorite twists:
- Dairy-Free: Swap the vanilla ice cream for a coconut milk or almond milk-based alternative, and use vegan butter for the cookies.
- Seasonal Fruit Flavors: Instead of strawberry and blueberry, try raspberry and blackberry purees for a slightly different but just as stunning look and flavor.
- Chocolate Twist: Add ¼ cup (25g) cocoa powder to the blue cookie dough for a dark chocolate flavor that pairs beautifully with the vanilla ice cream.
- Mini Sandwiches: Make bite-sized versions for parties or kids’ lunches. They freeze well and are perfect for portion control.
- Spiced Cookies: Add a pinch of cinnamon or nutmeg to the dough for a subtle warmth that complements the fruit flavors.
Personally, I once tried swapping the vanilla ice cream for a creamy lemon sorbet to punch up the brightness, and it became an instant hit at a summer brunch. You can get creative with toppings too—rolling the edges in sprinkles or mini chocolate chips adds fun texture.
Serving & Storage Suggestions
These ice cream sandwiches are best served straight from the freezer when the ice cream is firm but scoopable. Letting them sit at room temperature for 5 minutes before serving softens the ice cream just enough for the perfect bite.
For a festive presentation, serve them on a platter lined with fresh berries or mint sprigs. They pair wonderfully with a cold lemonade or a sparkling berry-infused water for a refreshing summer combo.
To store, keep assembled sandwiches in a single layer in an airtight container or wrapped individually in parchment and plastic wrap to prevent freezer burn. They’ll keep well for up to 2 weeks. Reheating isn’t really needed, but if the ice cream gets too hard, a few minutes at room temperature softens them nicely.
One fun tip: flavors mellow and meld if you let them freeze overnight, making the fruit notes in the cookies even more pronounced the next day.
Nutritional Information & Benefits
Each ice cream sandwich contains approximately 250-300 calories, depending on portion size and ice cream choice. The cookies provide carbohydrates and fat from butter and sugar, while the ice cream adds protein and calcium.
The use of real fruit purees adds a touch of natural antioxidants and vitamins without extra sugar. Choosing a lower-sugar or dairy-free ice cream option can reduce calories and cater to dietary needs.
This recipe is naturally gluten-friendly if you swap with a gluten-free flour blend, and dairy-free with appropriate ingredient swaps, making it versatile for many eating preferences. Personally, I appreciate that it offers a sweet treat with some real fruit goodness, which feels better than artificial coloring or flavors.
Conclusion
These Delicious Red, White, and Blue Ice Cream Sandwiches for Summer have earned a special place in my recipe rotation because they’re just plain fun to make and eat. They’re festive without being fussy and bring that perfect balance of creamy, chewy, and fruity to the table. Whether you’re whipping them up for a holiday party or a simple sunny day treat, there’s something about them that makes summer feel a little sweeter.
Feel free to tweak the colors, flavors, or sizes to suit your crowd and your kitchen mood. I love how this recipe invites creativity while still delivering that dependable, crowd-pleasing flavor combo. And if you’re curious about other easy crowd-pleasers, my sheet pan honey mustard chicken is another quick and satisfying option for summer dinners.
Go ahead and give these ice cream sandwiches a try—you might just find yourself making them over and over, like I did. I’d love to hear how you customize them or what your favorite summer dessert is, so don’t hesitate to share your thoughts!
FAQs
Can I make these ice cream sandwiches ahead of time?
Yes! You can bake the cookies and assemble the sandwiches, then freeze them in an airtight container for up to two weeks. Just let them thaw for a few minutes before serving.
What if I don’t have fresh berries for the purees?
Frozen berries work perfectly. Just thaw and mash them before folding into the dough. Avoid using jam or jelly as it changes the dough texture.
Can I use store-bought cookies instead of homemade?
Sure, but homemade cookies provide the best texture and flavor. If using store-bought, choose soft, chewy cookies that won’t crumble when sandwiching ice cream.
How do I prevent the ice cream from melting when assembling?
Work quickly with slightly softened ice cream and keep the cookies and assembled sandwiches chilled on a cold surface or in the freezer between steps.
Are these sandwiches suitable for kids?
Absolutely! They’re colorful, fun, and not too messy when properly assembled. Mini versions are great for little hands and portion sizes.
Pin This Recipe!
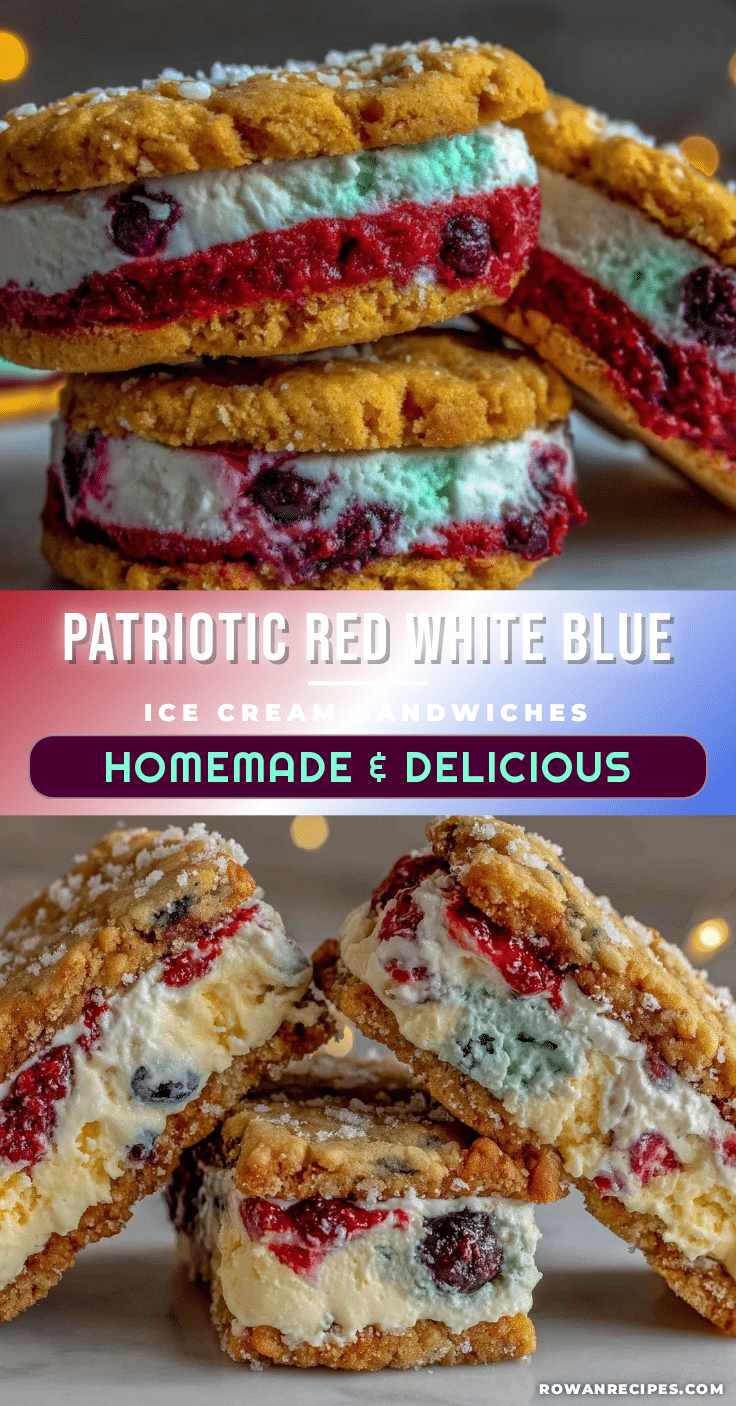
Delicious Red White and Blue Ice Cream Sandwiches
Festive and refreshing homemade ice cream sandwiches featuring red and blue fruit puree cookies with creamy vanilla ice cream, perfect for summer gatherings.
- Prep Time: 15 minutes
- Cook Time: 12 minutes
- Total Time: 1 hour 30 minutes
- Yield: 12 sandwiches 1x
- Category: Dessert
- Cuisine: American
Ingredients
- 2 cups (240g) all-purpose flour
- 1 tsp baking powder
- 1/4 tsp salt
- 3/4 cup (170g) unsalted butter, softened
- 1 cup (200g) granulated sugar
- 1 large egg, room temperature
- 2 tsp pure vanilla extract
- 1/2 cup (120ml) strawberry puree (fresh or thawed frozen)
- 1/2 cup (120ml) blueberry puree (fresh or thawed frozen)
- 1 quart (946ml) vanilla ice cream, softened slightly
Instructions
- In a medium bowl, whisk together flour, baking powder, and salt. Set aside.
- In a large bowl, beat softened butter and sugar until light and fluffy, about 3-4 minutes with an electric mixer.
- Beat in the egg and vanilla extract until combined.
- Gradually add the flour mixture to the butter mixture, mixing just until combined. Do not overmix.
- Divide dough into three equal parts. Fold strawberry puree into one part, blueberry puree into the second, and leave the third plain.
- Wrap each dough portion separately in plastic wrap and chill in the refrigerator for at least 30 minutes.
- Preheat oven to 350°F (175°C) and line baking sheets with parchment paper or silicone mats.
- Roll each dough color into small balls (about 1.5 tablespoons or 20g each) and place spaced evenly on baking sheets. Flatten slightly with palm or bottom of a glass.
- Bake one sheet at a time for 10-12 minutes until edges are set but centers remain soft.
- Transfer baked cookies to cooling racks and cool completely before assembling.
- Soften vanilla ice cream slightly (about 5 minutes at room temperature).
- Spread a generous scoop of ice cream onto the bottom of a red cookie, top with a white cookie, pressing gently. Repeat layering with blue cookies or sandwich red and blue cookies with ice cream in between.
- Place assembled sandwiches on a tray lined with parchment and freeze for at least 1 hour to firm up before serving.
Notes
Chill dough before baking to prevent spreading and keep colors vibrant. Fold fruit purees gently to maintain streaks of color. Rotate pans halfway through baking if oven has hot spots. Cool cookies completely before assembling to prevent ice cream melting. Soften ice cream just enough to spread but not too much. Cookies and assembled sandwiches can be frozen for up to 2 weeks. For gluten-free, use 1:1 gluten-free baking blend. For dairy-free, use coconut or almond milk-based ice cream and vegan butter.
Nutrition
- Serving Size: 1 ice cream sandwich
- Calories: 275
- Sugar: 22
- Sodium: 150
- Fat: 12
- Saturated Fat: 7
- Carbohydrates: 38
- Fiber: 1
- Protein: 4
Keywords: ice cream sandwiches, summer dessert, red white and blue, patriotic dessert, homemade cookies, vanilla ice cream, fruit puree cookies