“Hey, what are you bringing to the party?” That text popped up just as I was juggling dinner plans and a mountain of work emails. Honestly, I wasn’t in the mood for anything complicated—something quick, pretty, and tasty. I remembered a charcuterie board I threw together last summer that got everyone chatting and reaching for seconds. It wasn’t just any board though; it featured seasonal stone fruits that added this unexpected pop of juicy sweetness alongside the usual savory bites.
That evening, slicing ripe peaches and plums while the sun dipped low felt almost meditative, a quiet moment amid the chaos. The combination of creamy cheeses, salty cured meats, crunchy nuts, and those vibrant fruits made it clear: this is more than a snack, it’s an experience. I’ve since made this perfect charcuterie board with seasonal stone fruits over and over, tweaking it here and there but never losing that effortless charm. It’s become my go-to for entertaining, the kind of spread that invites conversation and lingering.
The beauty lies in its simplicity—the colors, textures, and flavors balancing each other without any fuss. If you’re looking for a way to impress guests without sweating over the stove, or just want a relaxing way to enjoy fresh fruit in a fun format, this recipe might just become your new favorite. There’s something quietly satisfying about how the sweet, tart stone fruits play off the savory elements. It’s the kind of dish that sticks with you, a little moment of joy on a platter.
Why You’ll Love This Recipe
After testing this charcuterie board recipe through many gatherings and quiet nights alike, I can say it hits the spot every time. What makes it stand out isn’t just the fresh seasonal stone fruits, but how the whole board comes together seamlessly with minimal effort. Here’s why this recipe is a keeper:
- Quick & Easy: You can assemble the whole board in under 20 minutes, perfect for last-minute plans or casual entertaining.
- Simple Ingredients: No need for specialty shops—most ingredients are pantry staples or easy to find at your local market.
- Perfect for Entertaining: Whether it’s a summer brunch, a wine night, or a casual potluck, this board brings a polished touch without the stress.
- Crowd-Pleaser: The mix of sweet, salty, creamy, and crunchy elements always draws compliments from kids and adults alike.
- Unbelievably Delicious: The seasonal stone fruits add a juicy brightness that lifts the whole board beyond the usual charcuterie fare.
What makes this charcuterie board truly different is the thoughtful pairing of each component. For example, the buttery richness of a triple-cream cheese balances the fresh acidity of ripe nectarines, while a handful of Marcona almonds adds a delicate crunch. I’ve found that swapping in fresh figs or apricots when stone fruits aren’t quite in season keeps things interesting. Honestly, after assembling this board a dozen times, I still close my eyes at the first bite—it’s that kind of comfort food with a fresh twist.
So whether you want to impress guests without hours in the kitchen or simply crave a beautiful, vibrant snack, this recipe offers the best of both worlds. It’s a casual, elegant way to share food and good company.
What Ingredients You Will Need
This charcuterie board uses simple, wholesome ingredients to deliver bold flavor and satisfying texture without the fuss. Most items are pantry staples or easy to swap based on what’s fresh or on hand.
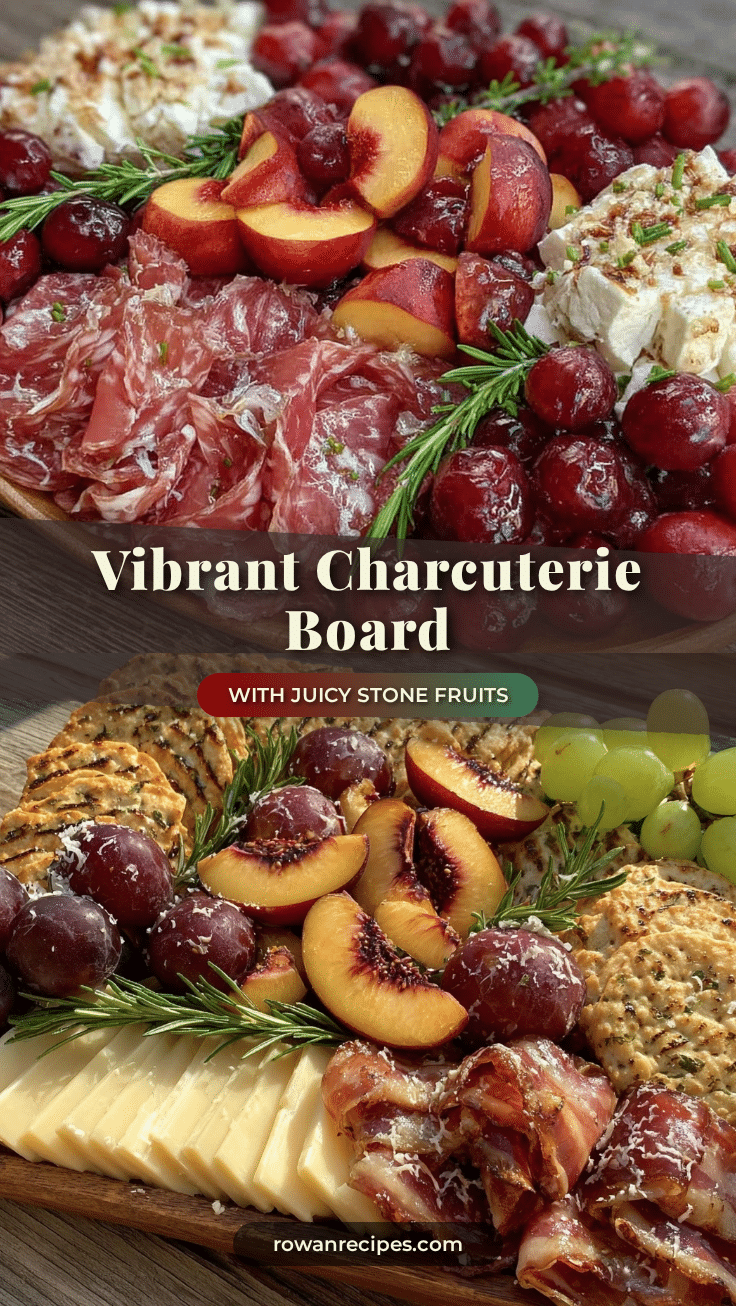
- Seasonal Stone Fruits: Peaches, nectarines, plums, apricots, or cherries, sliced or halved (choose ripe but firm fruits for best texture)
- Cured Meats: Prosciutto, salami, or soppressata (I prefer Volpi brand for authentic flavor)
- Cheeses:
- Triple-cream Brie or Camembert (for creamy richness)
- Aged Manchego or sharp Cheddar (for a firmer, nutty contrast)
- Fresh goat cheese (crumbled or in small rounds for tanginess)
- Crunchy Elements: Marcona almonds, walnuts, or candied pecans (adds texture and a touch of sweetness)
- Fresh Herbs: Sprigs of rosemary or thyme (adds aroma and visual appeal)
- Accents & Extras:
- Olives (Kalamata or Castelvetrano for a briny kick)
- Honey or fruit preserves (fig jam or apricot preserves complement the fruits beautifully)
- Crackers or sliced rustic bread (I like to use multigrain crackers for a hearty bite)
Feel free to swap cheeses based on your preferences—if you want a dairy-free option, try hummus or a nut-based cheese alternative. When stone fruits aren’t quite at their peak, fresh figs or grapes make great substitutes. The key is balancing sweet, salty, creamy, and crunchy to keep every bite interesting. Also, for an extra touch, drizzle a bit of balsamic reduction over the fruits just before serving—it adds a subtle tang that ties everything together.
Equipment Needed
Putting together this perfect charcuterie board doesn’t require fancy gadgets, but a few tools make the process smoother:
- Large wooden or slate serving board: A flat surface around 18-20 inches works well to arrange everything visually.
- Sharp paring knife: For slicing stone fruits and trimming cheese edges cleanly.
- Cheese knives or spreaders: Different knives for soft and hard cheeses help keep flavors distinct.
- Small bowls or ramekins: To hold olives, nuts, and preserves without mixing flavors.
- Tongs or small serving forks: Useful for guests to pick up delicate items without squishing the fruit.
If you’re on a budget, a clean wooden cutting board doubles as a great serving surface, and butter knives work fine for spreading cheeses. I’ve also found that having a separate small knife for trimming the rind or cutting firm cheeses helps keep things neat. Keeping your knives sharp makes slicing stone fruits easier and cleaner, which honestly makes the whole board look more polished. Plus, a few fresh herb sprigs can be plucked right from your garden or windowsill for garnish—the smallest details count.
Preparation Method
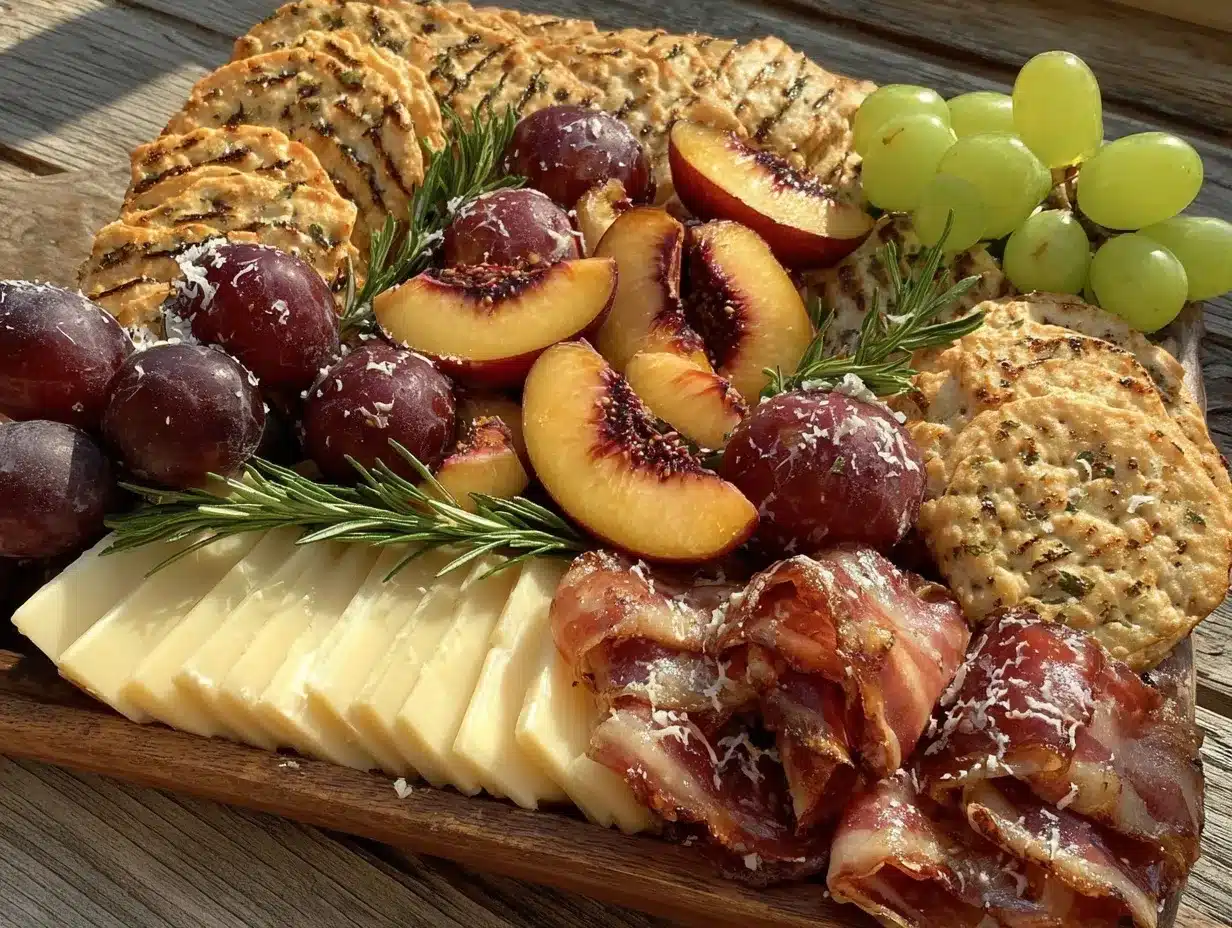
- Prepare the Fruits (10 minutes): Rinse and gently dry your seasonal stone fruits. Slice peaches, nectarines, and plums into thin wedges or bite-sized chunks. Halve or quarter smaller fruits like apricots or cherries. Keep the pieces uniform in size for a tidy presentation.
- Slice and Arrange Cheeses (5 minutes): Cut the Brie or Camembert into wedges, leaving its creamy center intact. Slice firmer cheeses like Manchego into thin, fan-shaped pieces. Crumble or form fresh goat cheese into small rounds. Place cheeses spaced evenly around the board to create focal points.
- Arrange the Meats (5 minutes): Fold prosciutto or salami into delicate ribbons or small piles. Avoid overcrowding; the idea is to create visual interest with neat folds rather than messy piles.
- Add Crunchy Elements (3 minutes): Scatter Marcona almonds, walnuts, or pecans in small clusters near the cheese and fruit. This adds texture and breaks up the softer elements.
- Place Accents in Bowls (2 minutes): Fill small ramekins with olives, honey, or preserves and nestle them into open spaces on the board. This keeps wet or oily ingredients contained.
- Garnish and Final Touches (2 minutes): Tuck fresh herb sprigs around the edges, and if you like, drizzle a little balsamic reduction over the stone fruits. Add crackers or sliced baguette on the side or arranged around the board.
Tips to note: Don’t overcrowd the board—leave some breathing room to make each element stand out. If you’re prepping ahead, slice the fruits just before serving to avoid browning. For a little extra flair, chill the board briefly before guests arrive so the cheeses hold their shape better. When slicing stone fruits, a sharp knife and gentle pressure prevent squishing, preserving that beautiful juicy look. This methodical layering is what makes your board seem effortlessly curated, even when you’re throwing it together at the last minute.
Cooking Tips & Techniques
Honestly, assembling a charcuterie board is as much about art as it is about taste, and a few tricks can make your board look like it came from a fancy deli. First off, always start with a clean, dry board—moisture can make crackers soggy and cheese slide around.
Don’t be afraid to mix textures; the contrast between soft cheeses and crunchy nuts brings life to every bite. When working with stone fruits, gently pat them dry after slicing to avoid excess juice running all over your board. I learned the hard way that a messy board loses its charm fast!
Layering is key: place larger items first, then fill in gaps with smaller accents. This is the kind of thing that looks simple but takes a bit of practice to get right. Also, consider your guests’ preferences—have a balance of mild and bold flavors, and cater to dietary needs if you know them. I always keep some gluten-free crackers handy for friends who ask.
Timing is crucial, too. Assemble your board close to serving time to keep fruits fresh and cheeses at their best. If you need to prep ahead, slice fruits but don’t arrange immediately; store them lightly covered in the fridge with a little lemon juice to slow browning. And speaking of multitasking, setting out a quick sheet pan honey mustard chicken or a creamy garlic butter Tuscan shrimp pasta alongside your board can turn an appetizer into a full meal with minimal fuss.
Variations & Adaptations
This charcuterie board is flexible and lends itself well to different seasons, dietary needs, and flavor preferences. Here are some ideas you might want to try:
- Seasonal Swaps: In cooler months, swap stone fruits for sliced pears or apples and add a handful of dried cranberries for a festive touch.
- Dietary Adaptation: For a vegan version, replace cheeses with nut-based alternatives and use plant-based deli slices or marinated tofu. Add hummus or baba ganoush for creamy elements.
- Flavor Twists: Add a spicy element with pickled jalapeños or pepperoni slices. Or try drizzling a little chili honey over the stone fruits for a sweet-heat combo.
- Cooking Method Variation: Lightly grill peach or nectarine slices to add a smoky depth to your board—just a quick char on a grill pan.
- Personal Favorite: I once added a few dollops of whipped ricotta with lemon zest on the side—it brought a bright creaminess that paired wonderfully with the salty meats and sweet fruits.
These tweaks keep things fresh and allow you to tailor the board to your guests or occasion. It’s fun to experiment with different nuts, herb garnishes, or even homemade crackers when you have the time.
Serving & Storage Suggestions
Serve this charcuterie board at room temperature for the best flavor and texture. Chill the cheeses and meats beforehand, then let them sit out for about 20 minutes before serving so their full flavor shines through. Arrange the board on your dining or coffee table for easy grazing, and provide small plates and napkins for guests.
Complement the board with a crisp white wine, a light rosé, or even sparkling water with fresh citrus slices. For a fuller meal, pair with warm dishes like a slow cooker French dip sandwich, which works well alongside this fresh board without competing flavors.
If you have leftovers (which is rare), wrap everything tightly in plastic wrap and store in the fridge for up to 2 days. Fruits may lose a bit of their fresh texture, so it’s best to eat them within a day. Reheat any accompanying dishes separately rather than the board itself. The flavors tend to deepen when stored properly, but fresh assembly is always best.
Nutritional Information & Benefits
This perfect charcuterie board offers a balanced mix of nutrients thanks to the diverse ingredients. Stone fruits like peaches and nectarines are rich in vitamins A and C, fiber, and antioxidants. The nuts provide healthy fats and protein, while cheeses contribute calcium and B vitamins.
Though the cured meats contain sodium and saturated fats, enjoying them in moderation with fresh produce and nuts makes for a satisfying and relatively balanced snack or appetizer. This recipe can be adapted for gluten-free diets by choosing gluten-free crackers or skipping bread altogether. For those watching carbs, focusing more on the fruits, nuts, and cheeses keeps the intake moderate.
From a wellness perspective, sharing a colorful board like this encourages mindful eating and social connection, which honestly does wonders for the soul—something I’ve come to appreciate more over time.
Conclusion
Putting together the perfect charcuterie board with seasonal stone fruits is one of those simple joys that feels fancy without the stress. It’s approachable for cooks of any level, yet impressive enough to spark conversation and delight guests. I love how this recipe invites creativity—whether you stick to the classic ingredients or try your own twists, it’s a beautiful way to celebrate fresh flavors and good company.
Give yourself permission to customize based on what’s fresh, what your guests love, or even what’s lingering in the fridge. This board has been a reliable friend on busy nights and special occasions alike, and I hope it becomes a staple in your entertaining toolkit too. If you try it, I’d love to hear how you made it your own!
Happy entertaining, and may your next gathering be as effortless as it is delicious.
FAQs
- Can I prepare the charcuterie board ahead of time? It’s best to slice fruits and arrange the board shortly before serving to keep everything fresh, but you can prep cheeses, meats, and nuts a few hours ahead.
- What are good substitutes for stone fruits if they’re out of season? Fresh figs, grapes, sliced apples, or pears work well as alternatives and provide similar sweetness and texture.
- How do I keep the stone fruits from browning? Toss sliced fruits lightly in lemon juice and store covered in the fridge until ready to arrange on the board.
- What type of cheese pairs best with stone fruits? Creamy cheeses like Brie or goat cheese balance the sweetness nicely, while aged cheeses like Manchego add a savory contrast.
- Can I make this board vegan-friendly? Yes! Use plant-based cheeses and meats, and include dips like hummus or baba ganoush to add creaminess and flavor.
Pin This Recipe!
Perfect Charcuterie Board with Seasonal Stone Fruits

A quick, easy, and elegant charcuterie board featuring seasonal stone fruits paired with creamy cheeses, cured meats, crunchy nuts, and flavorful accents. Perfect for entertaining or casual snacking.
- Prep Time: 20 minutes
- Cook Time: 0 minutes
- Total Time: 20 minutes
- Yield: 6-8 servings
- Category: Appetizer
- Cuisine: American
Ingredients
- Seasonal stone fruits: peaches, nectarines, plums, apricots, or cherries, sliced or halved
- Cured meats: prosciutto, salami, or soppressata
- Cheeses: triple-cream Brie or Camembert, aged Manchego or sharp Cheddar, fresh goat cheese
- Crunchy elements: Marcona almonds, walnuts, or candied pecans
- Fresh herbs: sprigs of rosemary or thyme
- Accents & extras: olives (Kalamata or Castelvetrano), honey or fruit preserves (fig jam or apricot preserves), crackers or sliced rustic bread (multigrain preferred)
- Optional: balsamic reduction for drizzling
Instructions
- Prepare the fruits (10 minutes): Rinse and gently dry your seasonal stone fruits. Slice peaches, nectarines, and plums into thin wedges or bite-sized chunks. Halve or quarter smaller fruits like apricots or cherries. Keep the pieces uniform in size for a tidy presentation.
- Slice and arrange cheeses (5 minutes): Cut the Brie or Camembert into wedges, leaving its creamy center intact. Slice firmer cheeses like Manchego into thin, fan-shaped pieces. Crumble or form fresh goat cheese into small rounds. Place cheeses spaced evenly around the board to create focal points.
- Arrange the meats (5 minutes): Fold prosciutto or salami into delicate ribbons or small piles. Avoid overcrowding; create visual interest with neat folds rather than messy piles.
- Add crunchy elements (3 minutes): Scatter Marcona almonds, walnuts, or pecans in small clusters near the cheese and fruit to add texture.
- Place accents in bowls (2 minutes): Fill small ramekins with olives, honey, or preserves and nestle them into open spaces on the board to keep wet or oily ingredients contained.
- Garnish and final touches (2 minutes): Tuck fresh herb sprigs around the edges, drizzle a little balsamic reduction over the stone fruits if desired, and add crackers or sliced baguette on the side or arranged around the board.
Notes
Slice fruits just before serving to avoid browning; toss sliced fruits lightly in lemon juice if prepping ahead. Keep knives sharp for clean slicing. Chill cheeses and meats before serving and let them sit at room temperature for 20 minutes for best flavor. Avoid overcrowding the board to maintain visual appeal. Drizzle balsamic reduction over fruits for extra flavor if desired. Substitute cheeses and meats for vegan or dairy-free options as needed.
Nutrition
- Serving Size: Approximately 1/6 to
- Calories: 0.2503
- Sugar: 8
- Sodium: 350
- Fat: 18
- Saturated Fat: 7
- Carbohydrates: 12
- Fiber: 2
- Protein: 8
Keywords: charcuterie board, seasonal stone fruits, entertaining, appetizer, easy recipe, summer snack, cheese board, cured meats, nuts, fresh fruit