Let me tell you, the scent of freshly brewed espresso mingling with velvety mascarpone cream is enough to make anyone’s mouth water. The first time I made this creamy tiramisu in a jar, I was instantly hooked — the kind of moment where you pause, take a deep breath, and just smile because you know you’re onto something truly special. I remember being knee-high to a grasshopper, watching my Nonna carefully layer her classic tiramisu, but honestly, this jar version brings a fresh twist that feels both cozy and delightfully modern.
Years ago, I stumbled upon this recipe on a rainy weekend when the oven was off limits but my craving for tiramisu was sky-high. My family couldn’t stop sneaking these jars off the counter (and I can’t really blame them). The creamy tiramisu in a jar with rich espresso layers quickly became a staple for family gatherings and gifting during holidays. It’s dangerously easy to make and offers pure, nostalgic comfort in every spoonful. You know what? It’s perfect for potlucks, a sweet treat for your kids’ lunches, or just a little pick-me-up after a long day.
After testing this recipe multiple times in the name of research, of course, I can confidently say it’s a winner. It feels like a warm hug in dessert form, and you’re going to want to bookmark this one for those moments when only a creamy tiramisu with rich espresso layers will do.
Why You’ll Love This Creamy Tiramisu in a Jar Recipe
Honestly, this creamy tiramisu in a jar ticks all the boxes for a no-fuss dessert that tastes like it took hours to make. Here’s why it stands out:
- Quick & Easy: Comes together in under 30 minutes, perfect for busy weeknights or last-minute cravings.
- Simple Ingredients: No fancy grocery trips needed; you likely already have everything in your kitchen.
- Perfect for Entertaining: Great for potlucks, dinner parties, or casual family meals.
- Crowd-Pleaser: Always gets rave reviews from kids and adults alike — it’s a guaranteed hit.
- Unbelievably Delicious: The combination of creamy mascarpone and bold espresso layers is next-level comfort food.
What makes this recipe different? It’s all about the layering technique — soaking ladyfingers just right in rich espresso so they’re moist but not soggy, and folding a lightly sweetened mascarpone cream that melts on your tongue. Plus, serving it in individual jars makes it extra charming and mess-free. This isn’t just any tiramisu; it’s my best version, tested and loved.
And let’s face it, this recipe isn’t just good—it’s the kind that makes you close your eyes after the first bite. It’s comfort food reimagined—easy, quicker, but with all the soul-soothing satisfaction of the classic dessert. Whether you’re impressing guests without stress or turning a simple moment into something memorable, this creamy tiramisu in a jar with rich espresso layers is your go-to.
What Ingredients You Will Need
This recipe uses simple, wholesome ingredients to deliver bold flavor and a satisfying texture without the fuss. Most of these are pantry staples or easy to find in any grocery store.
- For the Espresso Layer:
- 1 ½ cups (360 ml) freshly brewed espresso or strong coffee, cooled (I recommend Lavazza for best flavor)
- 2 tablespoons coffee liqueur (optional but adds a nice depth)
- For the Creamy Mascarpone Layer:
- 8 oz (225 g) mascarpone cheese, room temperature (look for a high-quality brand for smooth texture)
- 1 cup (240 ml) heavy cream, chilled (use dairy-free cream if preferred)
- ⅓ cup (65 g) granulated sugar
- 1 teaspoon pure vanilla extract
- For the Base:
- 24 ladyfinger cookies (savoiardi), store-bought or homemade
- For Garnish:
- Unsweetened cocoa powder, for dusting
- Dark chocolate shavings (optional)
Substitution tips: Swap ladyfingers with gluten-free biscuits for a gluten-free option. Use coconut cream and dairy-free mascarpone alternatives for a vegan-friendly treat. For a less sweet version, reduce sugar by a tablespoon.
Equipment Needed
- Mixing bowls — preferably one large for whipping cream and another for combining mascarpone
- Electric mixer or handheld whisk (makes whipping cream a breeze)
- Measuring cups and spoons for precise ingredient amounts
- Small jars or glass containers (about 8 oz / 240 ml capacity) — mason jars work perfectly
- Sifter or fine mesh strainer for dusting cocoa powder evenly
- Spatula for folding mascarpone and cream smoothly
If you don’t have an electric mixer, a sturdy balloon whisk will do, but be prepared for a bit of an arm workout! For budget-friendly jars, reuse clean baby food jars or small mason jars from your local store. Keeping your utensils and bowls chilled helps the cream whip up faster and stay stable longer.
Preparation Method
- Brew and Cool Espresso: Brew 1 ½ cups (360 ml) of strong espresso or coffee. Pour into a shallow dish and stir in 2 tablespoons of coffee liqueur if using. Let it cool completely — this usually takes about 15 minutes.
- Prepare the Cream Mixture: In a large mixing bowl, combine 8 oz (225 g) mascarpone cheese with ⅓ cup (65 g) sugar and 1 teaspoon vanilla extract. Gently mix with a spatula until smooth. In a separate chilled bowl, whip 1 cup (240 ml) heavy cream using an electric mixer on medium-high speed until soft peaks form (about 3-5 minutes). Fold the whipped cream into the mascarpone mixture carefully to keep it light and airy.
- Dip the Ladyfingers: Quickly dip each ladyfinger into the cooled espresso mixture — just about 1 second per side to avoid sogginess. The cookie should be moist but hold its shape. Line the bottom of each jar with 2-3 soaked ladyfingers.
- Layer the Cream: Spoon a generous layer (about ¼ cup / 60 ml) of the mascarpone cream over the soaked ladyfingers. Smooth evenly with the back of a spoon.
- Repeat Layers: Add another layer of dipped ladyfingers followed by another layer of mascarpone cream. Depending on jar size, you can do two or three layers — the top layer should always be cream.
- Chill: Cover the jars with lids or plastic wrap and refrigerate for at least 4 hours, preferably overnight. This resting time lets flavors meld and the tiramisu set beautifully.
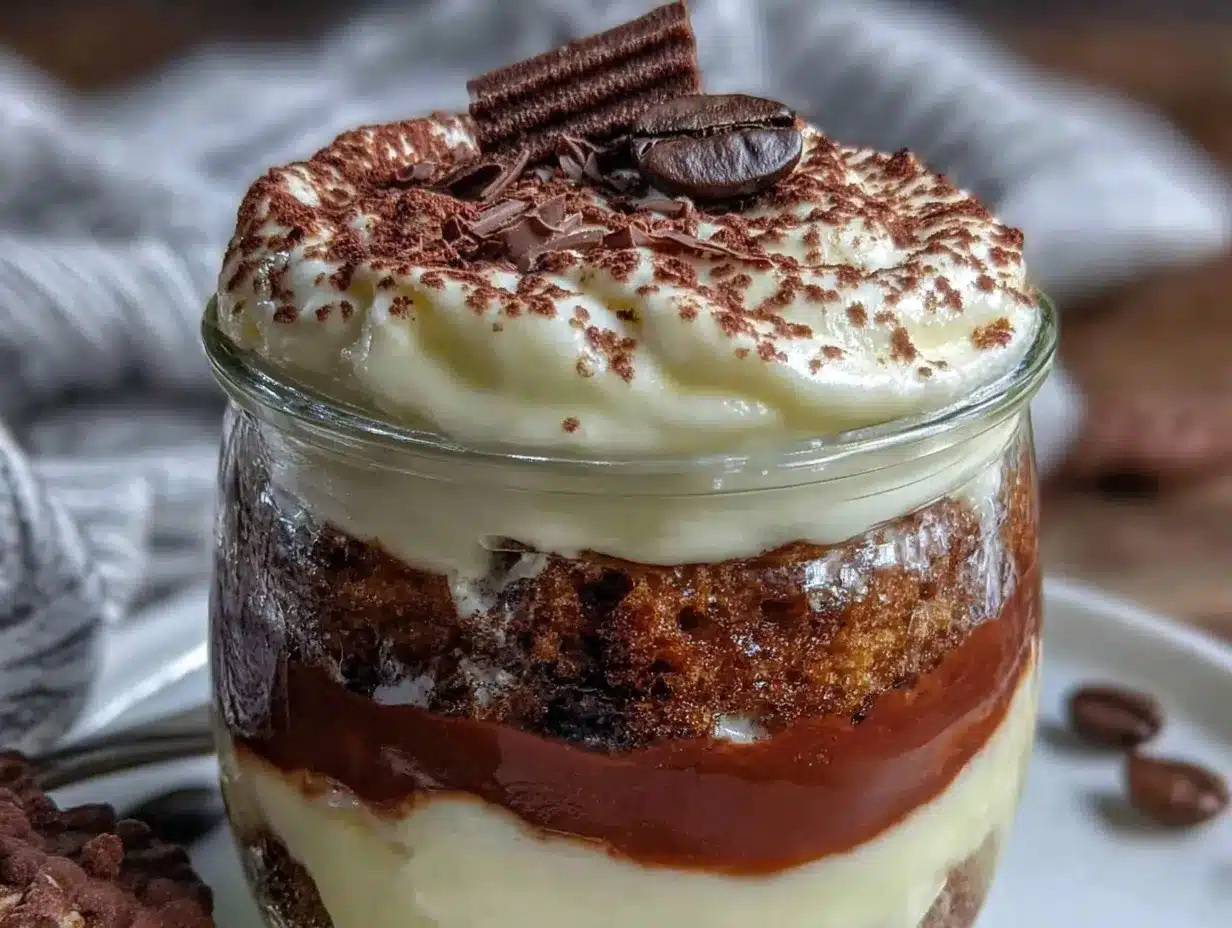
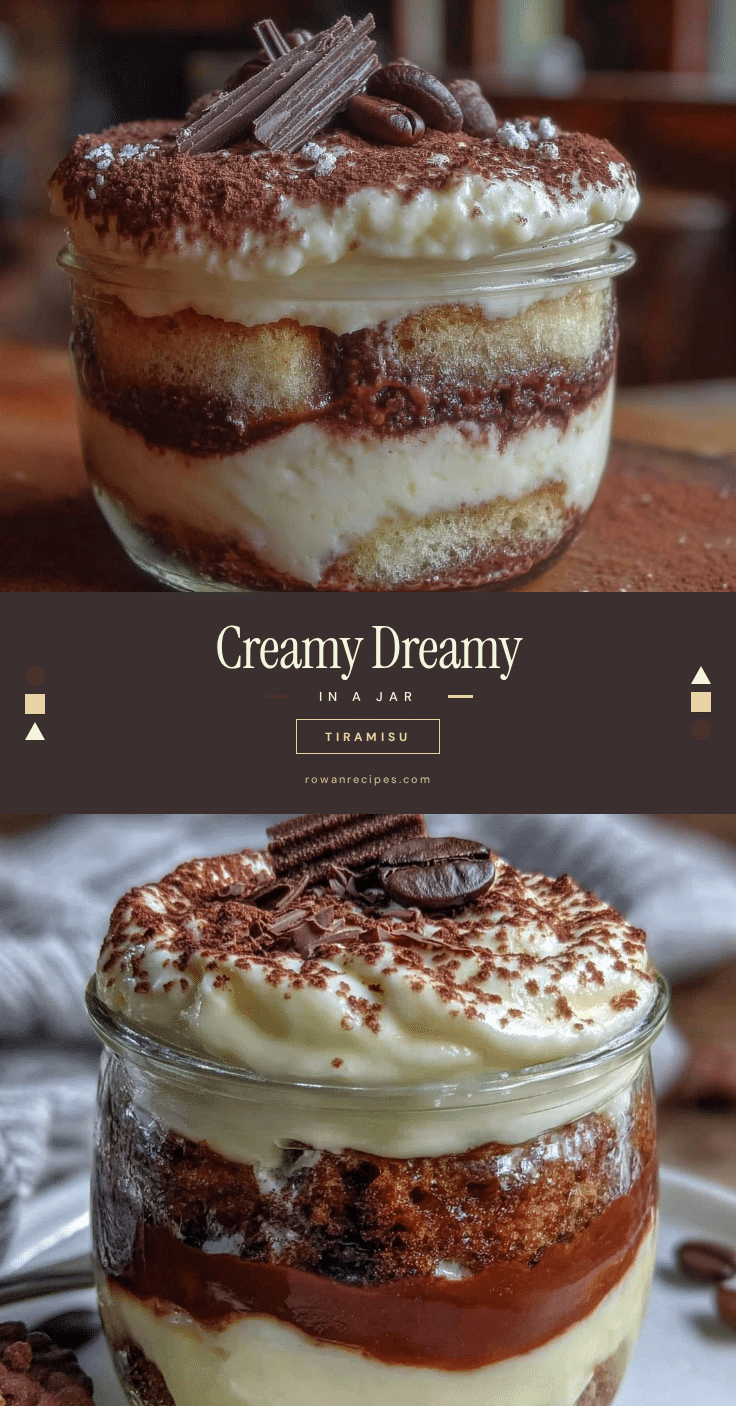
- Garnish and Serve: Just before serving, dust the top generously with unsweetened cocoa powder using a sifter. Add dark chocolate shavings if you like an extra touch of decadence.
Pro tip: Don’t rush the chilling step — the cream firms up and the espresso-soaked ladyfingers soften just right, making every bite pure bliss. If you notice the cream separating, folding in whipped cream gently usually fixes it.
Cooking Tips & Techniques
Getting that perfect creamy tiramisu in a jar with rich espresso layers is all about a few key tricks. First, timing your ladyfinger dips is crucial — you want them soaked but not soggy. Honestly, practice makes perfect here; dipping too long will leave you with a mushy mess, too short and the flavor won’t come through.
Whipping the cream to soft peaks is a game-changer. Over-whip it and you’ll get butter; under-whip and the cream won’t hold its light texture. I learned this the hard way when my cream turned grainy once (don’t ask). Keep everything chilled — cold bowls, cold cream — and you’ll get those fluffy peaks faster.
When folding mascarpone and whipped cream, don’t rush or stir vigorously. Using a spatula, gently fold in a figure-eight motion to keep the airiness intact. This makes a huge difference in the final texture — you want that melt-in-your-mouth softness, not a dense block.
Multitasking tip: Brew your espresso first, then whip the cream while it cools. This way, you save time and keep things moving smoothly. Also, prepping jars ahead of time (clean and dried) means you can assemble quickly and avoid mess.
Variations & Adaptations
- Vegan Version: Use coconut cream whipped with a bit of powdered sugar and dairy-free cream cheese instead of mascarpone. Swap ladyfingers for vegan sponge biscuits.
- Berry Twist: Add fresh raspberries or strawberries between layers for a fruity contrast. In summer, this is my go-to tweak, and it brightens the rich espresso flavors beautifully.
- Chocolate Lovers: Mix a tablespoon of cocoa powder into the mascarpone cream and add chocolate chips between layers. I tried this once for a birthday party, and it was a smash hit.
- Alcohol-Free: Simply omit the coffee liqueur and add a teaspoon of vanilla or almond extract for added flavor.
- Gluten-Free Option: Use gluten-free ladyfingers or sponge fingers. They’re easy to find in most health food stores or online.
You can also play with the jars — mini dessert glasses work well for parties, while larger mason jars make great gifts. Adjust portions to your liking and don’t be afraid to experiment with flavors.
Serving & Storage Suggestions
This creamy tiramisu in a jar is best served chilled, straight from the refrigerator. The flavors are more pronounced when cold, and the texture is luxuriously smooth. Present them with a dusting of cocoa powder and a few chocolate shavings for a classy touch that looks Pinterest-perfect.
Pair this dessert with a cup of espresso or a glass of dessert wine for a complete experience. It also pairs nicely with fresh fruit or a light biscotti on the side.
Store leftovers covered in the fridge for up to 3 days. The flavors actually deepen overnight, making the next day even better. For longer storage, freeze the jars without cocoa topping for up to a month. Thaw in the fridge overnight and dust with cocoa before serving.
When reheating (if you must), avoid microwaves as they ruin the texture. Instead, let it come to room temperature naturally to preserve that creamy goodness.
Nutritional Information & Benefits
Each jar of this creamy tiramisu contains roughly 350-400 calories, depending on portion size and ingredient variations. The mascarpone and heavy cream provide a good dose of calcium and healthy fats, while the espresso offers a caffeine boost to perk you up.
If you choose to omit alcohol and sugar or swap for alternatives, this dessert can fit into a more mindful eating plan. Using gluten-free ladyfingers makes it suitable for gluten-sensitive folks, and dairy-free substitutions accommodate vegans or those with lactose intolerance.
Honestly, while this isn’t a health food, it’s a well-balanced indulgence — a little jar of joy packed with flavor and memories. Perfect for treating yourself without guilt when enjoyed in moderation.
Conclusion
So there you have it — a creamy tiramisu in a jar with rich espresso layers that’s easy, impressive, and downright delicious. I hope you give this recipe a try and make it your own, whether you stick to the classic or add your own twists. It’s a dessert that always brings smiles and a few happy sighs around the table.
Personally, I love how this jar version feels both nostalgic and fresh — a little luxury that fits perfectly into today’s busy life. I’d love to hear how you customize it or any fun moments it creates in your home. Don’t forget to drop a comment, share with friends, or save this recipe for later. Happy spooning!
FAQs About Creamy Tiramisu in a Jar
Can I make this tiramisu in advance?
Absolutely! In fact, it tastes better after chilling for at least 4 hours or overnight. The flavors meld and the texture firms up beautifully.
What if I don’t have espresso?
You can use strong brewed coffee as a substitute. Just make sure it’s cooled before dipping the ladyfingers.
How long does this dessert keep in the fridge?
Stored covered, it will keep fresh for up to 3 days. Beyond that, the texture and flavor may start to decline.
Can I use regular cream cheese instead of mascarpone?
While you can, mascarpone has a creamier, less tangy taste that’s key to traditional tiramisu. If you use cream cheese, consider blending it with a bit of heavy cream for better texture.
Is it necessary to add coffee liqueur?
Nope! The coffee liqueur adds depth but is completely optional. You can skip it or replace with vanilla or almond extract for flavor.
Pin This Recipe!
Creamy Tiramisu in a Jar Recipe with Rich Espresso Layers Easy and Perfect

A no-fuss, creamy tiramisu in a jar featuring velvety mascarpone cream and rich espresso-soaked ladyfingers. Perfect for quick preparation, entertaining, and nostalgic comfort in every spoonful.
- Prep Time: 15 minutes
- Cook Time: 0 minutes
- Total Time: 4 hours 15 minutes
- Yield: 6 servings 1x
- Category: Dessert
- Cuisine: Italian
Ingredients
- 1 ½ cups (360 ml) freshly brewed espresso or strong coffee, cooled
- 2 tablespoons coffee liqueur (optional)
- 8 oz (225 g) mascarpone cheese, room temperature
- 1 cup (240 ml) heavy cream, chilled
- ⅓ cup (65 g) granulated sugar
- 1 teaspoon pure vanilla extract
- 24 ladyfinger cookies (savoiardi), store-bought or homemade
- Unsweetened cocoa powder, for dusting
- Dark chocolate shavings (optional)
Instructions
- Brew 1 ½ cups (360 ml) of strong espresso or coffee. Pour into a shallow dish and stir in 2 tablespoons of coffee liqueur if using. Let it cool completely (about 15 minutes).
- In a large mixing bowl, combine 8 oz mascarpone cheese with ⅓ cup sugar and 1 teaspoon vanilla extract. Gently mix with a spatula until smooth.
- In a separate chilled bowl, whip 1 cup heavy cream using an electric mixer on medium-high speed until soft peaks form (3-5 minutes).
- Fold the whipped cream into the mascarpone mixture carefully to keep it light and airy.
- Quickly dip each ladyfinger into the cooled espresso mixture for about 1 second per side to avoid sogginess. The cookie should be moist but hold its shape.
- Line the bottom of each jar with 2-3 soaked ladyfingers.
- Spoon a generous layer (about ¼ cup / 60 ml) of the mascarpone cream over the soaked ladyfingers and smooth evenly.
- Add another layer of dipped ladyfingers followed by another layer of mascarpone cream. Repeat for two or three layers depending on jar size, finishing with a cream layer.
- Cover the jars with lids or plastic wrap and refrigerate for at least 4 hours, preferably overnight.
- Just before serving, dust the top generously with unsweetened cocoa powder using a sifter and add dark chocolate shavings if desired.
Notes
Do not over-soak ladyfingers to avoid sogginess; dip about 1 second per side. Whip cream to soft peaks to avoid butter formation. Keep bowls and cream chilled for best whipping results. Gently fold mascarpone and whipped cream to maintain airiness. Chill at least 4 hours or overnight for best flavor and texture. Coffee liqueur is optional and can be replaced with vanilla or almond extract. For vegan or gluten-free versions, use appropriate substitutes as noted.
Nutrition
- Serving Size: One 8 oz jar
- Calories: 375
- Sugar: 20
- Sodium: 90
- Fat: 28
- Saturated Fat: 17
- Carbohydrates: 25
- Fiber: 1
- Protein: 6
Keywords: tiramisu, creamy tiramisu, tiramisu in a jar, espresso dessert, mascarpone dessert, easy tiramisu, no-bake dessert