I was standing in the produce aisle last Tuesday, staring at a bin of bell peppers like they held the answers to a question I hadn’t quite figured out how to ask. The lights hummed overhead, and somewhere nearby a kid was whining about wanting something—honestly, whose kid wasn’t whining about something these days? And then it hit me. Not the answer, at first, but the smell. That warm, slightly tangy, utterly comforting smell of my Aunt Carol’s kitchen on a Friday night in 1997. I was nine, sitting on a wobbly stool at her counter, watching her pull a bubbling dish out of the oven. She’d made her famous buffalo chicken dip for a family gathering, and I’d been allowed to “help” by crushing the crackers for the topping—which mostly meant I ate half of them before they made it into the bowl. She didn’t care. She just laughed and handed me another sleeve.
Aunt Carol passed a few years back, and with her went that specific Friday night ritual. I’ve tried to recreate that dip a dozen times, but it never tastes quite right—maybe because the magic was in the way she’d let me lick the spoon, or the way she’d wink and say “our little secret” when I asked for extra hot sauce. But standing there in the grocery store, with the fluorescent lights and the whining kid and the peppers staring up at me, I realized something. Maybe the dip wasn’t the point. Maybe the point was the feeling—the warmth, the togetherness, the way something simple could make a Friday night feel special. And maybe, just maybe, I could find that feeling again in a different shape.
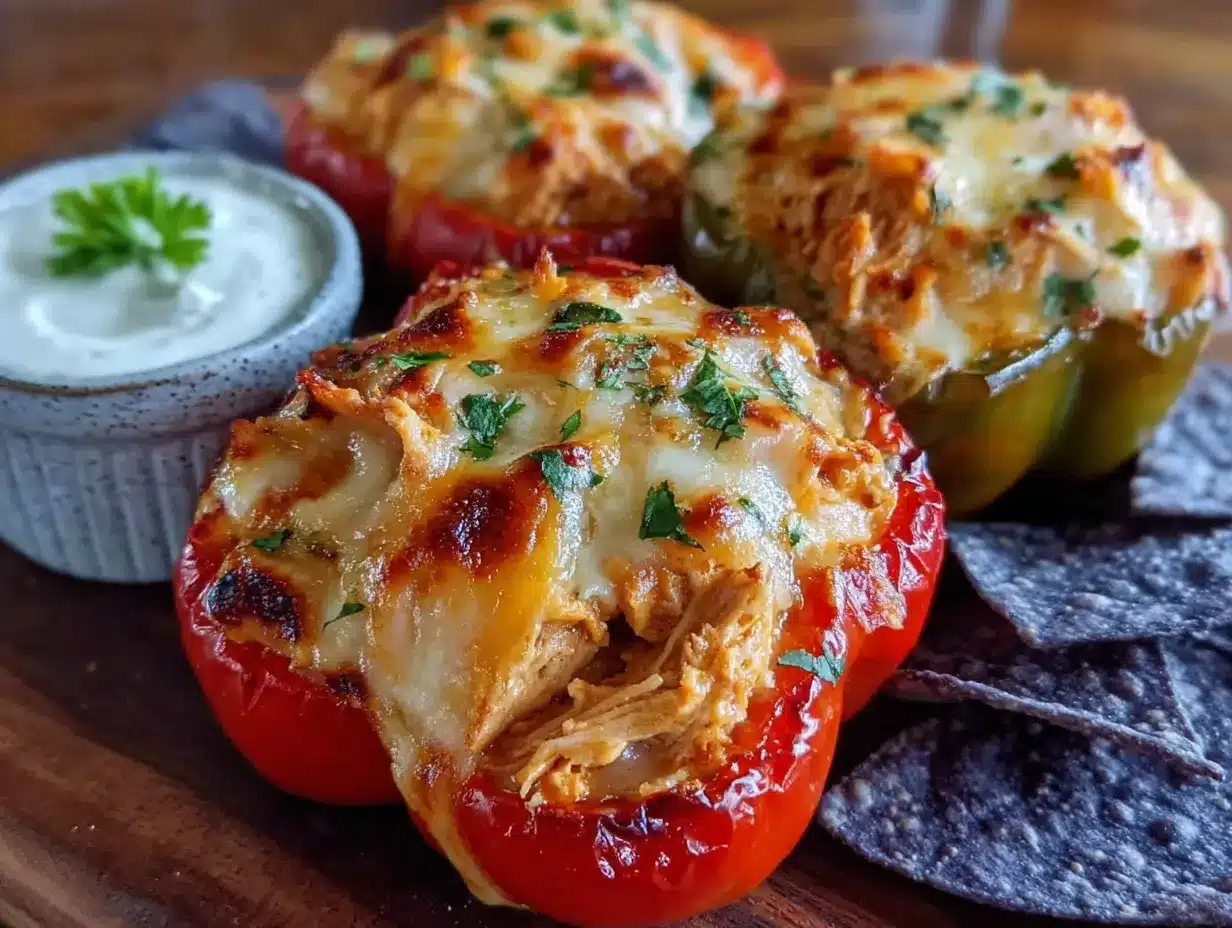
That’s how these Kid-Friendly Buffalo Chicken Dip Stuffed Peppers were born. They’re not a replica of Aunt Carol’s dip—they’re a new memory entirely. A way to get that same tangy, creamy, slightly spicy magic into something my own kids can hold in their hands, eat without a mess, and actually enjoy. Because let me tell you, getting buffalo chicken dip past a picky seven-year-old is no small feat. But these peppers? They disappeared. And for a minute, I felt like I was nine again, sitting on that wobbly stool, watching someone I love take a bite and smile. Maybe you’ve been there too—chasing a feeling you can’t quite name, but you know it when you taste it.
Why You’ll Love This Recipe
Look, I’ve tested a lot of buffalo chicken recipes in my time. Some were too spicy for the kids, some were too dry, and some just didn’t have that soul-soothing factor that makes you go back for seconds. These Kid-Friendly Buffalo Chicken Dip Stuffed Peppers hit the sweet spot—and I mean that literally and figuratively.
- Quick & Easy: From start to finish, you’re looking at about 35 minutes. That’s less time than it takes to argue about what’s for dinner.
- Simple Ingredients: You probably have most of this stuff in your fridge and pantry right now. No wild goose chases for obscure ingredients.
- Perfect for Family Dinners: These peppers are great for weeknights, but they also hold their own at potlucks, game day gatherings, or even a casual Sunday supper.
- Crowd-Pleaser: My kids, who normally side-eye anything with a hint of spice, devoured these. My husband, who loves heat, added extra hot sauce at the table. Everyone won.
- Unbelievably Delicious: The cream cheese and ranch dressing tame the buffalo sauce just enough to make it kid-friendly, while the shredded chicken and melted cheese create this gooey, satisfying filling that’s basically comfort food in pepper form.
What makes this recipe different from all the other stuffed pepper recipes out there? It’s the balance. I spent three rounds of testing to get the heat level just right—enough to taste the buffalo kick, but not so much that a seven-year-old reaches for a glass of milk after one bite. The secret is using a mild buffalo sauce and cutting it with cream cheese and ranch. It’s not just another version; it’s the version that finally got my kids to say “can we have this again?” without any prompting from me.
This recipe isn’t just good—it’s the kind that makes you close your eyes after the first bite. It’s comfort food reimagined: healthier than the traditional dip (hello, bell pepper instead of chips!), faster than a slow-cooker situation, but with the same soul-soothing satisfaction. Perfect for impressing guests without stress, or turning a simple Tuesday into something memorable.
What Ingredients You Will Need
This recipe uses simple, wholesome ingredients that come together to deliver bold flavor and that irresistible creamy texture. Most of these are pantry staples in my house, and I bet they are in yours too.
- For the Peppers:
- 4 large bell peppers, any color (red, orange, or yellow are sweetest; green works but is slightly more bitter)
- For the Filling:
- 2 cups cooked, shredded chicken (rotisserie chicken is a lifesaver here—I use the one from Costco or my local grocery store)
- 8 oz cream cheese, softened (I recommend Philadelphia for the creamiest texture; let it sit out for 20 minutes before mixing)
- ½ cup mild buffalo sauce (I use Frank’s RedHot Original—it’s tangy without being too fiery for kids)
- ¼ cup ranch dressing (use your favorite brand; I prefer Hidden Valley for that classic flavor)
- 1 cup shredded cheddar cheese, divided (sharp cheddar adds more flavor; mild cheddar is gentler for little palates)
- ½ cup shredded mozzarella cheese (adds that perfect stretchy texture)
- ¼ cup crumbled blue cheese (optional—for the adults who want that authentic buffalo wing experience)
- 2 green onions, thinly sliced (plus more for garnish)
- ½ teaspoon garlic powder
- ½ teaspoon onion powder
- ¼ teaspoon salt
- ¼ teaspoon black pepper
Ingredient Tips & Substitutions:
- Chicken: If you don’t have rotisserie chicken, you can poach 2 boneless, skinless chicken breasts in salted water for 15 minutes, then shred. Or use canned chicken in a pinch—just drain it well.
- Cream Cheese: For a lighter version, use Neufchâtel cheese (⅓ less fat). It works beautifully and the kids won’t notice a difference.
- Buffalo Sauce: If your family is extra sensitive to spice, use just ⅓ cup and add an extra tablespoon of ranch dressing. You can also use a “buffalo wing sauce” labeled mild.
- Ranch Dressing: Use dairy-free ranch if needed. I’ve tested it with a plant-based ranch and it still came out creamy and delicious.
- Blue Cheese: Totally optional, but if you’re serving adults, I highly recommend it. My husband says it “makes the dish.” I say it’s a nice touch, but the kids prefer it without.
Equipment Needed
You don’t need a fancy kitchen to pull these off. Here’s what I used:
- Large mixing bowl
- 9×13-inch baking dish (or any oven-safe dish that fits the peppers snugly)
- Sharp knife and cutting board
- Small spoon or melon baller for scooping out pepper seeds
- Aluminum foil (for covering the dish during baking)
- Measuring cups and spoons
Tool Tips: If you don’t have a 9×13 dish, a cast-iron skillet works great too—just arrange the peppers in a single layer. I’ve also used a muffin tin to keep the peppers upright, which is brilliant for preventing them from tipping over. For the pepper prep, a melon baller is my favorite tool; it scoops out the seeds and membranes in one clean motion. If you don’t have one, a regular teaspoon works fine—just take your time.
Budget-friendly note: Don’t go out and buy a fancy baking dish if you don’t have one. A rimmed baking sheet lined with foil works in a pinch, though you’ll want to nestle the peppers together so they support each other.
Preparation Method
Alright, let’s get cooking. I’ve broken this down so even a beginner can follow along without stress.
- Preheat your oven to 375°F (190°C). While it’s heating, get your peppers ready. Cut the tops off each bell pepper (about ½ inch from the top) and carefully remove the seeds and white membranes from inside. I like to tap the peppers upside down on the cutting board to dislodge any stubborn seeds. If your peppers wobble, slice a thin piece off the bottom to create a flat surface—but don’t cut through, or the filling will leak.
- Place the peppers upright in your baking dish. If they’re snug, they’ll hold each other up. If they’re loose, crumple a piece of foil and wedge it between them. This is one of those little tricks I learned after my first batch tipped over and made a mess in the oven. Trust me on this one.
- In a large mixing bowl, combine the softened cream cheese, buffalo sauce, ranch dressing, garlic powder, onion powder, salt, and pepper. Mix until smooth and well combined. I use a spatula for this, but a hand mixer works if your cream cheese is still a bit cold. The mixture should be creamy and slightly orange from the buffalo sauce—it’s going to look beautiful.
- Add the shredded chicken, ½ cup of the cheddar cheese, the mozzarella cheese, and the sliced green onions. Stir until everything is evenly coated. This is the filling that’s going to make your kitchen smell like a game day party. Taste it—yes, raw, I know—but just a tiny bit to check the seasoning. If you want more heat, add another tablespoon of buffalo sauce. If it’s too spicy for your crew, add another tablespoon of ranch dressing.
- Divide the filling evenly among the four peppers. I use a spoon to pack it in, pressing down gently to make sure there are no air pockets. The filling should mound slightly over the top of each pepper—that’s the best part. Don’t be shy; really pile it on.
- Sprinkle the remaining ½ cup of cheddar cheese over the tops of the stuffed peppers. If you’re using the blue cheese crumbles, sprinkle them on now too. This is where the magic happens—that melted, golden cheese crust is what makes these irresistible.
- Cover the baking dish with aluminum foil and bake for 20 minutes. The foil traps steam and helps the peppers soften without drying out. After 20 minutes, remove the foil and bake for another 10-15 minutes, until the cheese is bubbly and starting to brown in spots. The peppers should be tender but still hold their shape—you don’t want them collapsing into mush.
- Let the peppers rest for 5 minutes before serving. This is crucial—the filling is molten hot straight out of the oven, and the rest time lets it set up so you don’t burn your mouth. I know it’s hard to wait, but trust me, it’s worth it.
Sensory Cues: Your kitchen should smell like a combination of tangy buffalo sauce, roasted peppers, and melted cheese. The peppers will look slightly wrinkled and the cheese will be golden and bubbly. When you cut into one, the filling should be creamy and steaming, with shreds of chicken visible throughout. If the filling seems runny, it probably needed another minute or two in the oven—the cream cheese needs heat to fully incorporate.
Cooking Tips & Techniques
I’ve made these peppers at least a dozen times now, and I’ve learned a few things the hard way so you don’t have to.
Don’t Overcook the Peppers. The first time I made these, I got distracted by a phone call and left them in the oven an extra 10 minutes. The peppers came out soft and sad, and the filling was dry. Keep an eye on them after you remove the foil. You want the peppers tender but still with a bit of structure—think al dente pasta, not mushy vegetables.
Use Room Temperature Cream Cheese. I cannot stress this enough. Cold cream cheese doesn’t mix smoothly, and you’ll end up with lumps of cream cheese in your filling. Take it out of the fridge when you start prepping everything else, and by the time you’re ready to mix, it’ll be perfect. If you forget (I do, constantly), microwave it in 10-second bursts until soft but not melted.
Shred Your Own Cheese. I know, I know—pre-shredded cheese is convenient. But it’s coated in anti-caking agents that prevent it from melting smoothly. For that gooey, stretchy, restaurant-quality texture, buy a block of cheddar and shred it yourself. It takes two extra minutes and makes a noticeable difference.
Timing Strategy: If you’re making these for a weeknight dinner, here’s my game plan: Shred the chicken and chop the green onions the night before. Mix the filling in the morning and store it in the fridge. When you get home, just prep the peppers, stuff them, and bake. Dinner on the table in 35 minutes, and you look like a hero.
Consistency Tip: If your filling seems too dry, add a tablespoon of chicken broth or extra ranch dressing. If it seems too wet (usually from watery rotisserie chicken), add a tablespoon of breadcrumbs or crushed crackers to absorb the excess moisture. The filling should be thick and scoopable, not soupy.
Variations & Adaptations
One of the best things about this recipe is how flexible it is. Here are a few ways I’ve adapted it for different moods and dietary needs.
Low-Carb / Keto Version: Skip the bell peppers entirely and use hollowed-out zucchini boats instead. The filling is already low-carb friendly—just check your buffalo sauce and ranch dressing labels for added sugars. I’ve made this for a keto friend and she practically licked the plate clean.
Vegetarian Version: Substitute the shredded chicken with two cans of drained and rinsed chickpeas or a bag of frozen cauliflower florets (thawed and chopped small). The texture is different but still satisfying, and the buffalo-cream cheese combo works with almost anything. I tried this on a Meatless Monday and my kids didn’t even notice the swap.
Spicy Adult Version: For those of us who like a real kick, use hot buffalo sauce instead of mild, add an extra tablespoon of hot sauce to the filling, and top with crumbled blue cheese and pickled jalapeños before baking. My husband calls this the “game day special” and requests it every time the football is on.
Dairy-Free Adaptation: Use dairy-free cream cheese (Kite Hill makes a good one), dairy-free ranch dressing, and vegan shredded cheese. The texture will be slightly less creamy, but the flavor is still fantastic. I’ve tested this for a friend with lactose intolerance and she said it was “the best thing she’s eaten in months.”
Personal Variation: My favorite twist is adding a handful of fresh spinach to the filling—just chop it finely and mix it in with the chicken. The spinach wilts as it bakes, adding color and nutrients without changing the flavor. It’s my sneaky way of getting extra greens into my kids, and they’ve never once complained.
Serving & Storage Suggestions
These peppers are best served hot, straight from the oven, with the cheese still bubbly and the filling steaming. Let them rest for 5 minutes first—I know I said it already, but it really does make a difference.
Serving Ideas: I like to serve these with a side of celery sticks and carrot sticks for dipping into extra ranch or blue cheese dressing. It keeps with the buffalo wing theme and adds a nice crunch. For a heartier meal, serve with a simple green salad or some roasted potatoes. My kids love when I serve them with sweet potato fries—the sweetness balances the tangy buffalo perfectly.
Storage: Leftover stuffed peppers keep beautifully in the refrigerator for up to 4 days. Store them in an airtight container, and they’ll actually get even more flavorful as the peppers soak up the sauce. To reheat, pop them in a 350°F oven for 10-15 minutes, or microwave for 2-3 minutes. The microwave is faster, but the oven keeps the peppers from getting soggy.
Freezer Instructions: These freeze really well, which is a lifesaver for busy weeks. Assemble the peppers completely but don’t bake them. Wrap each pepper individually in plastic wrap, then place them in a freezer bag. They’ll keep for up to 3 months. When you’re ready to eat, thaw them in the fridge overnight and bake as directed, adding 5-10 minutes to the cooking time since they’re starting from cold.
Flavor Development: Honestly, these are one of those rare dishes that taste even better the next day. The flavors meld together overnight, and the peppers soften just a bit more. If you’re meal-prepping, you can make the filling up to 2 days ahead and stuff the peppers right before baking. I’ve done this for busy weeks and it’s a total game-changer.
Nutritional Information & Benefits
Here’s the nutritional breakdown for one stuffed pepper (using regular cream cheese and cheddar, no blue cheese):
| Nutrient | Amount |
|---|---|
| Calories | 385 |
| Protein | 28g |
| Fat | 24g |
| Saturated Fat | 12g |
| Carbohydrates | 12g |
| Fiber | 3g |
| Sugar | 6g |
| Sodium | 820mg |
Health Benefits: Bell peppers are packed with vitamin C—one red pepper has more than double the vitamin C of an orange. They’re also a great source of vitamin A and antioxidants. The chicken provides lean protein to keep everyone full and satisfied, and the cream cheese adds calcium (in moderation, of course). For a lighter option, use Neufchâtel cheese and reduced-fat cheddar to cut the saturated fat by about a third.
Dietary Considerations: This recipe is naturally gluten-free (just check your buffalo sauce and ranch labels). It’s also low-carb at about 12g net carbs per serving. It contains dairy and can be adapted to be vegetarian or dairy-free as mentioned above. If you have specific allergies, the substitutions I listed earlier should help you make it work.
Personal Wellness Perspective: I love that this recipe lets me feed my family something that feels indulgent but actually has real nutritional value. It’s not “health food” in the strict sense, but it’s a balanced meal with protein, vegetables, and healthy fats. And honestly, the joy on my kids’ faces when they eat something they genuinely love? That’s a nutrient too.
Conclusion
These Kid-Friendly Buffalo Chicken Dip Stuffed Peppers have become a staple in my kitchen, and I think they deserve a spot in yours too. They’re quick enough for a busy Tuesday, special enough for a Friday night, and flexible enough to please everyone at your table—from the spice-averse seven-year-old to the hot sauce-obsessed spouse. They’re the kind of recipe that makes you feel like you’ve got it all figured out, even on the days when you’re just barely holding it together.
I love this recipe because it honors the memory of my Aunt Carol’s buffalo chicken dip while creating something entirely new. It’s proof that you can chase a feeling without having to replicate it exactly—sometimes the best memories are the ones you make yourself. So go ahead, make these peppers your own. Add extra spice if that’s your thing, skip the blue cheese if it’s not, and don’t forget to let the kids help with the stirring. That’s where the real magic happens.
I’d love to hear how these turn out for you! Drop a comment below and tell me about your own kitchen memories—or any tweaks you made to the recipe. And if you loved these, share this post with a friend who needs a new weeknight dinner idea. Happy cooking, friends.
Frequently Asked Questions
Can I make these ahead of time?
Absolutely! You can assemble the peppers up to 24 hours in advance and store them in the fridge. Just add 5-10 minutes to the baking time since they’ll be starting from cold.
How do I make these less spicy for sensitive kids?
Use only ⅓ cup of mild buffalo sauce and increase the ranch dressing to ⅓ cup. You can also use a “buffalo wing sauce” labeled mild or even mix the buffalo sauce with an equal amount of melted butter to tone down the heat.
Can I use a different type of pepper?
Yes! Mini sweet peppers work great for appetizers or lunchboxes—just cut them in half lengthwise and stuff them. Poblano peppers offer a mild heat that adults might enjoy. Just adjust the baking time based on the size of the peppers.
What’s the best way to shred chicken?
For rotisserie chicken, I just pull it apart with two forks while it’s still warm. For cooked chicken breasts, let them cool slightly, then shred with two forks or use a hand mixer on low speed—it shreds the chicken in seconds without any effort.
Can I freeze the filling separately?
Definitely! The filling freezes beautifully for up to 3 months. Thaw it in the fridge overnight, then stuff fresh peppers and bake as directed. This is my favorite meal-prep hack—I always keep a batch of filling in the freezer for emergency dinners.
Pin This Recipe!

Best Kid-Friendly Buffalo Chicken Dip Stuffed Peppers Recipe

These Kid-Friendly Buffalo Chicken Dip Stuffed Peppers combine the tangy, creamy, slightly spicy magic of buffalo chicken dip with the convenience of a handheld pepper. Perfect for weeknight dinners, game day gatherings, or any time you need a crowd-pleasing meal that even picky eaters will love.
- Prep Time: 15 minutes
- Cook Time: 30 minutes
- Total Time: 45 minutes
- Yield: 4 servings 1x
- Category: Main Course
- Cuisine: American
Ingredients
- 4 large bell peppers, any color (red, orange, or yellow are sweetest; green works but is slightly more bitter)
- 2 cups cooked, shredded chicken (rotisserie chicken is a lifesaver)
- 8 oz cream cheese, softened (Philadelphia recommended)
- ½ cup mild buffalo sauce (Frank’s RedHot Original recommended)
- ¼ cup ranch dressing (Hidden Valley recommended)
- 1 cup shredded cheddar cheese, divided (sharp or mild)
- ½ cup shredded mozzarella cheese
- ¼ cup crumbled blue cheese (optional, for adults)
- 2 green onions, thinly sliced (plus more for garnish)
- ½ teaspoon garlic powder
- ½ teaspoon onion powder
- ¼ teaspoon salt
- ¼ teaspoon black pepper
Instructions
- Preheat your oven to 375°F (190°C). Cut the tops off each bell pepper (about ½ inch from the top) and carefully remove the seeds and white membranes. If peppers wobble, slice a thin piece off the bottom to create a flat surface—but don’t cut through.
- Place the peppers upright in a 9×13-inch baking dish. If they’re loose, crumple a piece of foil and wedge it between them to keep them upright.
- In a large mixing bowl, combine the softened cream cheese, buffalo sauce, ranch dressing, garlic powder, onion powder, salt, and pepper. Mix until smooth and well combined.
- Add the shredded chicken, ½ cup of the cheddar cheese, the mozzarella cheese, and the sliced green onions. Stir until everything is evenly coated. Taste and adjust seasoning if needed.
- Divide the filling evenly among the four peppers, packing it in gently and mounding slightly over the top.
- Sprinkle the remaining ½ cup of cheddar cheese over the tops of the stuffed peppers. If using blue cheese crumbles, sprinkle them on now.
- Cover the baking dish with aluminum foil and bake for 20 minutes. Remove the foil and bake for another 10-15 minutes, until the cheese is bubbly and starting to brown in spots, and the peppers are tender but still hold their shape.
- Let the peppers rest for 5 minutes before serving. Garnish with additional sliced green onions if desired.
Notes
For less spice, use only ⅓ cup buffalo sauce and increase ranch dressing to ⅓ cup. For a lighter version, use Neufchâtel cheese. Leftovers keep in the fridge for up to 4 days and can be reheated in the oven or microwave. Unbaked stuffed peppers freeze well for up to 3 months.
Nutrition
- Serving Size: 1 stuffed pepper
- Calories: 385
- Sugar: 6
- Sodium: 820
- Fat: 24
- Saturated Fat: 12
- Carbohydrates: 12
- Fiber: 3
- Protein: 28
Keywords: buffalo chicken dip, stuffed peppers, kid-friendly, game day, weeknight dinner, comfort food, buffalo chicken, bell peppers